How to Screw Into Wood: 9 Pro Tricks for Tight, No-Split Joints
Screw into wood cleanly, and a tray stand build gets easier fast. Done right, the joint pulls tight, stays aligned, and doesn’t split your boards. Done wrong, you’ll fight crooked screws, stripped heads, and wobbly parts that never seem to snug up.
This guide walks you through screw choice, pilot holes, countersinks, and driver technique, with real tray-stand situations you’ll run into at the bench.
Contents Here
- 1 The quick truth about screwing into wood
- 2 Pick the right screw before touching a drill
- 3 Pilot holes: the one step that prevents most disasters
- 4 Countersinking: flush heads without chewing up the surface
- 5 Driving technique: where most people strip heads
- 6 Lubrication: the quiet trick for hardwood
- 7 Screwing near the end of a board without splitting it
- 8 Screwing into end grain: doable, but don’t depend on it
- 9 Tray stand build situations where screw technique matters most
- 10 Common screw problems and fast, reliable fixes
- 11 Safety notes that matter in a small shop
- 12 Step-by-step: the reliable method that works on almost any tray stand joint
- 13 Final thoughts
The quick truth about screwing into wood
A screw is a wedge that also acts like a clamp. As it bites, it pushes wood fibers aside, then pulls two pieces together.
That’s the “why” behind almost every best practice below: control the wedge effect (so wood doesn’t split), and control the pull (so the joint stays tight).
Benefits of doing it the right way
- Cleaner joins with less cracking and less tear-out
- Stronger holding power, especially in softwoods
- Better alignment (tiers stay centered, posts stay plumb)
- Fewer stripped heads and fewer snapped screws
- A nicer finished look because the screw seats correctly
Drawbacks if you skip the basics
- Splits along the grain, especially near edges
- Screws that “spin” without tightening (stripped wood fibers)
- Misaligned parts that force a wobble later
- Ugly mushrooming around the head, even after sanding
- Broken screws that are miserable to extract
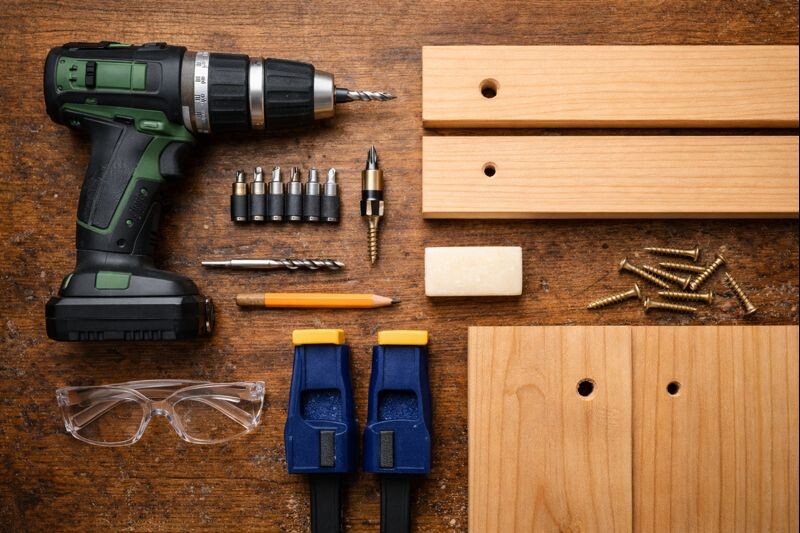
Pick the right screw before touching a drill
Most screw problems start with the wrong screw.
Wood screw vs. “whatever was in the drawer”
A real wood screw has a thread pattern and shank shape meant to bite into wood fibers and pull two pieces tight.
If you want the quick breakdown, skim this simple wood-screw explainer and keep it bookmarked.
Coarse vs. fine threads
- Coarse thread: best for softwoods (pine, fir) and plywood
- Fine thread: better for hardwoods (maple, oak, walnut) where coarse threads can bind and snap
If you’re still deciding species for a tray stand, this wood comparison guide helps you match wood type to hardware choices.
Screw length: the “2/3 rule” that actually works
For two pieces joined face-to-face:
- Aim for about 2/3 of the screw length embedded in the bottom piece
- Keep at least 3/8 in. away from edges in most hardwoods (more in brittle stock)
For tray stands, that usually means 1-1/4 in. to 2 in. screws depending on tier thickness and center post design.
Head style: match it to the job
- Flat/countersunk head: sits flush, great for shelves, tray bottoms, and anything you’ll decorate
- Pan/washer head: spreads load, good for brackets and thin stock
- Pocket-hole screws: specialized, great when you’re building a hidden frame under a tier
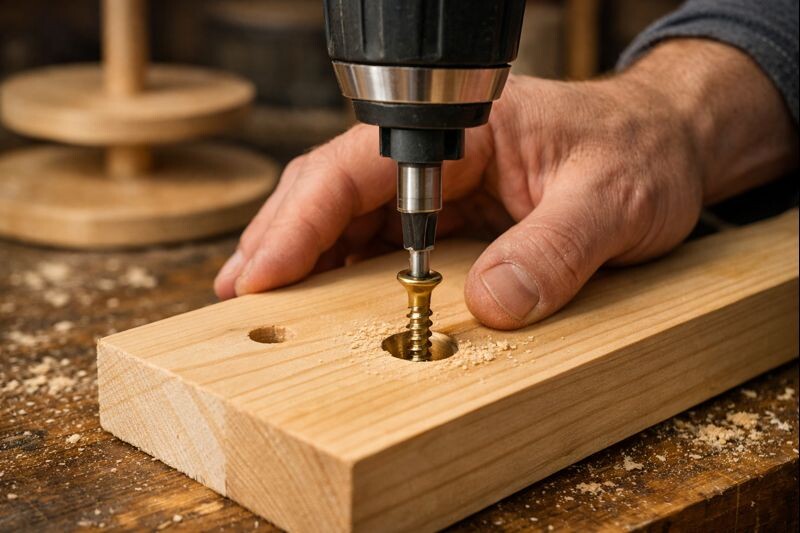
Pilot holes: the one step that prevents most disasters
A pilot hole does two jobs. It reduces splitting, and it reduces torque so screws don’t snap.
Where pilot holes matter most
- Within 1 inch of any board end
- Along narrow rails and trim
- Hardwood (especially maple, oak, and anything dense)
- Any time the screw feels like it needs “real muscle” to drive
Pilot hole sizing that’s easy to remember
- Pilot hole should be close to the screw’s root diameter (the thickness of the shank without threads)
- In hardwoods, go slightly larger than you think
- In softwoods, slightly smaller is fine
Here’s a practical table you can use at the bench.
| Common wood screw size | Typical pilot bit (softwood) | Typical pilot bit (hardwood) | Notes |
|---|---|---|---|
| #6 | 3/32″ | 7/64″ | Great for trim, light duty |
| #8 | 1/8″ | 9/64″ | Solid “default” for tray stands |
| #10 | 9/64″ | 5/32″ | Use for heavier center posts/brackets |
Bits vary by screw brand, so use the table as a starting point.
If you want to understand screw sizing numbers better, this screw sizing guide clears up the confusion.
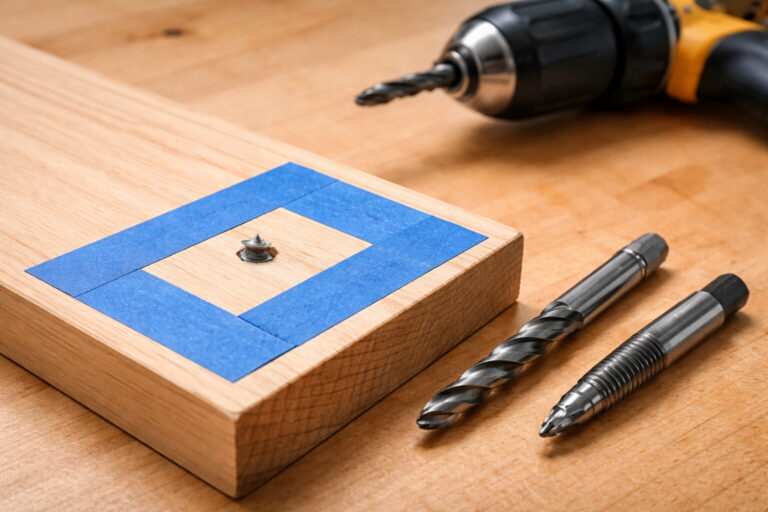
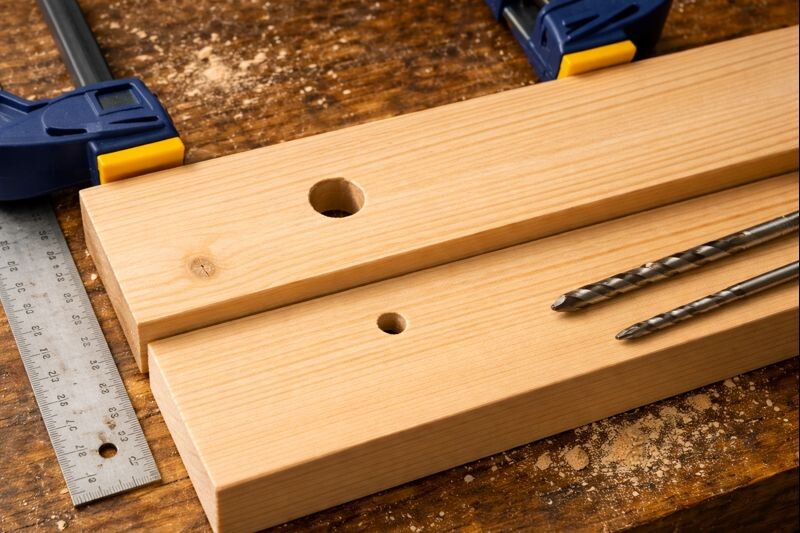
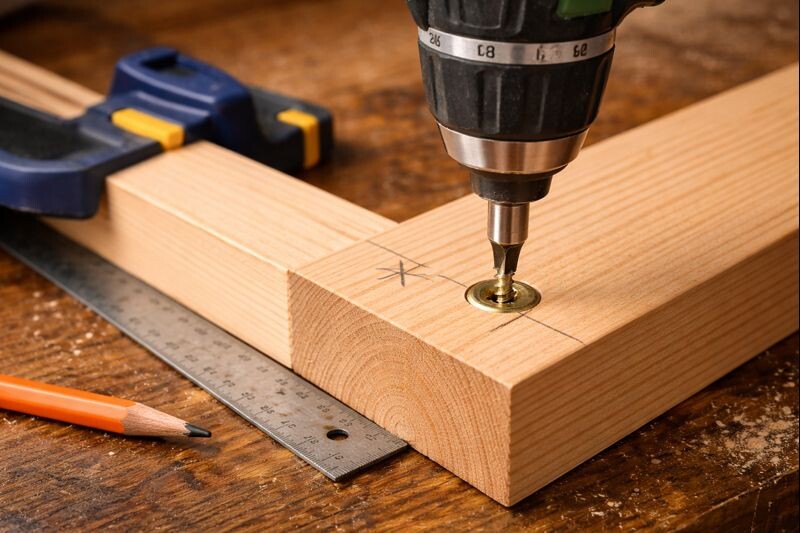
Two-step drilling for clean pull-up (important)
If you’re joining two boards, drill:
- A clearance hole through the top board (same size as the screw’s outer thread diameter, or a hair larger)
- A pilot hole into the bottom board (near the root diameter)
This prevents “jacking,” where the screw bites both boards and leaves a gap.
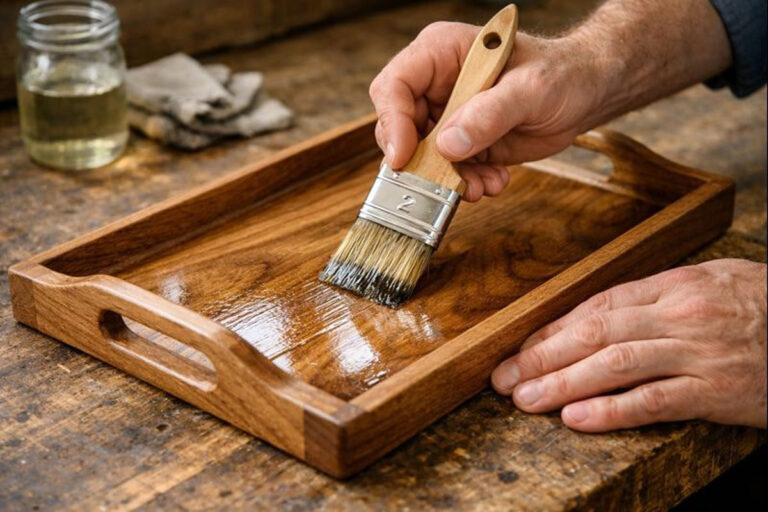
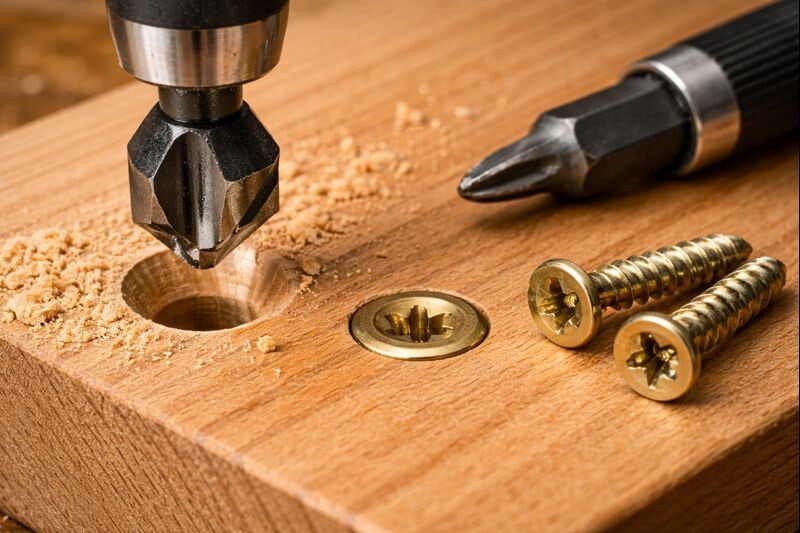
Countersinking: flush heads without chewing up the surface
If a screw head needs to sit flush (common on tray tiers), countersink it.
When to countersink
- When the head must sit below the surface for filler or plugs
- When the surface will be sanded flat and finished
- When décor items will slide across it (tiered trays get used hard)
Two clean options
- Countersink bit: fastest and consistent
- Pre-drill + larger bit “kiss”: lightly chamfer the hole with a bit wider than the screw head
Don’t overdo it.
A deep countersink weakens the surface fibers and can cause a little crater.
If you plan to paint your tray stand, a neat countersink plus filler helps you get a smooth finish.
This guide on getting a smooth painted surface without brush marks pairs well with clean screw prep.
Driving technique: where most people strip heads
Even with the perfect pilot hole, driving technique matters.
Match the driver bit to the screw head
- Use the correct bit type (Phillips, square, Torx/star)
- Use a fresh bit, not the rounded one you’ve abused for a year
Torx/star heads are the least likely to cam-out.
Phillips is famous for cam-out, which is why it strips so easily.
Use the right speed and clutch setting
- Drill/driver clutch should slip before you bury the head too deep
- In hardwood, drive slower to reduce heat and binding
- Stop as soon as the head seats; don’t “lean” on the tool afterward
A good habit is to drive until the head is almost seated, then finish the last turn at a slower speed. That keeps the head crisp and prevents the wood from crushing.
If your driver and bits feel rough or inconsistent, keep tools tuned up. This simple tool maintenance routine saves a lot of headaches.
Lubrication: the quiet trick for hardwood
Dense wood plus long screws can equal snapped screws.
A little lubrication drops friction a lot:
- Rub threads on a bar of soap
- Or use paste wax
- Or use a dedicated screw wax (nice, but not required)
This is especially useful when attaching a center post or hardware plate under a tier where the screw is long and the wood is hard.
Screwing near the end of a board without splitting it
Splits are predictable. Wood wants to split along the grain where fibers are weakest.
Best practices that actually prevent splits
- Drill a pilot hole every time near an end
- Keep screws farther from edges (more distance = less split risk)
- If possible, angle the screw slightly toward the board’s center mass (not toward the edge)
- Use clamps so parts don’t shift and force a split
If you see a hairline crack starting, stop. Back the screw out, enlarge the pilot hole slightly, and try again.
Screwing into end grain: doable, but don’t depend on it
End grain is the weak direction for screw holding. It can work, but it’s not the best place to rely on screws alone.
Better alternatives for tray stand parts
- Add a glue block or cleat so screws bite into long grain
- Use a cross dowel / threaded insert when you need removable tiers
- Use through-bolts for a heavy center post structure
If end grain is unavoidable, increase holding power by:
- Drilling a pilot hole
- Using a longer screw
- Adding glue where appropriate (but avoid glue if the part must be removable)
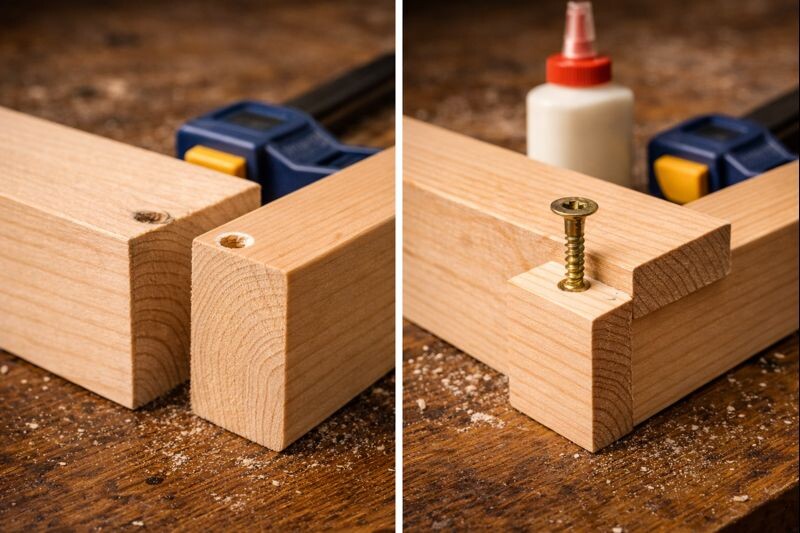
Tray stand build situations where screw technique matters most
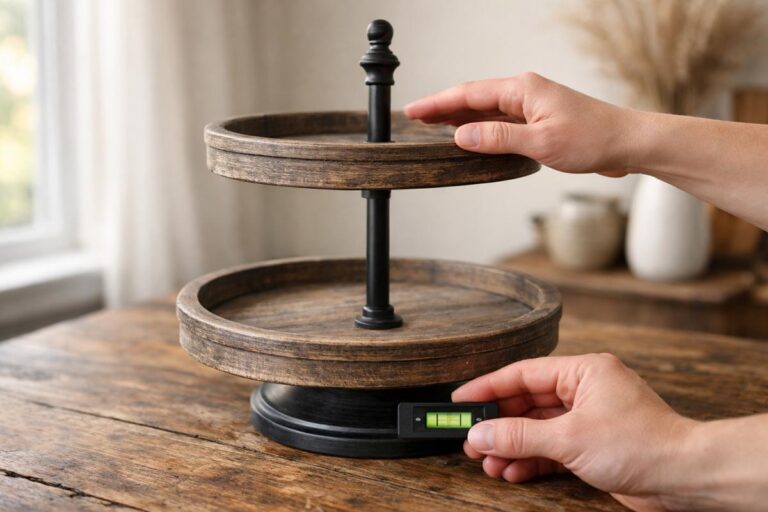
Attaching the bottom tier to a center post
This is where wobble starts if anything is off.
Tips:
- Lay out the center carefully and mark it clearly
- Drill a clean pilot hole dead-center
- Use a clearance hole through the tier so it pulls tight to the post
- Drive the screw straight—tilt here creates a permanent lean
If wobble shows up later, this guide on stopping a tiered tray stand from wobbling is a lifesaver.
Mounting brackets or plates under a tier
Metal hardware loves to shift as you drive.
Do this:
- Clamp the hardware or tape it down
- Pre-drill pilot holes first
- Drive screws halfway in sequence, then snug them all at the end
That keeps the plate from “walking” and throwing the tier out of square.
Screws showing on a decorative tray
If a screw head will be visible, plan the finish from the start:
- Countersink neatly
- Consider a plug or matching filler
- Sand flush and finish
If your finish ever turns cloudy around patched areas, these clear-coat cloudiness fixes can save the project.
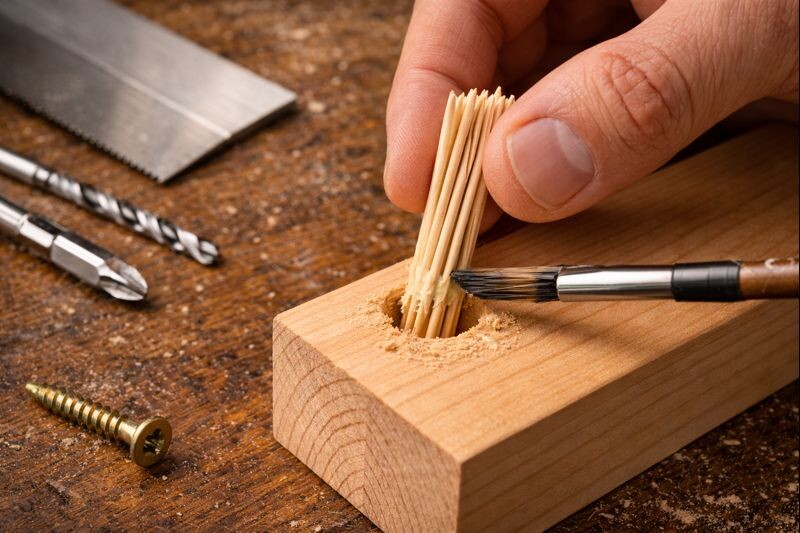
Common screw problems and fast, reliable fixes
The screw hole stripped out
That’s usually from overdriving, soft wood, or no pilot hole.
Fix options:
- Use a longer/wider screw (only if you have room)
- Fill the hole with glued toothpicks or a hardwood dowel, then re-drill
- Use a threaded insert for repeat assembly
For a full walk-through, this stripped screw-hole repair guide covers clean, durable fixes.
The screw head stripped
If the head is chewed up, stop trying to power through it.
Use:
- A better-fitting bit and firm pressure
- Locking pliers if the head is proud
- A screw extractor if it’s buried
These guides help depending on what happened:
The wood “mushroomed” around the head
That’s from overdriving or no countersink.
Fix it by:
- Backing the screw out slightly
- Adding a shallow countersink
- Re-driving gently until just seated
- Light sanding after
Safety notes that matter in a small shop
Screws feel harmless until a bit slips. Keep eyes protected, clamp parts, and keep your off-hand away from the driver’s path.
If you want a clean checklist for a small woodworking setup, this safety gear guide is worth a quick read.
Step-by-step: the reliable method that works on almost any tray stand joint
- Mark the screw locations and keep them away from edges.
- Clamp the pieces so nothing shifts while drilling.
- Drill a clearance hole through the top piece if you’re pulling two boards tight.
- Drill the pilot hole into the receiving piece.
- Add a shallow countersink if the head must sit flush.
- Wax the screw threads for hardwood or long screws.
- Drive at a moderate speed with steady pressure and a correct bit.
- Stop when the head seats—don’t crush the fibers.
- Check alignment before driving the next screw.
- If anything feels wrong, back out and fix it immediately.
Final thoughts
Screwing into wood isn’t complicated, but it rewards patience. Pilot holes, clearance holes, and clean driving technique are the difference between a tray stand that feels solid and one that slowly loosens up.
Treat screws like precision hardware, not brute-force fasteners, and your builds stay tight, square, and good-looking for the long haul.