How to Cover Screws Sticking Out of Wood: 9 Pro Fixes
To cover screws sticking out of wood, identify whether the tip is poking through the back or the head sits proud on the face. Then set the head properly, trim or replace the fastener, and finish the surface so the repair disappears under stain or paint. If you’d like to prevent repeat blow-throughs, start by choosing the right screw length to avoid blow-through.
Screws poking out of wood are a knuckle-slicer, a countertop scratcher, and a dead giveaway on an otherwise clean build. The good news is you can cover them in a way that’s safe, strong, and looks intentional—whether the screw tip is sticking out the back, the head is sitting proud on the face, or the joint loosened and let hardware creep out over time.
Contents Here
- 1 Overview
- 2 Tools & materials
- 3 Safety notes
- 4 Guide to Cover Screws Sticking Out of Wood
- 4.1 Step 1: Identify what’s sticking out (tip or head) and where it lives
- 4.2 Step 2: Back the screw out and check the hole condition
- 4.3 Step 3: Choose the right “cover” method for your situation
- 4.4 Step 4: Fix option A (best): Replace the screw with the correct length
- 4.5 Step 5: Fix option B (fast): Trim a protruding screw tip and make it safe
- 4.6 Step 6: Cover option 1: Recess the area and install a wooden plug (cleanest “invisible” cover)
- 4.7 Step 7: Cover option 2: Add a pad, foot, or bumper for underside protection
- 4.8 Step 8: Cover option 3: Use a hardware cap (great for industrial or utility builds)
- 4.9 Step 9: Cover option 4: Countersink the head and plug it (best for “nice” faces)
- 5 Troubleshooting
- 6 Finishing & care
- 7 FAQs about Cover Screws Sticking Out of Wood
- 8 Wrap-up
Overview
Before you “cover” anything, decide what you’re really fixing.
If the tip is sticking out the back, the cleanest solution is usually to shorten or swap the screw, then protect the surface with a plug, cap, or recessed pocket. If the head is sticking up on the face, you’ll usually countersink it and hide it with a wooden plug, filler, or a screw cover.
One rule I stick to: if the screw is part of a structural joint (tray stand uprights, rails, handles), fix the fastener first—then hide it. Don’t bury a problem and hope it behaves.
If you want a broader look at hiding fasteners for furniture-grade results, this pairs well with smart ways to hide screws in wood without weakening the joint.
Tools & materials
You won’t need everything here, but these are the usual players:
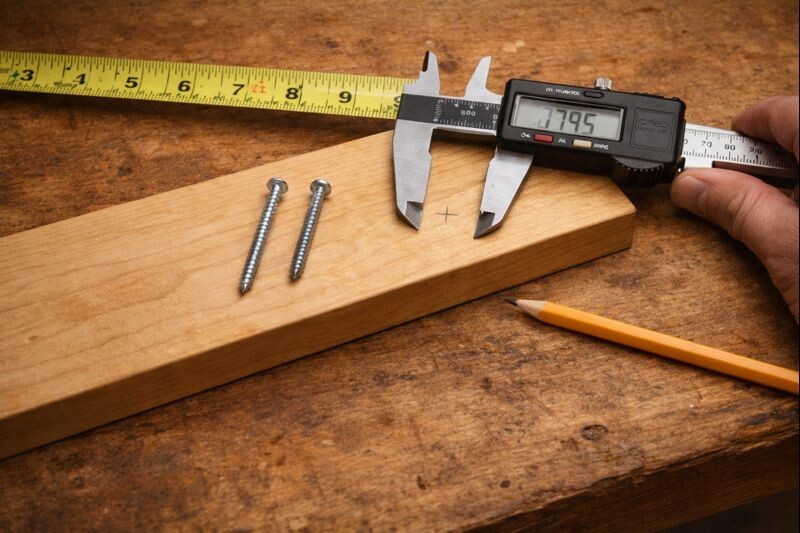
- Tape measure or calipers (for screw length and protrusion)
- Screwdriver/driver bit
- Flush-cut saw or end-cutting nippers (for trimming)
- File or sandpaper (120, 180, 220)
- Drill + countersink bit (or a Forstner bit for flat-bottom recesses)
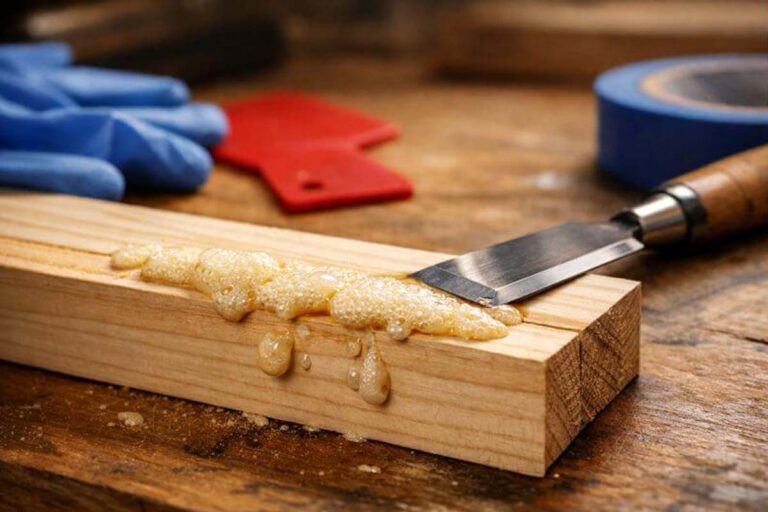
- Wood glue (PVA)
- Wooden plugs (store-bought or cut with a plug cutter)
- Wood filler (paint-grade or small cosmetic spots)
- Screw caps / finishing washers / cap nuts (for exposed hardware)
- Painter’s tape (glue control and scratch protection)
For joint issues, it also helps to know how far a screw should go into wood for solid bite without blow-through.
Safety notes
Metal and wood don’t forgive sloppy handling. Clamp the work before you cut or drill. Wear eye protection any time you’re trimming screws or drilling recesses—little shards and chips love to find your face. Plus, keep oily rags and sawdust away from sparks if you use any powered cutting method.
If you’re working near finished surfaces (painted trays, sealed countertops), mask the area with painter’s tape first. It saves you from that one slip you’ll remember forever.
Guide to Cover Screws Sticking Out of Wood
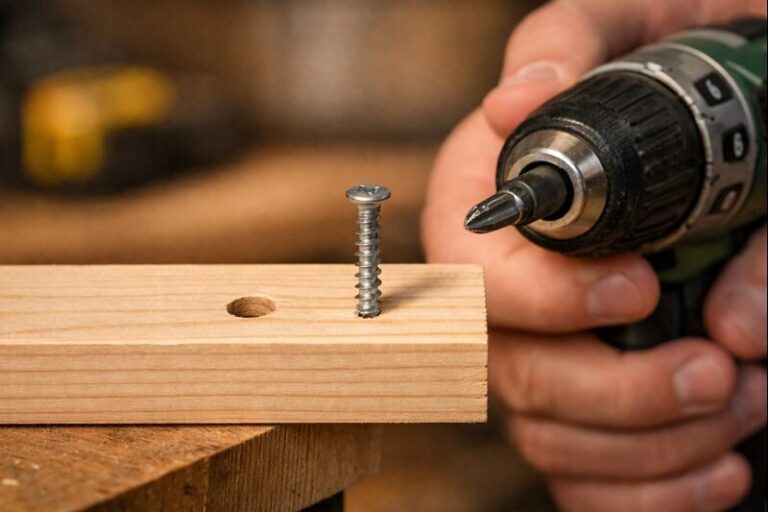
Step 1: Identify what’s sticking out (tip or head) and where it lives
Run your fingers lightly around the area and look from the side.
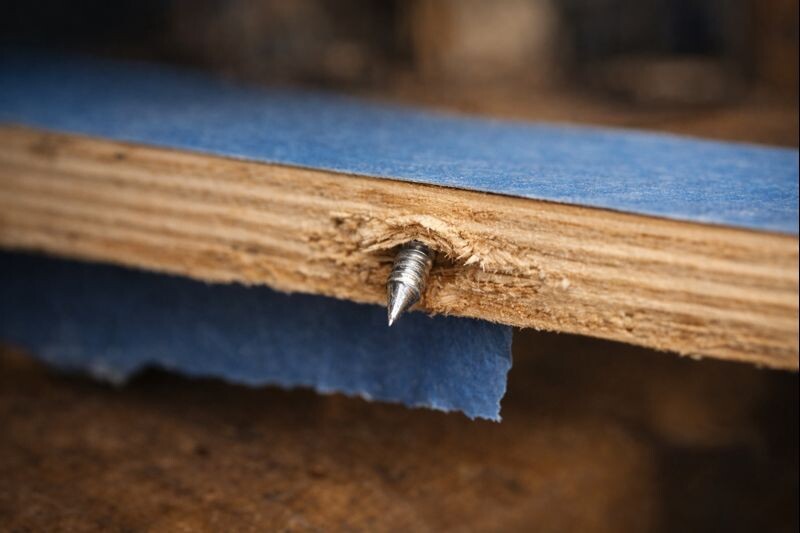
- Tip sticking out the back: the screw is too long, or it pulled through as the joint loosened.
- Head sticking out on the face: it wasn’t countersunk, or the wood compressed and the head rose.
If the joint moved, deal with that first. This is where quick fixes for loose screws in wood that actually hold can save the day.
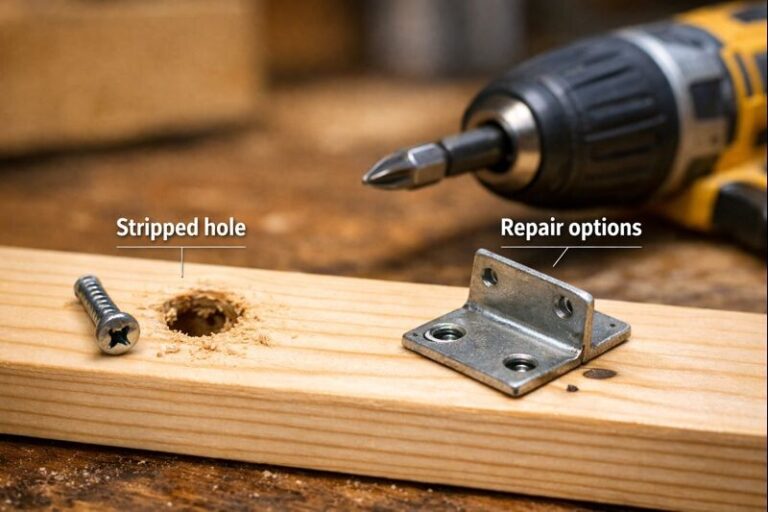
Step 2: Back the screw out and check the hole condition
Remove the screw and inspect the hole.
If the hole is stripped, don’t reuse it and hope. Repair it first using a reliable stripped screw hole fix in wood. Next, choose the correct screw length so the tip won’t reappear.
If the screw is stuck or chewed up, step over to how to remove a stripped screw from wood without tearing up the piece before you escalate.
Step 3: Choose the right “cover” method for your situation
Here’s the practical way to choose, without overcomplicating it:
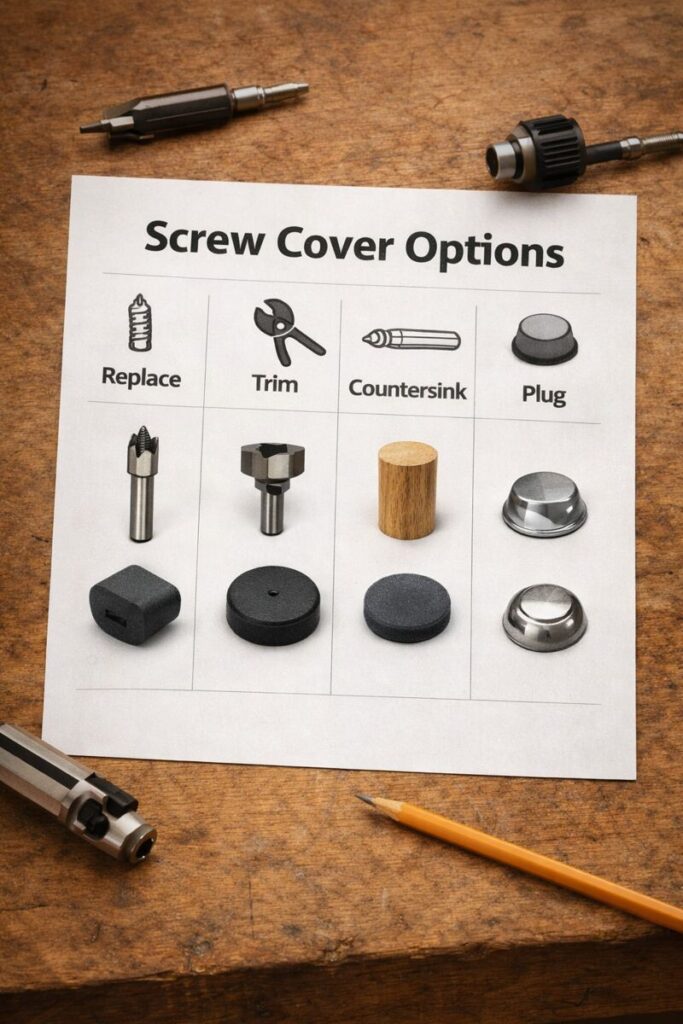
If the screw tip sticks out and you can remove the screw.
Swap to a shorter screw. That’s the cleanest fix and keeps the joint honest. Use the right pilot hole so you don’t split edges—this is the method I follow to stop wood splitting when screwing—then reinstall.
If the tip sticks out but you can’t remove the screw easily.
Trim it flush and protect the area so it won’t snag skin or scratch surfaces. You’ll cover it afterward with a recess, pad, or cap depending on the project.
If the screw head sticks out on the face.
Recess the head (countersink or Forstner pocket) and cover the hole with a plug or filler. For stained or clear-finished wood, plugs win most of the time.
If your end goal is “make the mark disappear,” keep this handy: how to cover screw holes in wood without the patch showing.
Step 4: Fix option A (best): Replace the screw with the correct length
Measure the material thickness and your target bite. A good target is solid engagement in the receiving piece without exiting the far face.
Drive the replacement screw properly—straight, controlled torque, and no overdriving. If you need a refresher on clean technique, this guide on how to screw into wood the right way covers the fundamentals that prevent most blow-through problems.
Then you’re done. No “cover” needed because nothing’s sticking out anymore.
Step 5: Fix option B (fast): Trim a protruding screw tip and make it safe
This is the move when the screw is trapped (glued joint) or removal would cause more damage than it’s worth.
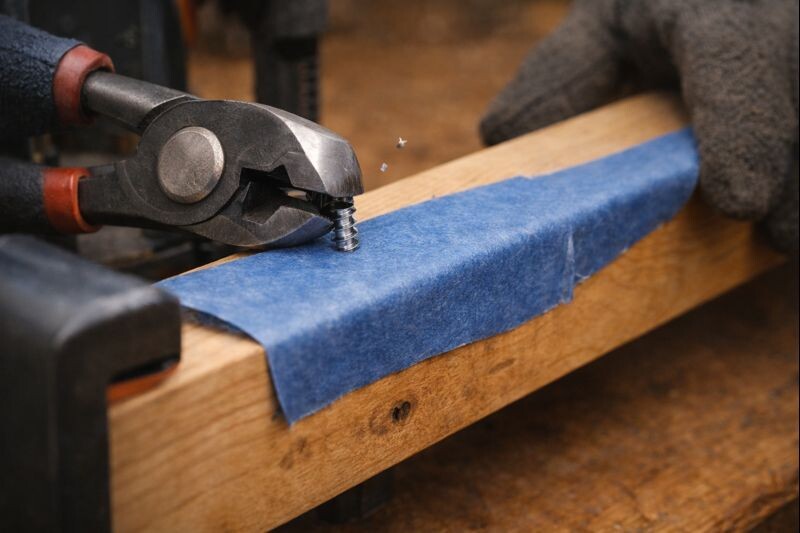
- Protect the surrounding wood. Tape around the screw tip, and clamp the piece.
- Cut the tip flush.
- Use a flush-cut saw for control, or end-cutting nippers if the tip is small.
- Keep the tool flat so you don’t gouge the wood.
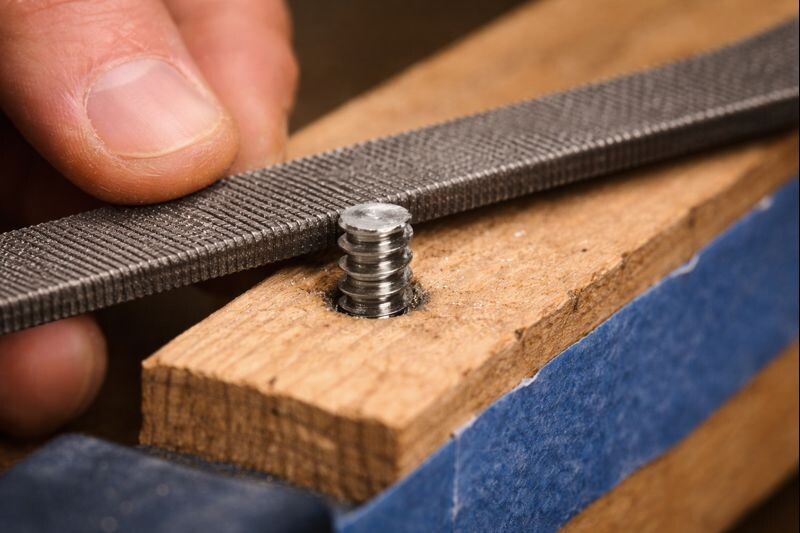
- Dress the metal. File the cut end until it’s smooth and slightly rounded. Next, sand the wood lightly to remove any raised fibers.
At this point the screw isn’t dangerous, but it can still scratch a surface. That’s where the cover matters.
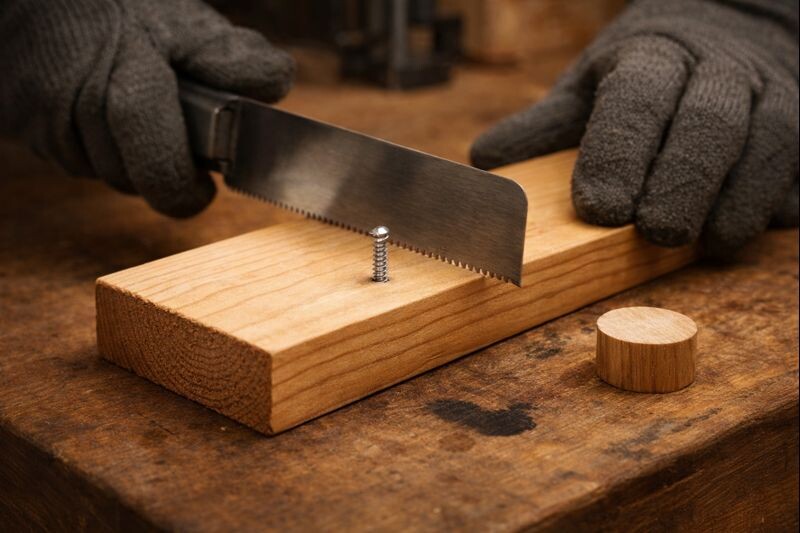
Step 6: Cover option 1: Recess the area and install a wooden plug (cleanest “invisible” cover)
If the protruding metal is on the underside of a tray, a stand base, or anything that touches a counter, I like a shallow recess with a plug. It hides the hardware and leaves a smooth bearing surface.
- Mark a centered spot over the screw tip.
- Drill a shallow flat-bottom recess with a Forstner bit. Go only as deep as needed to bury the trimmed tip plus a little clearance.
- Glue in a wood plug that matches the species. Keep glue on the plug sides, not a puddle in the bottom.
- Trim and sand flush after the glue sets.

The plug workflow matters (order of operations, grain alignment, glue control). If you want the full method I use, it’s covered in the “Wooden Plugs for Screw Holes” reference.
Step 7: Cover option 2: Add a pad, foot, or bumper for underside protection
For tray bottoms and decor stands, a simple cover can be more functional than invisible.
- Felt pads, cork dots, rubber bumpers, or a thin hardwood skid strip all work.
- Place them so the piece sits evenly and doesn’t rock.
However, don’t use a pad to “hide” a sharp screw tip. Always trim or replace first. Pads compress over time, and the metal will win.
Step 8: Cover option 3: Use a hardware cap (great for industrial or utility builds)
If the screw end is accessible and the look fits, hardware caps are tough and tidy.
- Cap nuts (acorn nuts) work when the screw protrudes through a nut on the back.
- Threaded screw caps and finishing washers work when the head is what you’re covering.
- For sheet-metal style screws in wood, a cap can still work, but the fit is fussier.
This option is especially nice when you want the hardware to look intentional instead of hidden.
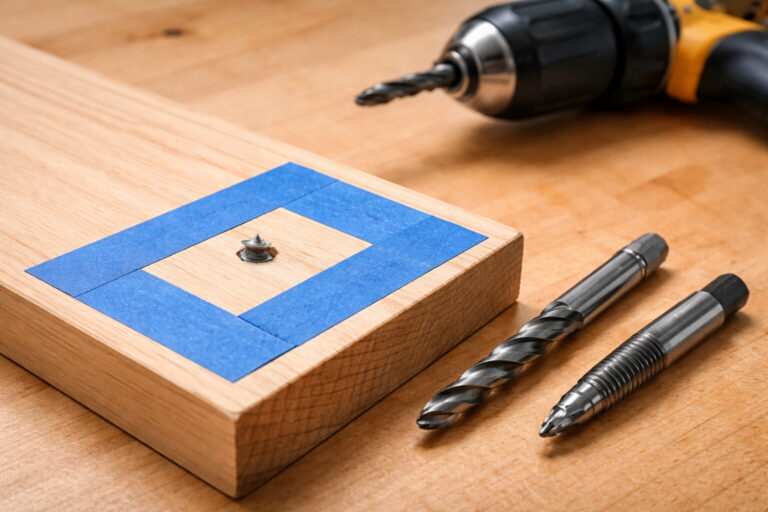
Step 9: Cover option 4: Countersink the head and plug it (best for “nice” faces)
If the issue is a screw head sticking up on the face, treat it like finish carpentry.
- Back the screw out.
- Drill a clean countersink (or a flat pocket with a Forstner bit).
- Re-drive the screw until the head sits below the surface.
- Glue in a plug, align the grain, trim flush, then sand.
This is the same approach I use on tray stands and serving tray builds where hands and eyes are close to the work.
Troubleshooting
The screw keeps backing out: That usually means the hole is worn or the joint is moving. Fix the hole first with a stripped-hole repair that restores bite, then reassemble.
You trimmed the screw, but it still scratches the surface: The cut end wasn’t dressed enough, or the piece rocks and the screw end is the low point. File it smoother and add a proper bumper or recessed plug.
The plug stands out like a dot: Grain mismatch. Rotate the plug to align grain before gluing, or cut plugs from project offcuts. If you’re staining, test on scrap first because plug grain can absorb differently.
The wood split near the screw: Pilot holes were too small or the screw was driven too close to an edge. Next time, follow these proven ways to stop wood splitting when screwing and don’t force oversized fasteners.
The screw broke off: Don’t bury it and pretend it didn’t happen. Pull it cleanly using a broken screw removal method that won’t crater the wood, then repair the hole and start fresh.
Finishing & care
After any cover work, sand like you mean it—but don’t dish the surrounding surface. I’ll level a plug with 120 only if I have to, then move to 180 and finish at 220 for most hardwoods.
If you’re staining pine or another blotch-prone softwood, you’ll get a more even blend if you prep properly. This pine blotching prevention method is worth the time when a plug needs to disappear.
For trays that will touch food or get wiped down often, choose a finish that cures hard and cleans well. Sealing a wooden serving tray the right way and understanding when polyurethane is food-safe after it fully cures help you make that call.
FAQs about Cover Screws Sticking Out of Wood
Is it okay to cut a screw flush instead of replacing it?
Yes, when the joint is already tight and you can’t back the screw out safely. Just deburr and seal the metal so it’s smooth and less prone to rust.
Will trimming the tip weaken the joint?
Only if you remove so much length that threads no longer have enough bite. If the screw is already through the back, you usually have extra length—not necessary holding power.
How do I prevent screws from poking through next time?
Pick the right length, drill proper pilot holes, and don’t overdrive. It also helps to sanity-check with how far a screw should go into wood before you commit.
What’s the cleanest way to hide a screw head on stained wood?
A countersink plus a grain-matched wooden plug is the most natural-looking result, especially under clear coats and stain.
Can I just bury the screw deeper to stop it sticking out the back?
No—driving deeper makes the tip more likely to poke through. Correct the length or change the joint method.
Wrap-up
Covering screws sticking out of wood starts with making the fastener safe and the joint solid. Replace the screw when you can. Trim and smooth it when you can’t. Then choose a cover that matches the project—plugs for invisible work, caps for intentional hardware, and pads or feet when you need surface protection. Done in that order, the fix looks clean and stays that way.