Wood Filler Over Screw Heads: 7 Tough Fixes That Won’t Sink or Crack

Wood filler over screw heads is the fastest way to make a tray stand (or any small wood project) look finished instead of “shop-built.”
It also prevents snaggy hardware, keeps moisture out of the hole, and makes paint look smooth.
However, the results depend on the filler type, the screw depth, and the finishing plan. This guide walks through the exact steps that keep screw spots from shrinking, cracking, or flashing under a topcoat.
Contents Here
- 1 When covering screw heads is the right move
- 2 When not to use wood filler over screw heads
- 3 Why filler jobs fail: the 5 common causes
- 4 Choose the right product: filler vs putty vs epoxy (simple breakdown)
- 5 Prep matters more than the filler: set the screw correctly
- 6 Step-by-step: wood filler over screw heads that sands flush and stays flush
- 7 Pro tips for tray stands specifically (where filler shows the most)
- 8 Common problems and quick fixes
- 9 Practical “buy once” tools and products (smart, not fancy)
- 10 FAQs about Wood Filler Over Screw Heads
- 10.1 Can wood filler cover a screw head without cracking later?
- 10.2 Does wood filler hold paint better than stain over screw heads?
- 10.3 How deep should a screw head sit before applying filler?
- 10.4 Should the filler be sanded before or after it fully cures?
- 10.5 Can screws be driven into a filled spot later for hardware changes?
- 11 Final thoughts
When covering screw heads is the right move
Screws are great for strength, especially on tiered tray stands where you’ve got racking forces and people grabbing the handle. But exposed heads distract the eye and can catch a rag when you wipe down the tray.
Covering screw heads with a filler makes sense when you want:
- A smooth painted surface (farmhouse trays, seasonal decor stands, display risers)
- A “no fasteners” look on visible faces
- Less chance of rust marks bleeding through paint later
- Easier cleanup on surfaces people touch often
If your goal is a natural stained look, filler can still work, but it’s the harder route. In that case, a wood plug usually looks better than any “stainable” filler. If you’re deciding between options, the walkthrough on ways to hide hardware on wood projects helps you pick the cleanest approach.
When not to use wood filler over screw heads
Wood filler is not a cure-all. Skip it when the joint may need service later, or when movement is expected.
Avoid filler in these situations:
- Parts you’ll remove later (hardware plates, brackets, replaceable feet)
- Outdoor projects unless you’re using a true exterior-grade filler and finish system
- Thin stock near an edge where sanding could dish the surface
- High-movement joints where seasonal wood movement may crack the patch
For stained pieces where the screw is on a show face, consider a plug instead of filler. The guide on covering screw holes in a cleaner, more “furniture” way is the direction most builders end up liking long-term.
Why filler jobs fail: the 5 common causes
Most “bad filler spots” come from one of these:
- Screw head wasn’t set deep enough: If the screw is nearly flush, the patch is too thin. Thin patches chip and reveal the ring fast.
- Dusty hole walls: Dust acts like a release agent. The filler bonds poorly and pops.
- Wrong filler for the finish: Some fillers sand great but stain terribly. Others resist paint unless primed.
- Shrinking: Many water-based fillers shrink as they dry. One pass looks perfect… then sinks overnight.
- Rushed sanding: Sanding before the core cures causes a soft center that later depresses under paint.
If the screw itself is problematic (stripped, spinning, not biting), fix that first. Start with repairing a stripped screw hole so you’re not hiding a weak joint under a pretty patch.
Choose the right product: filler vs putty vs epoxy (simple breakdown)
Here’s the practical rule that keeps you out of trouble:
- Painted finish: choose a filler that sands easily and primes well.
- Stained finish: choose a plug first; if using filler, pick a stain-friendly option and test.
- Structural patching: choose a 2-part filler (epoxy or polyester) for strength.
Quick comparison table
| Product type | Best for | Pros | Drawbacks | Tray stand use case |
|---|---|---|---|---|
| Water-based wood filler | Paint-grade patches | Easy cleanup, sands fast | Can shrink, may flash under stain | Painted tray stand tiers and posts |
| Solvent-based filler | Small surface fills | Less shrink than many water-based | Strong odor, longer dry | Touch-ups on painted bases |
| 2-part epoxy wood filler | Strength + durability | Very strong, minimal shrink | Short working time, harder sanding | Handle blocks, stress points |
| Polyester body filler (Bondo-style) | Fast, rock-solid patches | Sets fast, strong | Not stain-friendly, can be too hard | Hidden repairs before paint |
| Wood putty | Final cosmetic touch | Great for tiny pinholes | Not structural, some don’t sand well | After priming, micro touch-ups |
If you’re unsure whether screws can go into filler later (for add-ons or repairs), read whether screws hold in wood filler before committing.
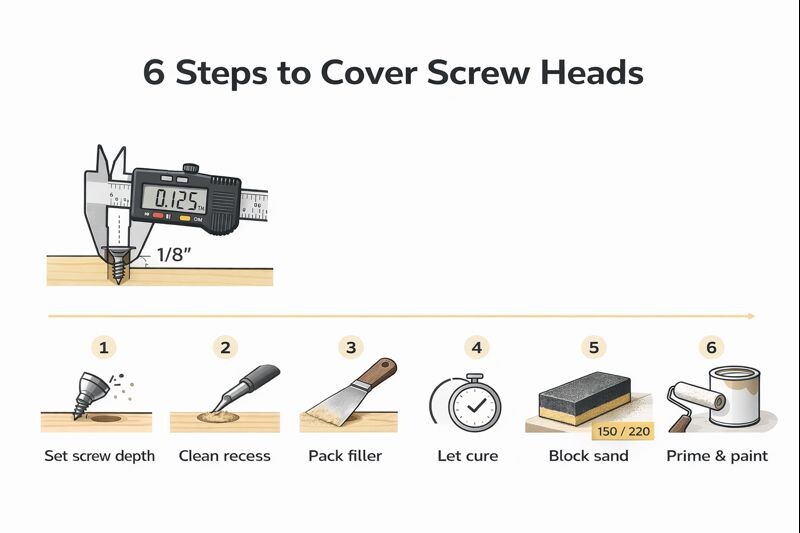
Prep matters more than the filler: set the screw correctly
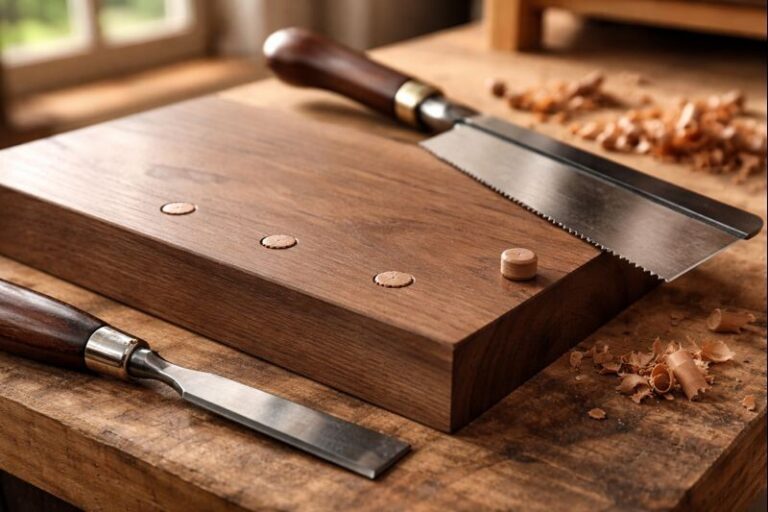
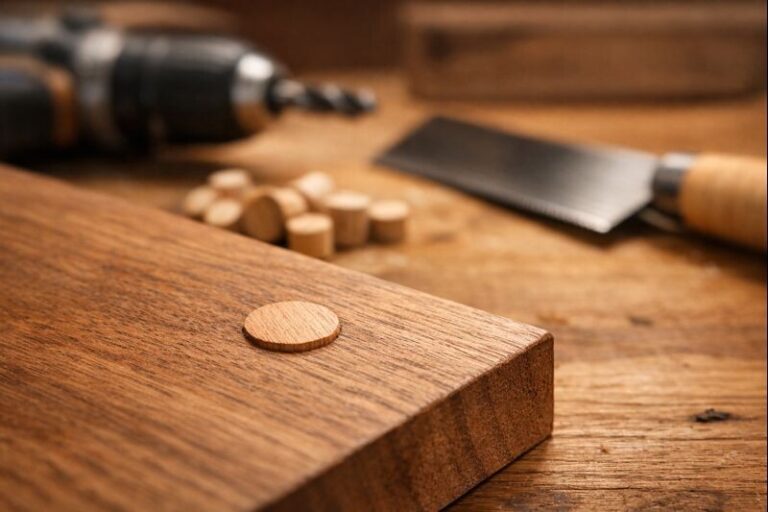
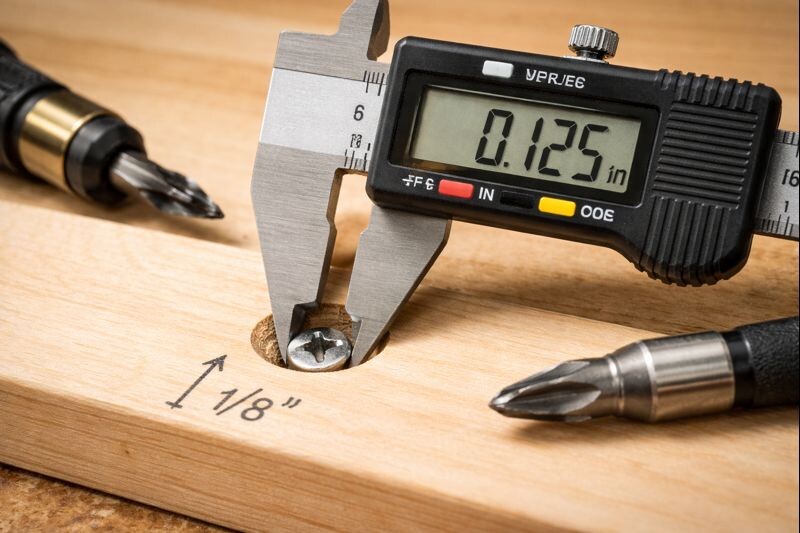
For a clean, long-lasting patch, the screw head needs a “cup” of space above it.
Target depth
- Countersunk screw head should sit about 1/16″ to 1/8″ below the surface.
- Deeper than 1/8″ is fine, but it needs a filler that won’t shrink and crack.
Step-by-step: set the screw head
- Drive the screw straight: Angled screws leave an oval void that’s harder to fill cleanly. The basics in driving screws into wood without drama help if the bit keeps camming out.
- Countersink or counterbore when needed: A countersink is fine for most tray stands. A counterbore is better when you want a deeper, plug-ready recess.
- Stop splitting before it starts: On tray stand parts like narrow rails or handles, pre-drill and control the bite. See ways to prevent wood from splitting during assembly if cracks have been showing up.
Step-by-step: wood filler over screw heads that sands flush and stays flush
This is the exact workflow that holds up on tray stands that get handled, wiped, and re-styled all year.
Step 1: Clean the recess
- Vacuum or blow out the hole.
- Wipe the area with a dry rag.
- If the wood is oily (some hardwoods can be), a quick wipe with mineral spirits can help adhesion. Let it fully flash off.
Step 2: Pick the filler based on finish
- Painting later: water-based filler is usually fine.
- Staining later: choose the most stain-friendly filler you can find and test on scrap from the same board.
- High stress spot: 2-part filler wins.
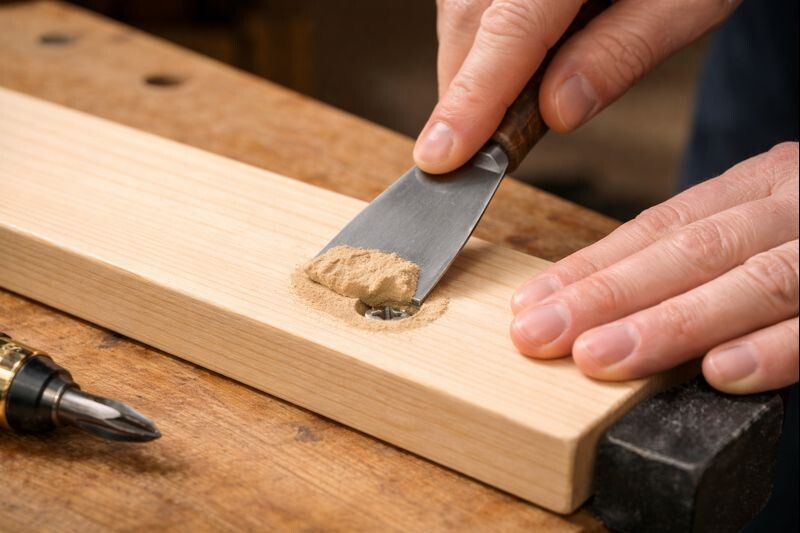
Step 3: Pack it in, don’t just smear it
Press filler down into the recess with a putty knife so it contacts the screw head and the side walls.
A good habit is “pack, then scrape.”
- Pack firmly to avoid air pockets.
- Slightly overfill by a hair (because most fillers shrink a touch).
- Scrape across the grain lightly to level the surface.
Step 4: Let it cure fully (not just “dry to touch”)
This is where patience saves you rework.
- If you sand too early, the surface looks flat, but the center is still soft.
- Later, primer and paint tighten up and that spot “dishes” slightly.
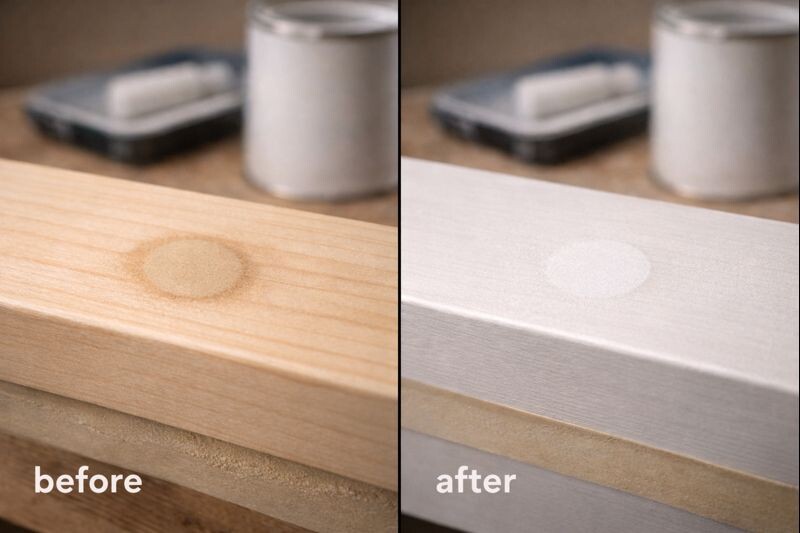
On tray stands, that dish shows up under side lighting on the tier faces. It’s the first thing people notice when they’re standing at a counter.
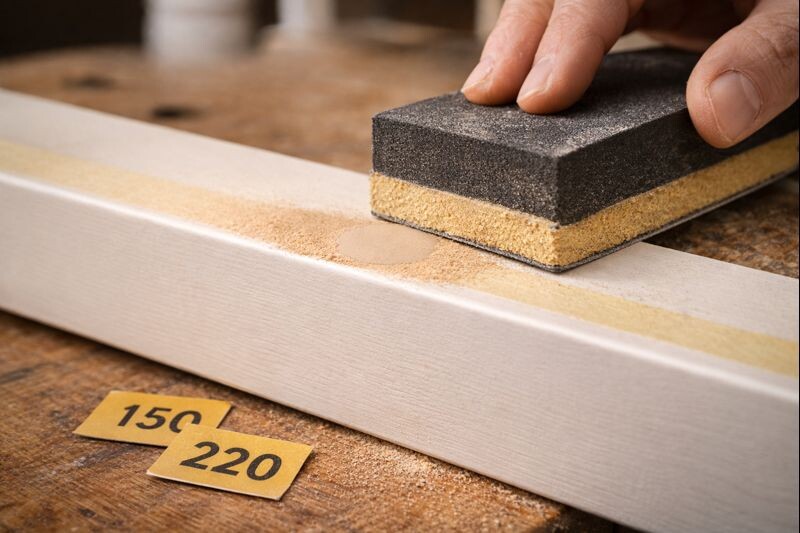
Step 5: Sand flush without creating a low spot
Use a sanding block. Fingers alone will dish soft filler and round edges.
A simple sanding sequence:
- Start with 120–150 grit to level the patch.
- Move to 180–220 grit to blend.
- Stop once the patch disappears to the touch.
If you’re chasing a flawless painted surface, the techniques in getting paint smooth without brush marks pair perfectly with good filler work.
Step 6: Seal and finish in the right order
For paint:
- Prime (a stain-blocking primer is helpful if wood tannins are a concern).
- Light sand.
- Paint.
- Clear coat only if you want extra durability.
For clear coats on functional trays:
If the tray is used for serving, be picky with finishes. The guide on food-safe cured polyurethane considerations is worth reviewing before finishing any serving surface.
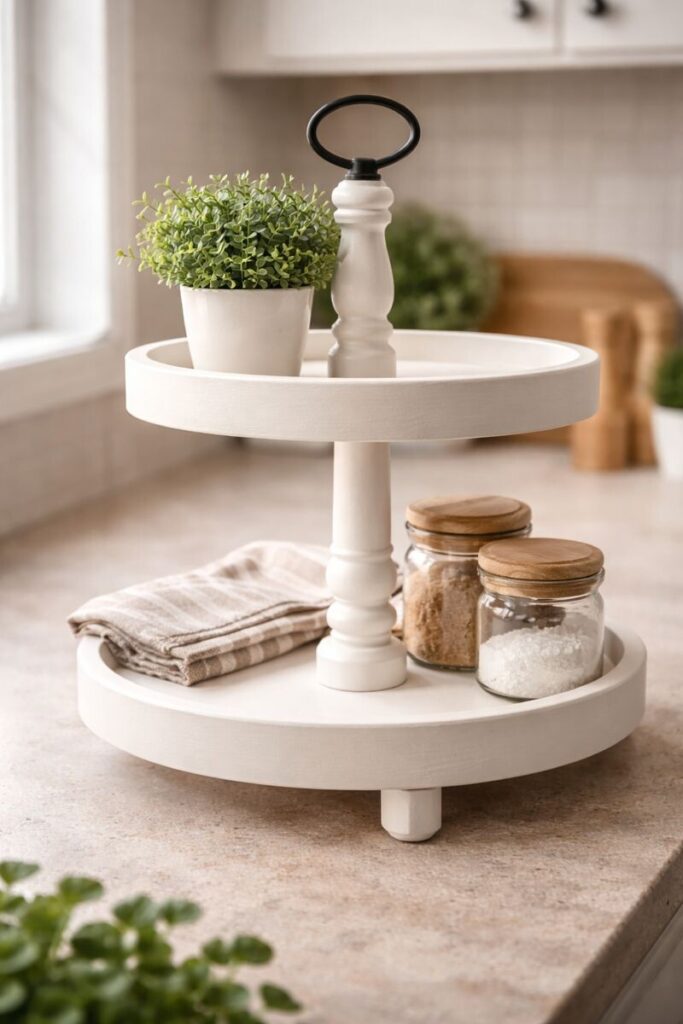
Pro tips for tray stands specifically (where filler shows the most)
Tray stands are full of “visibility traps”:
- Tier edges catch light.
- Posts sit at eye level.
- Handles are touched constantly.
Use these tricks to keep screw patches invisible:
- Keep screws on undersides or hidden faces whenever possible: Before filling anything, check if the joint can be flipped or reoriented.
- Use filler + primer for painted farmhouse styles: Paint hides filler better than stain, but primer is what keeps the patch from flashing.
- Spot-prime patches if needed: If patches look dull compared to the wood, spot prime, sand, then prime the whole piece.
- Avoid filler on end grain show faces: End grain soaks finish differently. Filler often looks like a “plug” of plastic in stain.
If the finished tray stand wobbles after assembly, fix that before final paint. A wobbly base can crack patches over time. Use the steps in stopping a tiered tray stand from wobbling to lock it down.
Common problems and quick fixes
The patch sank overnight
Cause: shrinkage or too-thin first coat.
Fix: add a second thin coat, let cure, then block sand flush.
The patch chipped out on sanding
Cause: poor adhesion (dust) or patch too thin.
Fix: re-clean the recess, deepen the countersink slightly, refill.
The patch “flashed” under paint (looks like a dull circle)
Cause: different porosity between filler and wood.
Fix: use primer, then sand smooth. Consider a high-build primer for perfection-grade paint jobs.
The patch looks awful under stain
Cause: most fillers don’t take stain like wood fibers do.
Fix: switch to a wood plug, or commit to a painted finish on that face.
Practical “buy once” tools and products (smart, not fancy)
This isn’t about brand loyalty. It’s about predictable results.
A solid kit for filling screw heads cleanly:
- Flexible putty knife (2″ is a sweet spot)
- Small stiff putty knife for packing deep recesses
- Sanding block or cork block
- Shop vacuum or brush for dust removal
- Primer matched to your finish plan (especially for paint)

Vacmaster Professional Beast Series (Wood Shop vacuum)
Best Beast Series High-Performance Motor
Powerful 320 AW vacuum captures dust down to 1 micron, 25-ft reach, nine tools, converts to blower. Oversized latches and on-board storage keep shop cleanup fast and tidy.
$92.99 at AmazonProduct types that tend to perform well for tray-stand builds:
- A sandable water-based filler for paint-grade work
- A 2-part epoxy filler for stress points
- A stain-blocking primer when using pine or tannin-rich woods
If you’re buying based on reviews, it’s smart to skim the site’s review process and testing standards and the affiliate disclosure so you know what’s measured and why.
FAQs about Wood Filler Over Screw Heads
Can wood filler cover a screw head without cracking later?
Yes, if the screw is set deep enough and the filler is packed firmly into a clean recess. Cracking usually comes from thin patches, dust contamination, or wood movement. A second coat after shrinkage prevents most long-term issues.
Does wood filler hold paint better than stain over screw heads?
Yes. Paint and primer can hide porosity differences between filler and wood. Stain highlights those differences and often leaves a visible halo. For stained projects, a wood plug is typically the cleaner-looking option than filler.
How deep should a screw head sit before applying filler?
A good target is about 1/16 to 1/8 inch below the surface. That depth leaves enough material for a durable patch without creating a huge void. If the recess is deeper, use a low-shrink or 2-part filler.
Should the filler be sanded before or after it fully cures?
After it fully cures. “Dry to the touch” isn’t enough for many fillers. Sanding too early can leave a soft center that later sinks under primer and paint. Full cure keeps the patch flat and stable.
Can screws be driven into a filled spot later for hardware changes?
Sometimes, but it depends on the filler type and the load. Standard water-based fillers aren’t great for holding threads under stress. For future fasteners, use a wood plug, an epoxy filler, or plan a new pilot hole in solid wood.
Final thoughts
Wood filler over screw heads is one of those small steps that separates a “quick build” from a tray stand that looks finished and stays that way. Set the screw to the right depth, clean the recess, match the filler to your finish, and sand with a block. Do that, and the patches won’t shrink, flash, or chip when the piece gets handled and cleaned.