What Do the Numbers on Screws Mean? Measuring Screws + Wood Screw Size Chart
Numbers on screws meaning comes down to this: the label tells you the screw’s diameter, length, thread style, and sometimes its strength, material, and coating. Get those numbers right and your tray stand joints pull tight, stay straight, and don’t loosen over time. Miss them and you’ll fight split wood, wobbly tiers, and stripped heads.
The good news is the “code” is consistent once you know what to look for. Those little symbols decide fit, holding power, and whether wood splits or stays clean. Once the numbering system clicks, screw shopping gets simple. Plus, measuring what you already have becomes quick and repeatable.
Contents Here
- 1 What the numbers on screws usually refer to
- 2 What does a #8 screw mean
- 3 What size is a #8 screw
- 4 What size is a #10 screw
- 5 What size is a #12 screw
- 6 What diameter is a #8 screw
- 7 How do you measure a screw
- 8 How to measure wood screws
- 9 Wood screw sizes chart
- 10 Wood screw dimensions
- 11 Putting screw numbers into real tray stand decisions
- 12 FAQs
- 12.1 Can a #8 screw replace a #10 screw in wood projects?
- 12.2 Are screw gauge numbers the same for all screw types?
- 12.3 What’s the easiest way to measure screw diameter without calipers?
- 12.4 What screw size works best for most tiered tray stand assemblies?
- 12.5 Where should screw length be measured from on a flat-head wood screw?
- 13 Final thoughts
What the numbers on screws usually refer to
On most wood-screw boxes in the U.S., the “numbers” are doing a few jobs at once. The trick is reading them in order.
A common label looks like this:
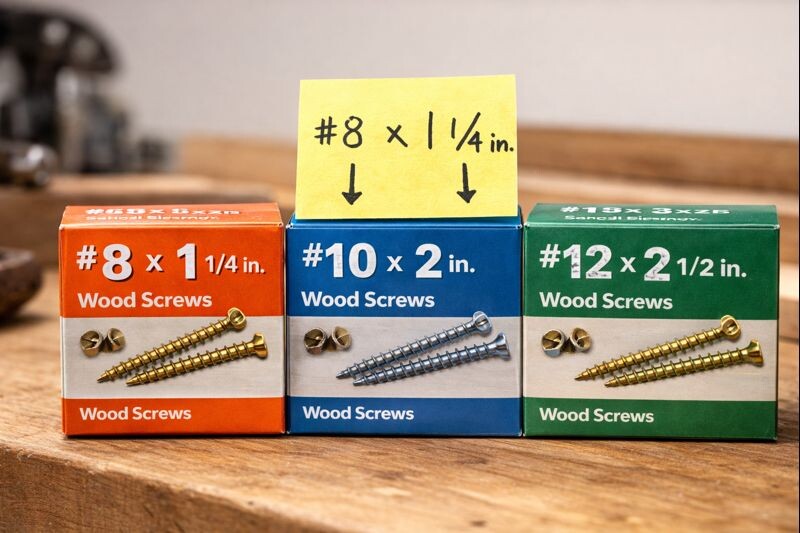
- #8 x 1-1/4 in.
- #10 x 2 in.
- #8-32 x 1 in. (more common for machine screws than wood screws)
Here’s what each part tends to mean.
Know more: How Are Screws Sized
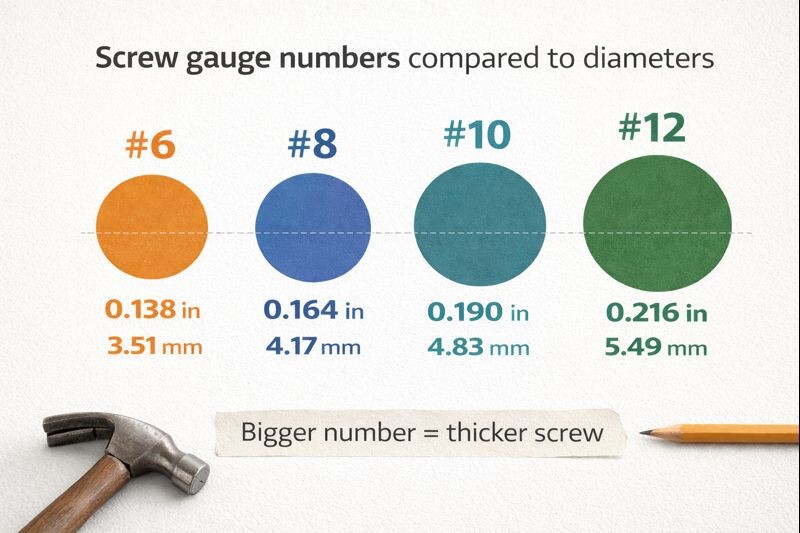
The “#” number is the screw gauge (diameter class)
For many screws, #6, #8, #10, #12 are gauge sizes. Bigger number usually means a thicker screw.
That matters a lot on tray stand builds. Thicker screws can hold more, but they also demand a proper pilot hole so the wood doesn’t split.
The “x” number is the length
The length is typically in inches in U.S. packaging. A longer screw gives more bite into the second piece of wood, but it can also poke through if you don’t plan the thickness.
If you’re building tiered trays, this comes up constantly on:
- Attaching tray bottoms to cleats
- Mounting center posts or brackets
- Securing feet or base blocks
If you’ve dealt with a wobbly stand before, the fasteners are often part of the story. This guide pairs well with my practical fixes for stopping a tiered tray stand from wobbling.
Extra numbers can mean thread type (often on machine screws)
If you see something like #8-32, that “32” is usually threads per inch (TPI) for machine screws. Wood screws are more often labeled by gauge and length, not TPI, because their thread pattern is designed for wood bite rather than nut-and-bolt matching.
Other markings may indicate drive, head, and coating
Some boxes also include:
- Drive: Phillips, square (Robertson), Torx/star
- Head: flat/countersunk, pan, washer head
- Material/coating: zinc, ceramic, stainless, exterior-rated
For tray stands that might sit near a coffee bar or sink, corrosion resistance matters. If finishing is part of the build plan, see how to seal a wooden serving tray and why clear coats get cloudy to avoid hardware-related staining and finish haze.
What does a #8 screw mean
A #8 screw means the screw is in the #8 gauge class, which refers to its major diameter (outside thread diameter).
In practical shop terms, #8 is a sweet spot for woodworking:
- Thick enough for solid holding power
- Common in pocket-hole style joinery and general fastening
- Less bulky than #10 or #12 when you want a clean look
For tray stands, #8 screws are a dependable choice for:
- Attaching tray rims and rails
- Securing brackets to a center post
- Fastening base parts where you still want to avoid oversized holes
However, #8 still needs a pilot hole in hardwoods. Skipping that is one of the quickest ways to split oak or maple. If you’re still choosing wood species, my breakdown on choosing between pine, oak, and maple helps you predict how forgiving the wood will be.
What size is a #8 screw
“Size” can mean two different things:
- Diameter (gauge)
- Length
A #8 screw has a standard major diameter around 0.164 in (about 4.17 mm). Then you choose length based on material thickness, usually 3/4 in. to 2-1/2 in. for typical woodworking.
A quick rule that works well for tray stands:
- Aim for at least 1 inch of thread bite into the second piece (without punching through)
- Use a shorter screw if the wood is thin or you’re close to an edge
What size is a #10 screw
A #10 screw steps up in diameter and strength. It’s often used when:
- The joint sees more load
- The parts are thicker
- You want extra stiffness in a frame
Typical major diameter for #10 is about 0.190 in (about 4.83 mm).
For tray stand builds, #10 screws make sense for:
- Base assemblies that carry the full stand weight
- Thick center posts or support blocks
- Mounting heavy metal hardware plates
However, #10 screws are more likely to split wood near edges if pilots aren’t right. If a hole strips, don’t toss the part. Use the repair method in fixing a stripped screw hole in wood.
What size is a #12 screw
A #12 screw is a bigger woodworking fastener, often chosen for:
- Heavier assemblies
- Structural-style connections in thicker stock
- Hardware mounting where pull-out strength matters
Typical major diameter for #12 is about 0.216 in (about 5.49 mm).
On a tiered tray stand, #12 screws are usually overkill unless the design is chunky or oversized. Bigger fasteners can look out of proportion on small trays. Plus, they force larger pilot holes and can weaken thin pieces.
What diameter is a #8 screw
A #8 screw’s major diameter is typically:
- 0.164 inches
- 4.17 mm
That’s the outside measurement across the threads.
Important detail: manufacturers can vary slightly, and specialty screws (like some decking screws) may not match “textbook” diameters perfectly. If precision matters, measure the actual screw with calipers.
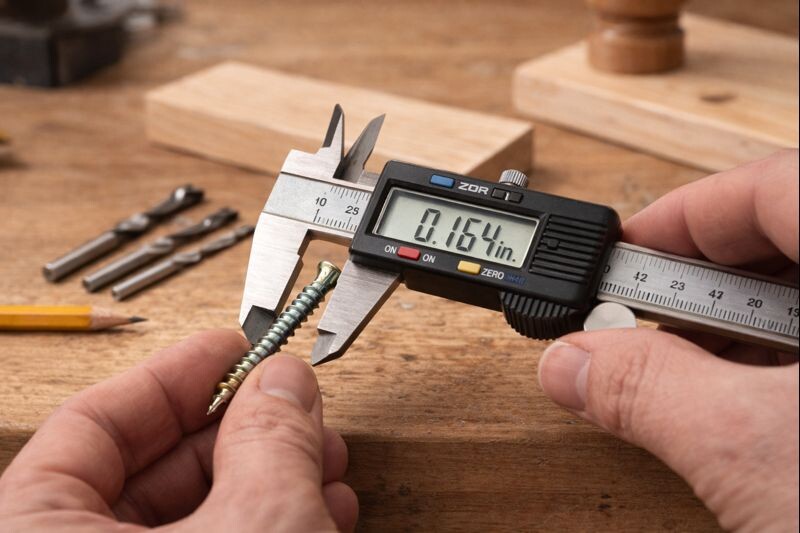
How do you measure a screw
Measuring a screw is simple if you stick to a consistent method. Focus on three things: length, diameter, and thread style.
Step-by-step screw measuring method
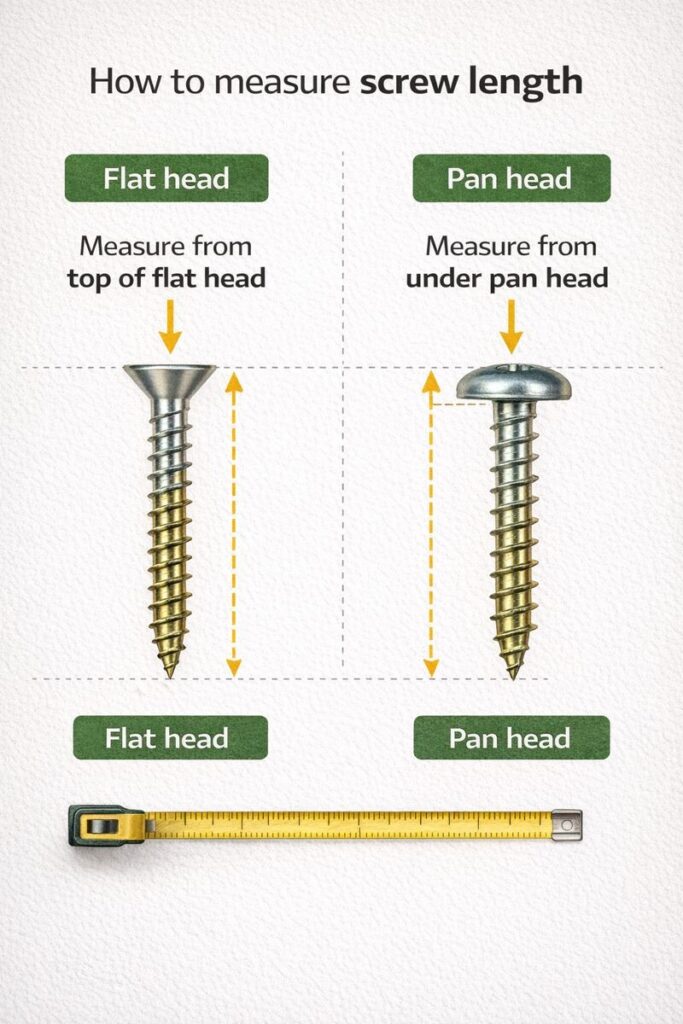
- Identify the head style
- Flat/countersunk head
- Pan/round/washer head
- Measure the length
- Flat/countersunk head: measure from the top of the head to the tip
- Pan/round/washer head: measure from under the head to the tip
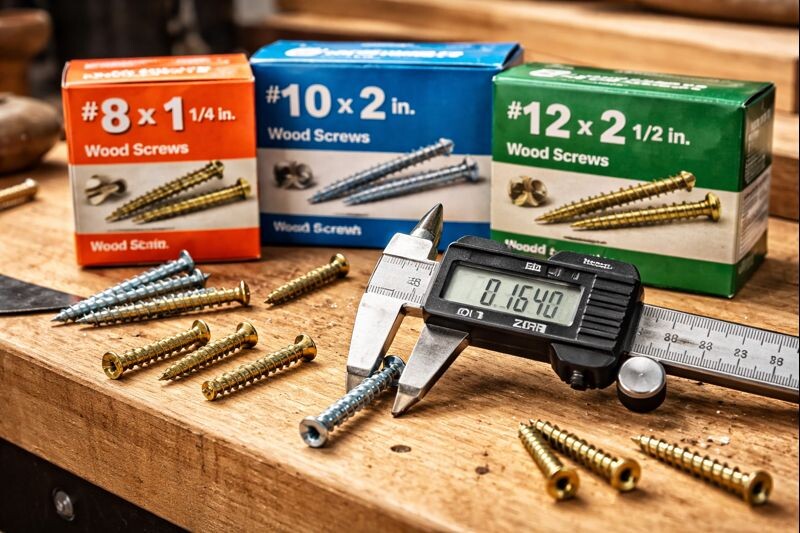
- Measure the diameter
- Use calipers across the outside of the threads (major diameter)
- No calipers? Compare the shank to known drill bit sizes as a rough check
- Check the thread type
- Wood screws: deeper, more aggressive threads
- Machine screws: finer threads, often labeled with TPI like 8-32
If the box is gone, you can still identify a screw in under a minute.
Step 1: Measure the diameter (this tells you #8 vs #10)
Use calipers if you have them. Measure across the outer threads.
- ~0.164″ → #8
- ~0.190″ → #10
- ~0.216″ → #12
No calipers? A drill bit set can act as a rough gauge in a pinch, but calipers are the clean answer.
Step 2: Measure the length (this is where people mess up)
- Flat/countersunk head: measure from the top of the head to the tip (because the head sinks flush).
- Round/pan head: measure from under the head to the tip.
Step 3: If it’s a machine screw, measure thread count
If the screw is labeled like #8-32, the “32” is threads per inch.
A thread gauge makes this easy, but you can also hold it up to a ruler and count threads in one inch.
How to measure wood screws (the woodworking way)
Wood screws add one extra wrinkle: many have an unthreaded shank near the head, especially traditional styles. That affects grip and clamping.
Here’s the method I actually use when I’m fitting screws to a wood joint:
- Confirm major diameter (choose #8/#10/#12).
- Measure full length, then check how much thread is actually doing the biting.
- Decide whether you need:
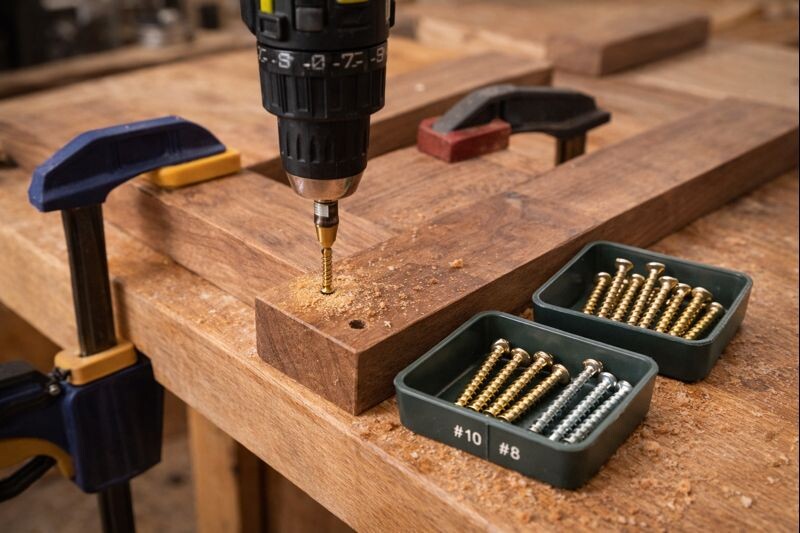
- a pilot hole (almost always), and
- a clearance hole in the top board (common with larger screws or hardwood) so the top piece pulls tight.
If you’re getting squeaks, gaps, or joints that won’t pull together, it’s often because the top board wasn’t given enough clearance.
And if a screw starts spinning but won’t tighten, that’s usually a pilot hole that was too large or fibers that gave up. This is where fixing loose screws in wood saves a project.
If you’re maintaining tools for this kind of measurement work, a clean caliper and a sharp set of bits matter more than people think. My routine in tool maintenance for woodworking newbies keeps measuring and drilling consistent.
How to measure wood screws
Wood screws deserve one extra check: the shank and the root diameter. Wood screws can have:
- A threaded section
- A partial unthreaded shank (common on longer screws)
That unthreaded shank helps pull two boards tight, which is great for tray rims and base blocks.
Step-by-step: measuring wood screws accurately
- Measure length correctly (based on head style)
- Flat head: top of head to tip
- Other heads: underside of head to tip
- Measure major diameter
- Calipers across thread peaks
- Estimate pilot hole needs
- Softwood (pine): smaller pilot hole
- Hardwood (oak/maple/walnut): larger pilot hole
- Match the screw to the job
- Thin trim pieces: #6 or #8
- Base and structural blocks: #8 or #10
- Oversized builds: #10 or #12 (with careful pilot holes)
If screws keep loosening over time, that’s usually wood movement or insufficient bite. The quick fixes in fixing loose screws in wood are worth keeping bookmarked.
Wood screw sizes chart
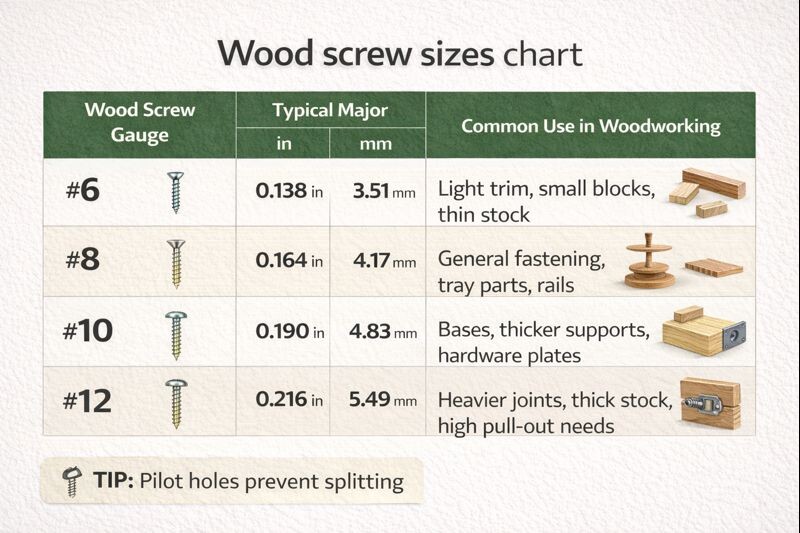
Here’s a practical wood screw sizes chart for the sizes people ask about most. The diameters below are the major diameter (outside thread).
| Screw gauge | Major diameter (in) | Major diameter (mm) | Nearest fractional (approx.) |
|---|---|---|---|
| #6 | 0.138″ | 3.5 mm | ~9/64″ |
| #8 | 0.164″ | 4.2 mm | ~5/32″ |
| #10 | 0.190″ | 4.8 mm | ~3/16″ |
| #12 | 0.216″ | 5.5 mm | ~7/32″ |
| #14 | 0.242″ | 6.1 mm | ~1/4″ |
A quick reality check: the “nearest fraction” is just a helpful mental anchor. If you’re drilling pilots, you’ll choose bit sizes based on wood type and whether you want a snug or forgiving fit.
Wood screw dimensions
Wood screw dimensions aren’t just gauge and length. For clean joinery, pay attention to these parts:
- Head diameter: affects countersink size and how the screw seats
- Head style: flat for flush mounting, washer head for extra clamping
- Shank diameter: the smooth section (if present) that helps clamp boards together
- Root diameter: the inner diameter between threads (important for pilot sizing)
- Thread length: full thread vs partial thread changes how boards pull tight
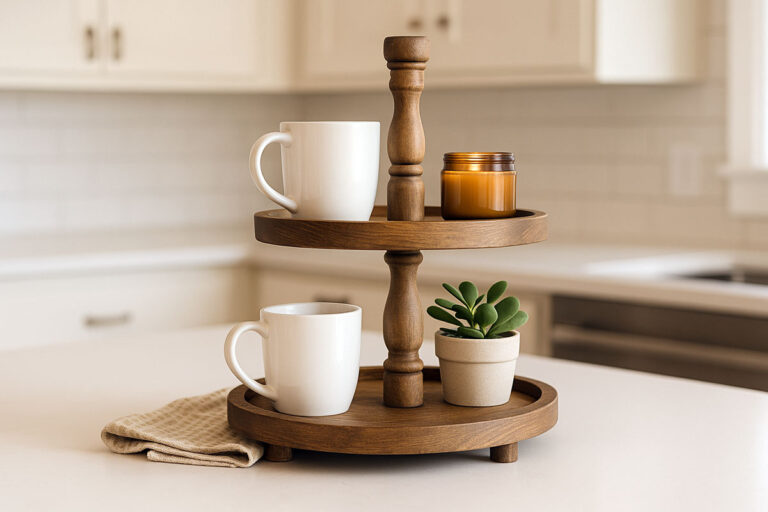
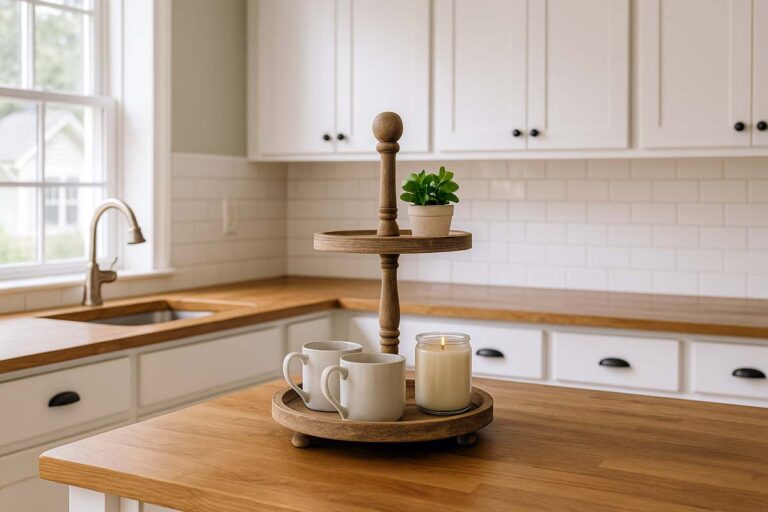
For tray stands, partial-thread wood screws are handy when fastening a tray bottom into a rim or cleat. They pull parts together instead of “jacking” the top board away.
If you’re building from scratch, my walkthrough on making a tiered tray stand shows where different fastener choices actually matter in the assembly.
Putting screw numbers into real tray stand decisions
Screw selection gets easier when you think in failure modes.
Benefits of choosing the right screw size
- Less splitting at edges and corners
- Better clamp-up between parts
- Stronger pull-out resistance
- Cleaner finished look (less patching and filling)
Drawbacks of oversizing or undersizing
- Too small: loosening, wobble, stripped holes
- Too large: splitting, ugly countersinks, weak thin stock
- Wrong length: tip pokes through, or not enough bite
A practical pairing that works well in many tiered tray stands:
- #8 x 1-1/4 in. for tray parts and cleats
- #10 x 1-1/2 in. for thicker base blocks or heavier joints
If a screw strips during assembly, removal matters. The step-by-step in removing a stripped screw from wood and getting a broken screw out of wood can save a project fast.
FAQs
Can a #8 screw replace a #10 screw in wood projects?
Sometimes, yes, but only if the joint isn’t heavily loaded and the wood has enough thickness. A #10 offers more pull-out resistance. If a tray stand base feels flexible, stepping up to #10 is usually safer.
Are screw gauge numbers the same for all screw types?
No. Gauge numbering is common for wood and sheet-metal style screws, but machine screws often use a different labeling style that includes threads-per-inch (like 8-32). Always read the full box label before matching replacements.
What’s the easiest way to measure screw diameter without calipers?
Use a drill bit set as a reference. Compare the screw’s major diameter to bit shanks until you find the closest match, then convert that bit size to inches or millimeters. It’s not perfect, but it’s practical.
What screw size works best for most tiered tray stand assemblies?
For many typical tray stand builds, #8 screws in 1 to 1-1/2 inch lengths cover most fastening jobs cleanly. Use #10 when the base is thick, the joint carries more load, or hardware plates need extra holding power.
Where should screw length be measured from on a flat-head wood screw?
Measure from the very top of the flat/countersunk head down to the tip. Flat-head screws are designed to sit flush after countersinking, so the head is counted as part of the functional length in most sizing systems.
Final thoughts
Screw numbers look confusing until you connect them to diameter and length. After that, it becomes a simple match game: wood thickness, load, and edge distance decide the gauge, then length follows. For tray stands, #8 handles most work cleanly, while #10 earns its spot in bases and heavier joints. Measure twice, drill the right pilot, and the build stays tight for years.