Is wood glue stainable? 5 Fast Tests to Spot Glue Before You Stain
Wood glue isn’t stainable in practice—once it dries on the surface, it seals the wood and leaves lighter patches because stain can’t soak in. Not in any useful way, and that’s why those pale “mystery patches” show up the moment stain hits your project. The good news is you can prevent it almost every time, and you can usually fix it without stripping the whole piece.
Contents Here
- 1 Is wood glue stainable? The straight answer
- 2 Why stain won’t “take” where glue touched
- 3 Which glues are more “stain-friendly” (and which aren’t)
- 4 Prevention that works every time when you do it on purpose
- 5 How to check for hidden glue before you stain
- 6 If you already stained and you see glue blotches
- 7 Best workflow for stained projects so glue doesn’t fight you
- 8 FAQs on is wood glue stainable
- 8.1 Is wood glue stainable once it’s fully cured?
- 8.2 Can you stain over yellow glue residue if you sand it smooth?
- 8.3 Can you stain over Gorilla Wood Glue or other polyurethane glues?
- 8.4 What’s the best way to remove squeeze-out before staining?
- 8.5 How do you find dried glue before applying stain or clear finish?
- 8.6 Can you tint glue with stain or dye so it matches?
- 9 Conclusion
Is wood glue stainable? The straight answer
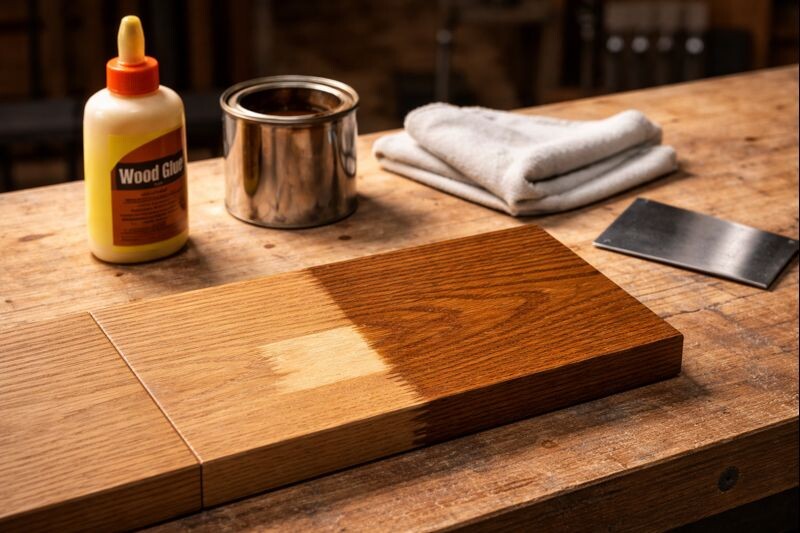
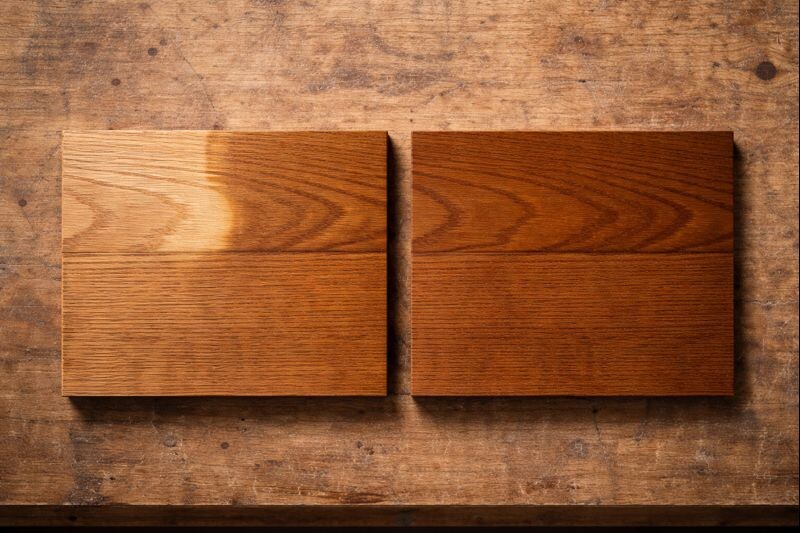
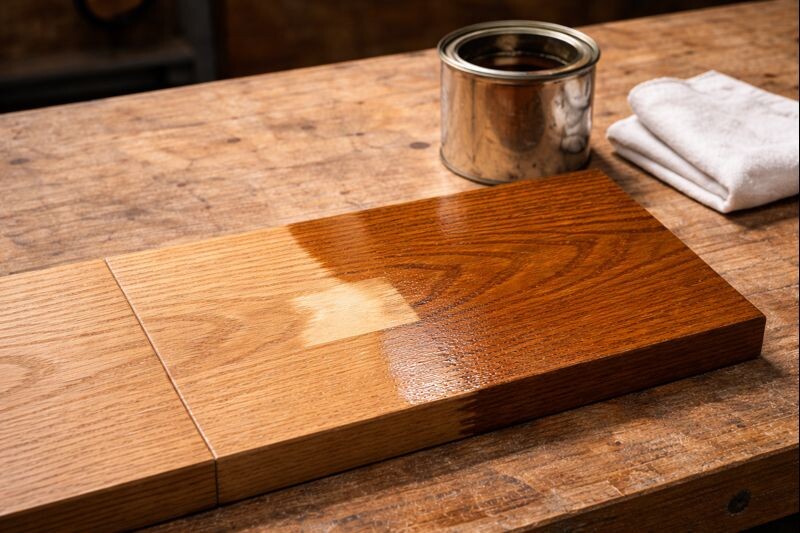
Most common woodworking glues don’t stain like wood because they aren’t wood. Stain needs open fibers to soak into, and dried adhesive is basically a sealed film. If glue is only inside the joint line, you often won’t notice it. If glue smeared onto the surface or into the grain, the stain can’t sink in there, so it stays lighter.
That “lighter halo” isn’t the glue “rejecting” stain out of spite. It’s just blocking the path that stain uses to color wood.
If you want a quick refresher on what typical yellow glue actually is and why it behaves this way, read what PVA glue is made from and how it works in joints.
Also see: Is Wood Glue Food Safe? 9 Quick Fixes for Cleaner Glue Lines
Why stain won’t “take” where glue touched
Stain needs open pores; glue blocks them
Oil stain, water-based stain, dye—doesn’t matter much here. They all need access to wood structure. Glue fills pores and coats fibers, so the stain has nothing to grab. The worst part is glue contamination can be nearly invisible until stain makes it obvious.
You can sand the wood smooth and still miss it. A thin glue smear can sit down in the grain and look like plain wood in dry light. Then you wipe stain, and it pops out like a bad tan line.
End grain and cross-grain joints make it worse
End grain acts like a bundle of straws, and it soaks up liquids fast. That means glue that gets into end grain can go deeper than you expect. Cross-grain joints—like rails meeting stiles or aprons meeting legs—are also tricky because sanding “just a little more” can dish the surface and ruin crisp edges.
If you want a cleaner approach for end grain before you ever reach for stain, this walkthrough on sanding end grain to a glassy, even surface helps a lot.
Which glues are more “stain-friendly” (and which aren’t)
Yellow/white PVA and aliphatic resin glue
This is the standard yellow or white bottle glue most of us use. It sands fairly well, cleans with water while wet, and bonds wood fibers strongly when clamped right. It still causes stain problems any time it’s left on the surface.
The real takeaway is simple: PVA can be great glue, but it’s a poor “stain partner.”
If you’re comparing brands, one helpful detail is clarity after cure. Here’s a quick read on whether certain popular glue formulas dry clear or stay cloudy so you know what you’re dealing with on lighter woods.
Polyurethane glue and epoxy
Polyurethane glue foams and expands, which can push into pores and leave stubborn residue. Epoxy is even less forgiving if it gets smeared on show surfaces. Both are non-porous once cured, so stain won’t blend through them at all.
If you use either, treat cleanup like part of the glue-up, not an afterthought.
Hide glue and other niche options
Traditional hide glue has a long history and some nice properties for certain builds. Even then, if you smear it on the surface and let it cure, it still blocks stain. Different glue, same basic problem: contamination on the face of the wood.
Prevention that works every time when you do it on purpose
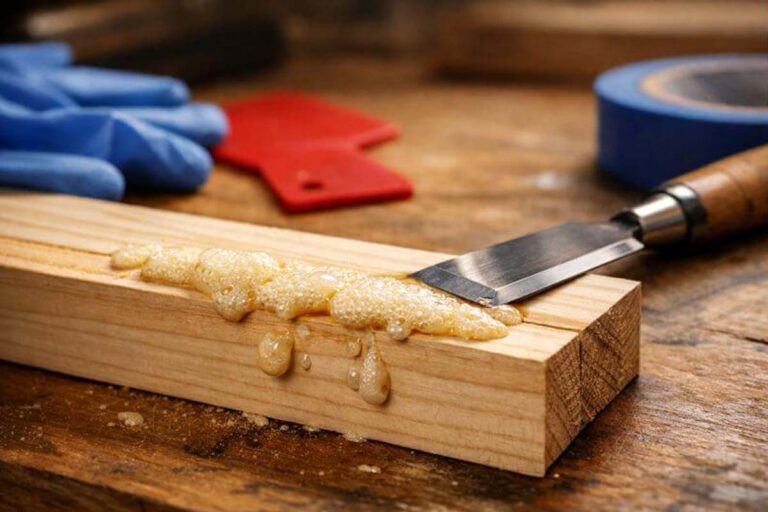
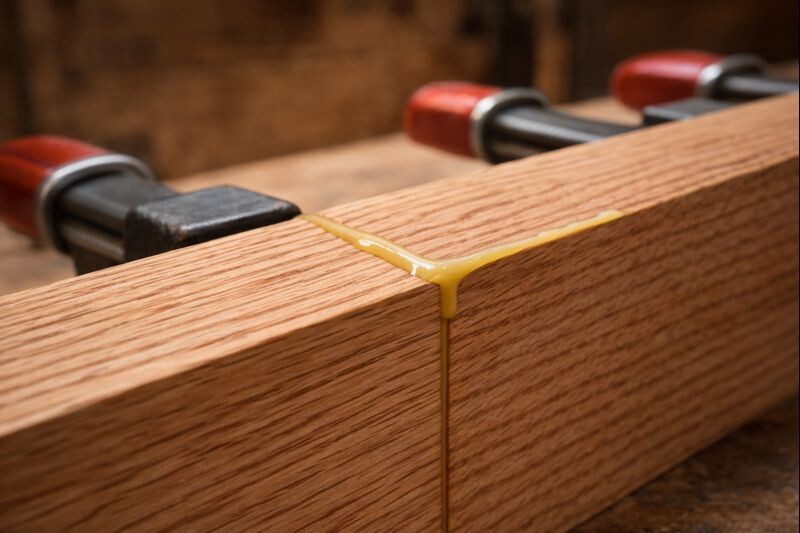
Use less glue and give squeeze-out somewhere to go
Most glue blotches start with too much glue. You want full coverage, not a flood. A thin, even layer on both mating surfaces is usually plenty. On joinery like mortises or dowel holes, tiny relief space helps excess glue stay inside instead of squeezing onto the show face.
A couple habits that keep things clean:
- Brush or spread glue instead of dumping it straight from the bottle.
- Stop when the surface looks “wet” with glue, not when it’s dripping.
- Dry-clamp once before gluing, so you’re not wrestling during squeeze-out.
Don’t wipe wet glue into the grain
This is the mistake I see most often. A wet rag feels right, but it can push diluted glue into the surrounding pores. Then you’ve basically sized the wood like a sealer, right where you want stain to penetrate.
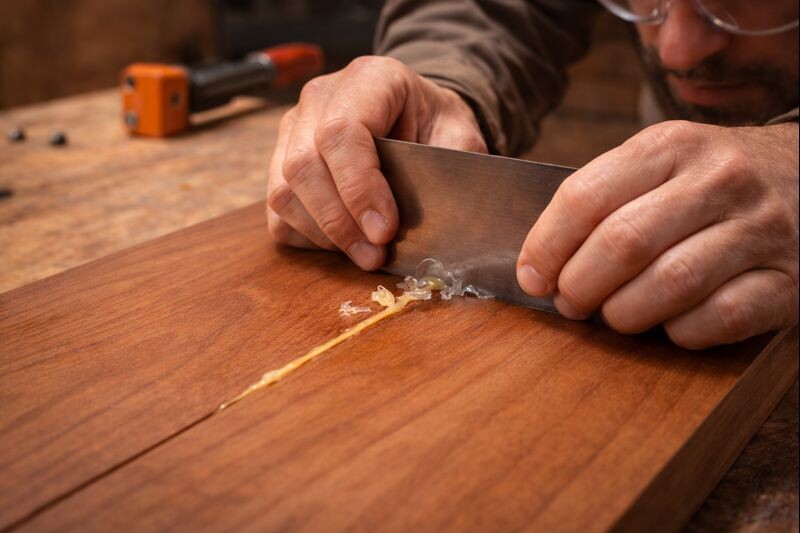
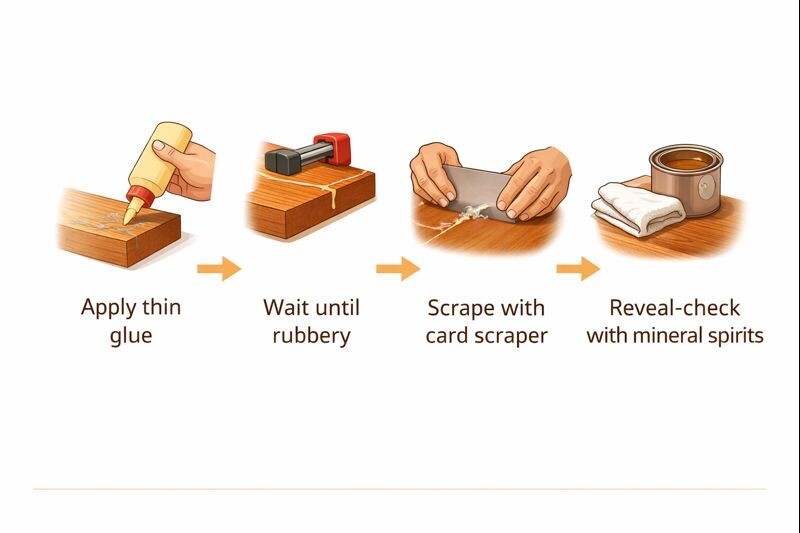
A better method is timing. Let squeeze-out sit until it turns rubbery, then lift it off.
The cleanup timing that saves your finish
Here’s the shop routine that keeps stain jobs predictable:
- Wait 5–20 minutes after clamping, depending on glue and temperature.
- Check the bead of squeeze-out. If it’s tacky and gels, you’re ready.
- Peel or scrape the bead off with a putty knife or a card scraper.
- Lightly sand only after the glue is fully cured and the surface is clean.
If you’re unsure when sanding is actually safe (and when it just smears semi-cured glue), this guide on how long to wait before sanding glued assemblies clears up the timing.
Before stain touches your project, do a “reveal wipe.” This is the fastest way to catch glue you can’t see dry.
Two common reveal options:
- Water: Darkens bare wood and raises grain slightly.
- Mineral spirits: Darkens bare wood without raising grain much.
Wipe a light coat over joints and nearby areas. Bare wood darkens evenly. Glue contamination usually stays lighter or shows a weird cloudy patch.
If you find a spot, scrape first, then sand. Don’t jump straight to sanding, because sanding can heat and spread glue into the grain.
Safety note: Mineral spirits needs ventilation, and keep it away from sparks. Let the surface fully flash off before applying any finish.
If you already stained and you see glue blotches
This is where folks panic and start stripping everything. Most of the time, you don’t need to.
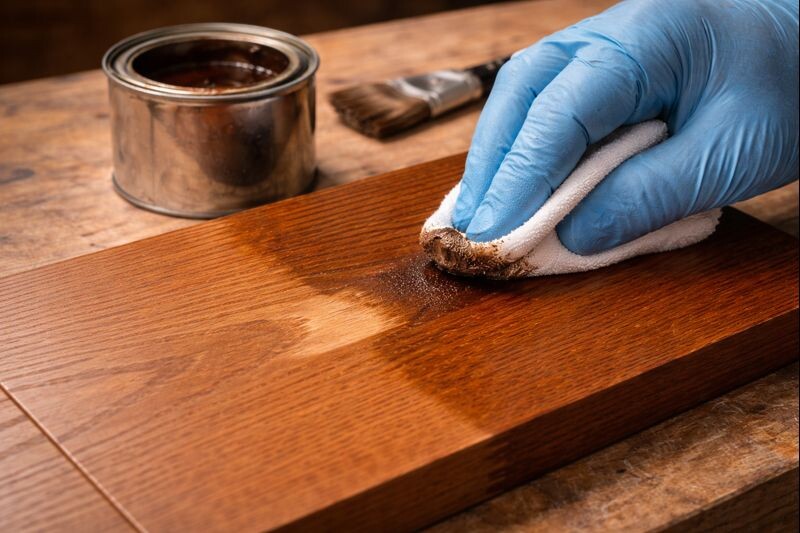
Spot repair: scrape or sand back, then re-stain
If the stain has clearly failed in one area, you need to remove the contamination, not just add more stain. Stain isn’t paint. It won’t hide a sealed spot by itself.
A practical repair approach:
- Let the stain dry completely, so you don’t gum up the paper.
- Use a sharp scraper first to remove finish and contamination.
- Sand the area just enough to match the surrounding scratch pattern.
- Feather the edges, then reapply stain in light coats.
You’re aiming for a blended transition, not a sharp “patch” outline.
Gel stain as the “blending” option
Gel stain sits closer to the surface, so it can help even out color where penetration-based stain failed. It won’t fix thick glue ridges, and it won’t match perfectly if the wood is wildly different underneath. But for small halos or slightly sealed areas, gel stain can bring the color closer.
If blotching is a bigger theme in your project—pine is famous for it—this article on keeping pine from turning blotchy under stain pairs well with gel-stain blending.
Disguise after a sealer or finish coat
This is the “advanced” fix when you’re close but not perfect. After sealing, you can adjust color with a glaze, tinted finish, or careful touch-up work, then lock it in with another coat. Done well, it’s invisible. Done heavy, it looks muddy.
If your project is walnut or another dark hardwood, finishing steps matter even more. Here’s a solid reference for finishing walnut so the surface stays even and rich.
Best workflow for stained projects so glue doesn’t fight you
There are two clean paths, depending on the build.
Option 1: Assemble first, then stain
This is common for furniture frames and anything with lots of joinery. If you go this route, your entire success depends on squeeze-out control and reveal checks. Keep scrapers ready, keep rags clean, and don’t “wash” glue into the grain.
Option 2: Stain parts before assembly
This works well for trim pieces, panels, and some tray builds. The rule is non-negotiable: don’t stain where glue must bond. Mask glue areas or leave them bare. If stain gets onto the glue surface, the joint can weaken.
For repairs and structural builds, glue choice matters too. If you’re selecting adhesive for a piece that may see stress, humidity, or movement, this guide on picking the right repair adhesive for furniture joints is worth a look.

FAQs on is wood glue stainable
Is wood glue stainable once it’s fully cured?
Dried glue on the surface typically won’t absorb stain. It acts like a sealed patch, so the stain can’t penetrate. You’ll usually see a lighter area around joints unless the glue is removed completely.
Can you stain over yellow glue residue if you sand it smooth?
Sometimes it looks smooth and still fails under stain. A thin smear can hide in the grain, especially on open-pored woods. Do a reveal wipe to confirm the area darkens evenly before staining.
Can you stain over Gorilla Wood Glue or other polyurethane glues?
Polyurethane glue is even less stain-friendly than PVA when it smears on the surface. It cures non-porous and can foam into grain. Scrape and clean it off before sanding and staining.
What’s the best way to remove squeeze-out before staining?
Let it gel until rubbery, then scrape or peel it clean. Avoid wiping wet glue with a damp rag, because it can push glue into pores and cause bigger stain problems later.
How do you find dried glue before applying stain or clear finish?
Wipe water or mineral spirits over the surface. Bare wood darkens evenly, while glue spots often stay lighter. Mark those areas, scrape first, then sand and re-check.
Can you tint glue with stain or dye so it matches?
You can add pigment or dye in some cases, but it’s unreliable for matching and can affect bond strength. It’s better to keep glue off the surface and treat glue lines as joinery, not coloration.
Conclusion
Glue itself doesn’t stain in a helpful way, so the real goal is keeping glue off the show surface. Use less glue, let squeeze-out gel before scraping, and always do a reveal wipe before staining. If you already have pale spots, scrape first, blend carefully, and use gel stain when penetration fails.