How to Remove Wood Glue From Wood: 9 Fast, Safe Fixes
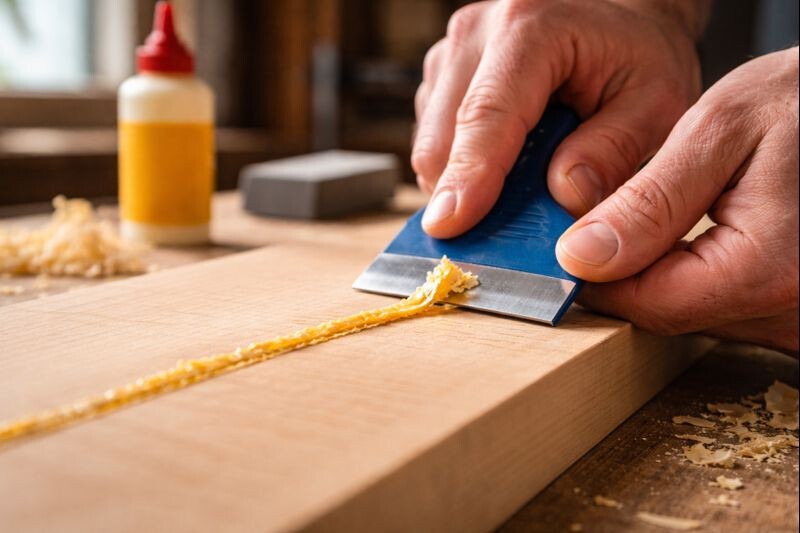
Remove wood glue from wood by scraping off the bulk (plastic scraper on finished surfaces, sharp scraper/chisel on bare wood), then wiping any residue with a finish-safe cleaner and lightly sanding only if the wood is unfinished.
Finished wood needs gentler steps, so you don’t scar the sheen. I’ll walk you through wet glue, dried glue, and stubborn residue without guesswork.
If you’re unsure whether your glue is fully set yet, check this guide on how long to wait before sanding a glued joint. It saves a lot of torn fibers.
Contents Here
- 1 Why wood glue is hard to remove and why stain shows every mistake
- 2 Figure out what you’re dealing with before you start
- 3 Tools and supplies that actually help
- 4 If the glue is wet or rubbery, clean it now
- 5 Removing dried wood glue from unfinished wood
- 6 Removing wood glue from finished wood without damaging the topcoat
- 7 Household options and when they’re worth trying
- 8 Commercial glue removers
- 9 After the glue is gone, restore the surface
- 10 Mistakes to avoid and basic safety
- 11 Prevention tips that save you time every build
- 12 FAQs on Remove Wood Glue From Wood
- 13 Last Words
Why wood glue is hard to remove and why stain shows every mistake
Most common wood glues cure into a thin plastic film. That film seals the pores and blocks stain absorption. You might not notice it until finishing day. Then you get pale patches, shiny streaks, or a dull “ghost line” along the joint.
In my shop, I treat glue removal like surface prep. If the surface is right, the finish behaves.
Figure out what you’re dealing with before you start
Before you reach for sandpaper or solvents, identify two things: the glue type and the wood surface. This keeps you from sanding through veneer or melting a finish.
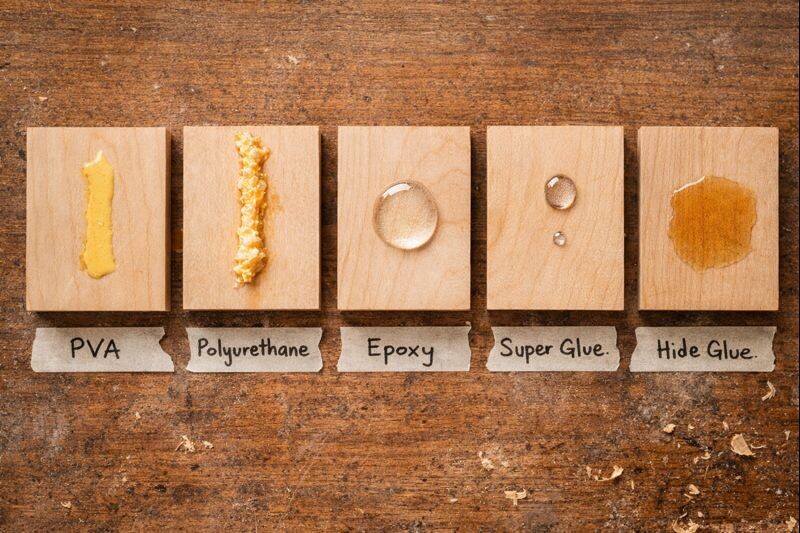
Quick glue ID cheat sheet
- PVA (yellow/white carpenter’s glue): dries amber or cloudy, chips off in flakes.
- Polyurethane glue (foaming types): expands, turns tan, feels hard and bubbly.
- Epoxy: looks glassy, very hard, often slightly raised.
- CA (super glue): glossy, brittle, sometimes whitish around the edges.
- Hide glue: older furniture clue, responds well to warmth and moisture.
If you’re choosing adhesives for a repair after cleanup, I keep a short list here: picking the right glue for furniture fixes.
Finished wood or bare wood
- Bare wood is forgiving, because you can sand to fresh fibers.
- Finished wood is touchy, because the finish is the fragile layer.
If you can feel a smooth topcoat and see reflected light, treat it as finished.
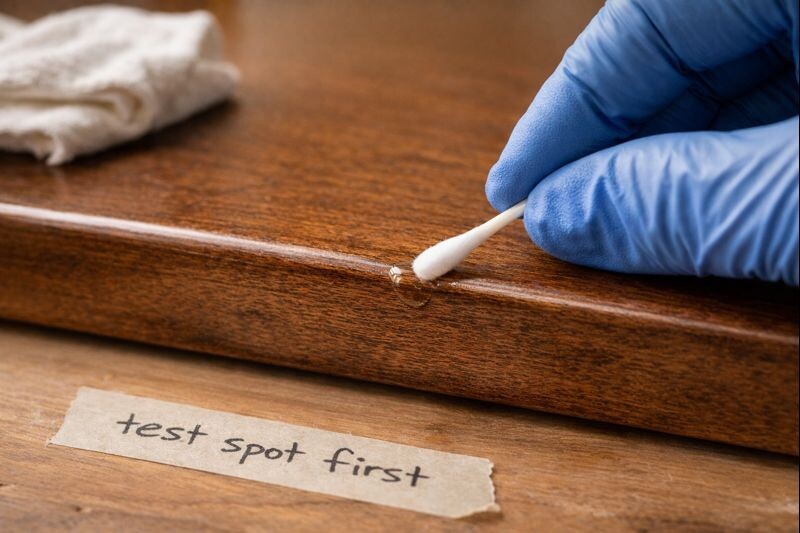
Always do a test spot
Test every chemical and heat method in a hidden area. Use the underside, inside edge, or back face. You’re checking for hazing, softening, or color shift. One tiny test beats a full refinish.
Tools and supplies that actually help
You don’t need a fancy kit, but you do need control.
- Plastic scraper or old gift card
- Sharp chisel or card scraper (for bare wood)
- Sandpaper and a sanding block
- Clean rags and cotton swabs
- Warm water (PVA), white vinegar (mild softening)
- Mineral spirits (residue cleanup on many finishes)
- Acetone (high risk, finish-dependent)
- Gloves and good ventilation
If the glue is wet or rubbery, clean it now
Fresh glue is the easiest glue you’ll ever remove. The trick is to lift it, not smear it.
- Scoop the squeeze-out with a dry rag or scraper edge.
- Dab remaining glue, don’t wipe hard across the grain.
- For PVA, use a slightly damp rag with warm water.
- Dry the area right away with a clean cloth.
If you’re clamping a project and wondering when it’s safe to unclamp, this helps: when clamps can come off without weakening the joint.
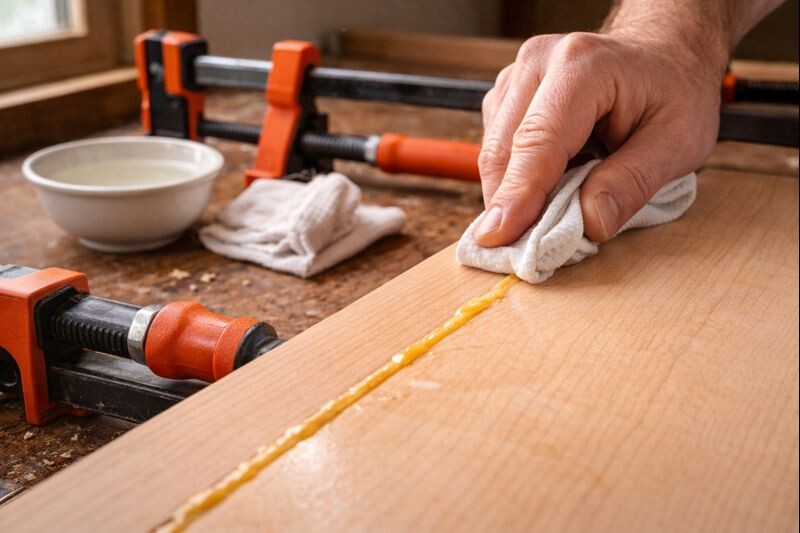
Removing dried wood glue from unfinished wood
On bare wood, your goal is simple. Remove the glue and the glue-soaked fibers under it. That’s what makes stain behave evenly later.
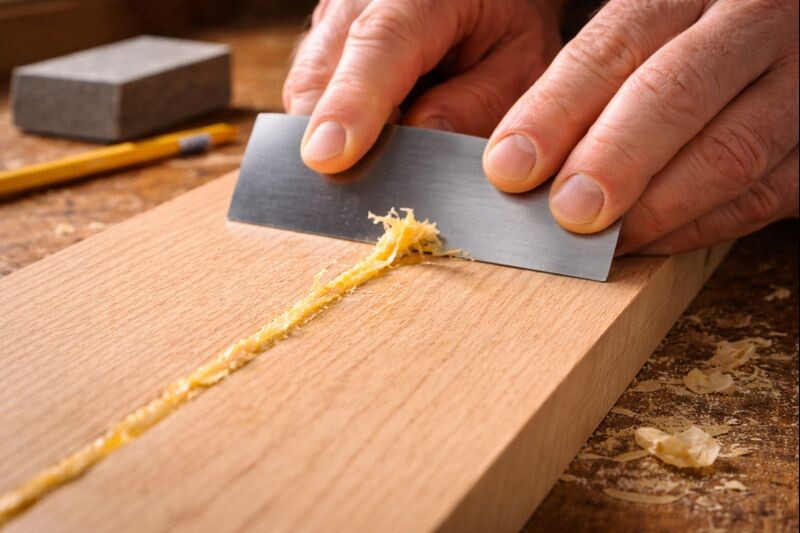
Step 1: Scrape the bulk off first
Start with a sharp card scraper or chisel. Keep the angle low and work with the grain. Take thin shavings, not chunks. If you dig in, you’ll spend the next hour sanding out a trench.
Tip: A plastic scraper works too, just slower. It’s safer if you’re new.
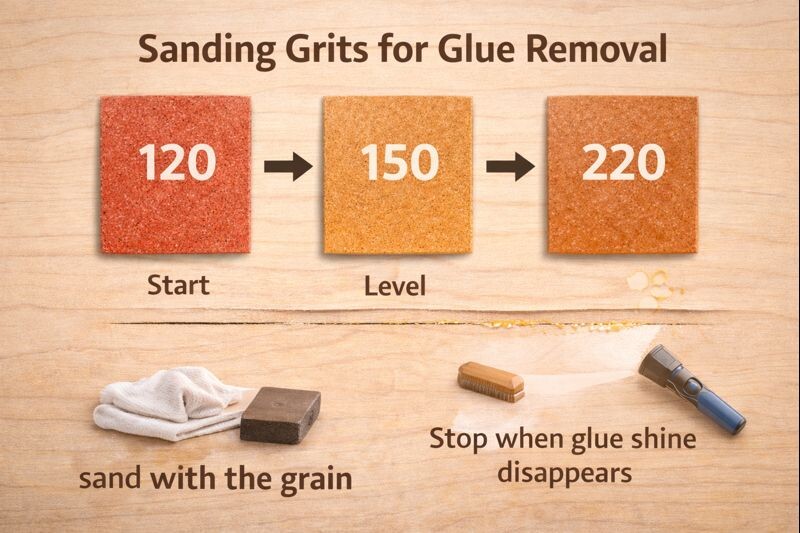
Step 2: Sand with a plan, not with panic
Once the glue is mostly gone, sand to erase the last film.
- Start with a medium grit to level the area.
- Finish with a finer grit to remove scratches.
- Stop once the surface looks evenly dull under raking light.
Don’t rush this stage. The “shiny glue glare” is the giveaway. If you still see it, stain will too.
If end grain is part of your glue cleanup, it can sand differently. This guide helps keep it even: sanding end grain until it feels truly smooth.
Removing wood glue from finished wood without damaging the topcoat
Finished surfaces need patience. The safest order is: soften, lift, then clean residue. Avoid aggressive sanding unless you’re ready to refinish that whole panel.
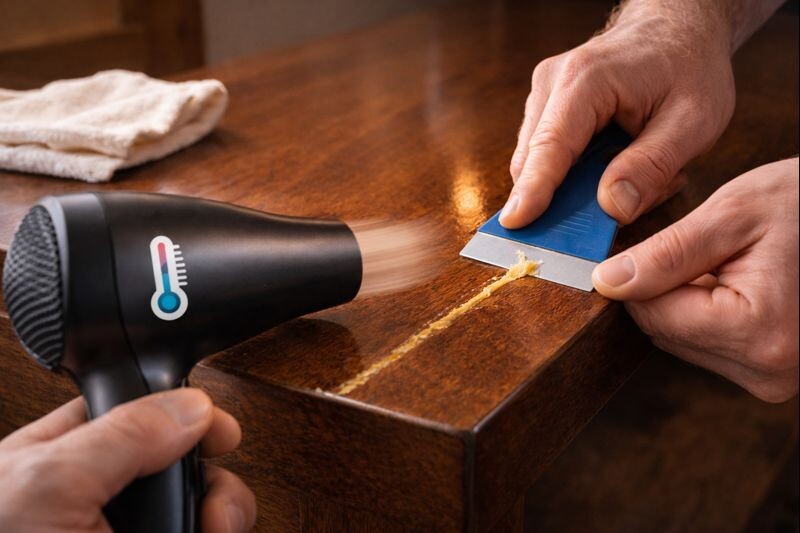
Method 1: Warm it gently and lift
A hair dryer often does enough. Use low to medium heat and keep it moving.
- Warm the glue for 20–40 seconds.
- Test it with a fingernail or plastic scraper.
- Lift from the edge, using light pressure.
Don’t park a heat gun in one spot. Finishes can bubble, especially on older pieces.
Method 2: Mild softening for PVA with vinegar
For dried carpenter’s glue on a finish, white vinegar can help.
- Dampen a rag or swab, don’t soak it.
- Hold it on the glue briefly.
- Lift with a plastic scraper and wipe clean.
Work in small passes. You’re trying to loosen the glue, not flood the wood.
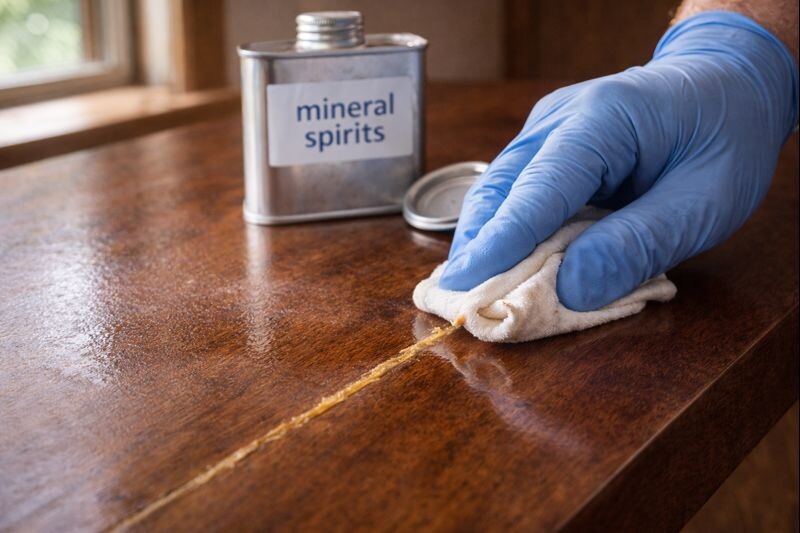
Method 3: Mineral spirits for smears and residue
Mineral spirits won’t dissolve cured PVA, but it does clean sticky grime and haze. It’s also useful after scraping, when the surface feels slightly tacky.
Put it on the cloth, not the wood. Wipe, then buff dry with a clean rag.
Method 4: Acetone, only when the glue demands it
Acetone can help with super glue and some stubborn adhesive spots. It can also wreck certain finishes fast. That’s why the test spot matters.
- Use a cotton swab with a tiny amount.
- Touch the glue, wait a few seconds, then wipe.
- Stop immediately if the finish turns dull or sticky.
If the surface is painted and you’re trying to preserve a clean look, you may want this after you’re done: getting a smooth painted finish without brush marks.
Household options and when they’re worth trying
Some home methods can help with light glue residue, especially on durable finishes.
- Warm water: best for fresh PVA, not cured glue.
- Vinegar: mild softener for some PVA films.
- Oil or petroleum jelly: can soften certain sticky residues, but leaves cleanup work.
- Baking soda paste: can add gentle abrasion, but can scratch gloss finishes.
Use these for small spots, not for thick glue ridges. Thick glue needs scraping first.
Commercial glue removers
Commercial removers can work well, but only if you follow the label. Many are designed for adhesive residue, not cured wood glue. They can also soften finishes if left too long.
Here’s the safe way to use them:
- Test spot first.
- Apply sparingly, control the dwell time.
- Lift gently and wipe completely clean.
If the remover leaves an oily feel, clean again before recoating.
After the glue is gone, restore the surface
Glue removal is only half the job. You want the surface ready for whatever comes next.
- Bare wood: final sanding, then dust removal before stain or finish.
- Finished wood: wipe away all solvent residue, then evaluate sheen.
If you dulled a patch, a light recoat may be needed to blend.
If you’re finishing walnut after a cleanup like this, here’s a solid approach: a practical way to finish walnut without muddying the grain.
For projects that need a tougher topcoat, read this before serving trays and kitchen pieces: when cured polyurethane is considered food-safe.
Mistakes to avoid and basic safety
Most damage happens from overconfidence, not from glue.
- Don’t attack finished wood with coarse sandpaper.
- Don’t use a metal scraper on a visible glossy surface.
- Don’t soak wood with water or solvents.
- Don’t overheat one spot with a heat gun.
- Ventilate when using mineral spirits, acetone, or removers.
Veneer deserves extra caution. It sands through fast and doesn’t forgive.

Prevention tips that save you time every build
The easiest glue cleanup is the one you never need.
- Mask glue lines with painter’s tape before clamping.
- Use just enough glue to wet the joint, not flood it.
- Remove squeeze-out when it turns rubbery, not rock hard.
- Keep a damp rag ready for PVA, then dry the surface.
If you’re trying to speed up a build schedule, be careful with shortcuts. This covers safe options: ways to help glue cure faster without weakening joints.
FAQs on Remove Wood Glue From Wood
What dissolves wood glue best?
Most cured PVA won’t truly dissolve. It softens with moisture and sometimes vinegar, then releases with scraping. Super glue responds to acetone, while epoxy usually needs mechanical removal. Polyurethane glue often scrapes best once fully cured.
Does vinegar remove dried wood glue?
It can help soften thin PVA films, especially on the surface. It won’t melt thick cured glue. Use it as a loosening step, then scrape gently and wipe clean.
Can I use nail polish remover on wood?
Many nail polish removers contain acetone, and acetone can damage finishes. Test in a hidden spot first. Apply to a cloth or swab, not directly to the wood.
How do I remove foamy polyurethane glue from wood?
Let it cure fully, then slice the foam off carefully with a sharp tool. On bare wood, sand lightly after scraping. On finished wood, keep tools plastic where possible to avoid scratches.
Last Words
The cleanest results come from a calm order of operations. Identify the glue and whether the wood is finished. Scrape first, then sand only on bare wood.
Use heat and mild cleaners on finished surfaces, and step up solvents carefully. When in doubt, test small and stop early.