How to Remove a Stripped Screw From Wood: 9 Safe Moves for Tight Spots
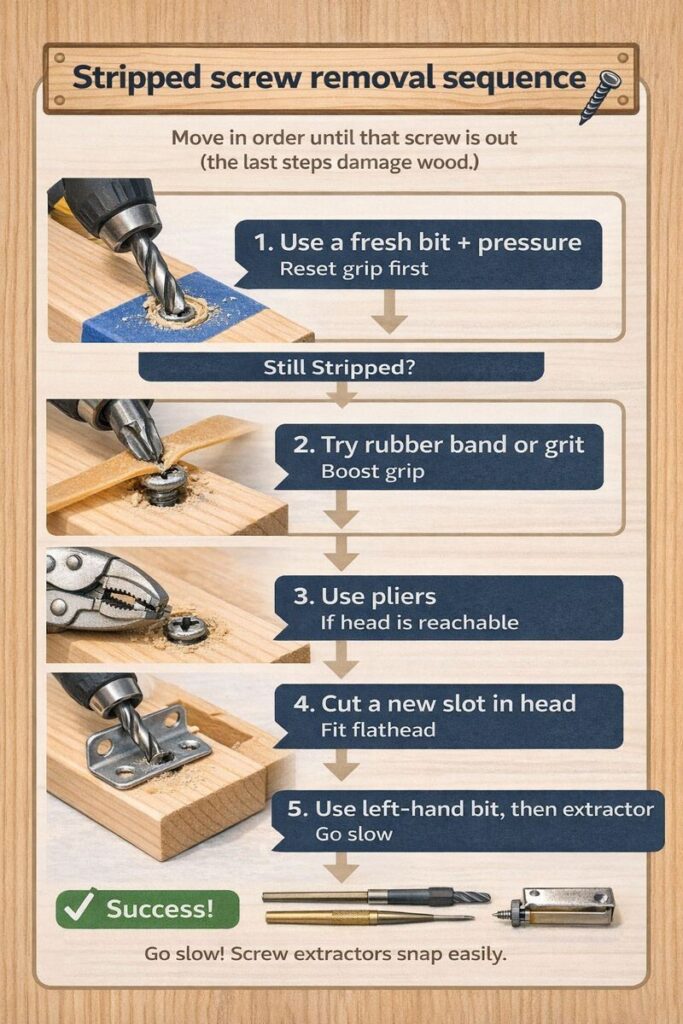
Remove a stripped screw from wood by starting with the least aggressive fix and stepping up only when the head is truly cooked. That approach saves the surface, keeps holes tight, and avoids snap-offs. In a tray stand build, one ruined screw can turn into a wobbly tier or a chewed-up top board. The good news is most stripped screws come out clean with the right sequence.
Contents Here
- 1 What “stripped” really means
- 2 Why screws strip in wood
- 3 Safety and setup that actually matters
- 4 Quick diagnosis: pick the right “level” of removal
- 5 Method 1: Reset the bite with the correct bit and pressure
- 6 Method 2: Add grip with a rubber band or abrasive
- 7 Method 3: Tap the bit into the head
- 8 Method 4: Use a manual impact driver for stubborn screws
- 9 Method 5: Grab the head with locking pliers
- 10 Method 6: Cut a new slot in the head
- 11 Method 7: Left-hand drill bit (often removes the screw by itself)
- 12 Method 8: Screw extractor (the classic, when used correctly)
- 13 Method 9: Drill the head off (the “guaranteed” method)
- 14 Repairing the hole after removal
- 15 A quick method guide table
- 16 Preventing stripped screws next time
- 17 Final thoughts
What “stripped” really means
A stripped screw usually fails in one of two places.
- The head strips (the bit can’t bite).
- The threads strip the wood (the screw spins but won’t back out).
This article focuses on the first problem, because that’s where most people panic and start tearing up the wood.
However, if the screw just spins in place and lifts a little, skip ahead to Repairing the hole. You’ll likely need a plug or filler after removal.
Why screws strip in wood
This usually happens because of a few predictable causes.
- The driver bit is the wrong size.
- The bit is worn, cheap, or rounded over.
- Too much speed and not enough downward pressure.
- No pilot hole, especially in hardwoods.
- The screw is binding from resin, paint, glue squeeze-out, or swelling.
If your screws strip often, tool condition is the first thing to fix. A quick tune-up routine helps more than people think, especially with driver tips and chucks (see my guide on simple tool care habits that prevent headaches).
Safety and setup that actually matters
Before trying removal tricks, set yourself up so the wood doesn’t get scarred.
- Clear the area so your drill doesn’t slip into the face of the board.
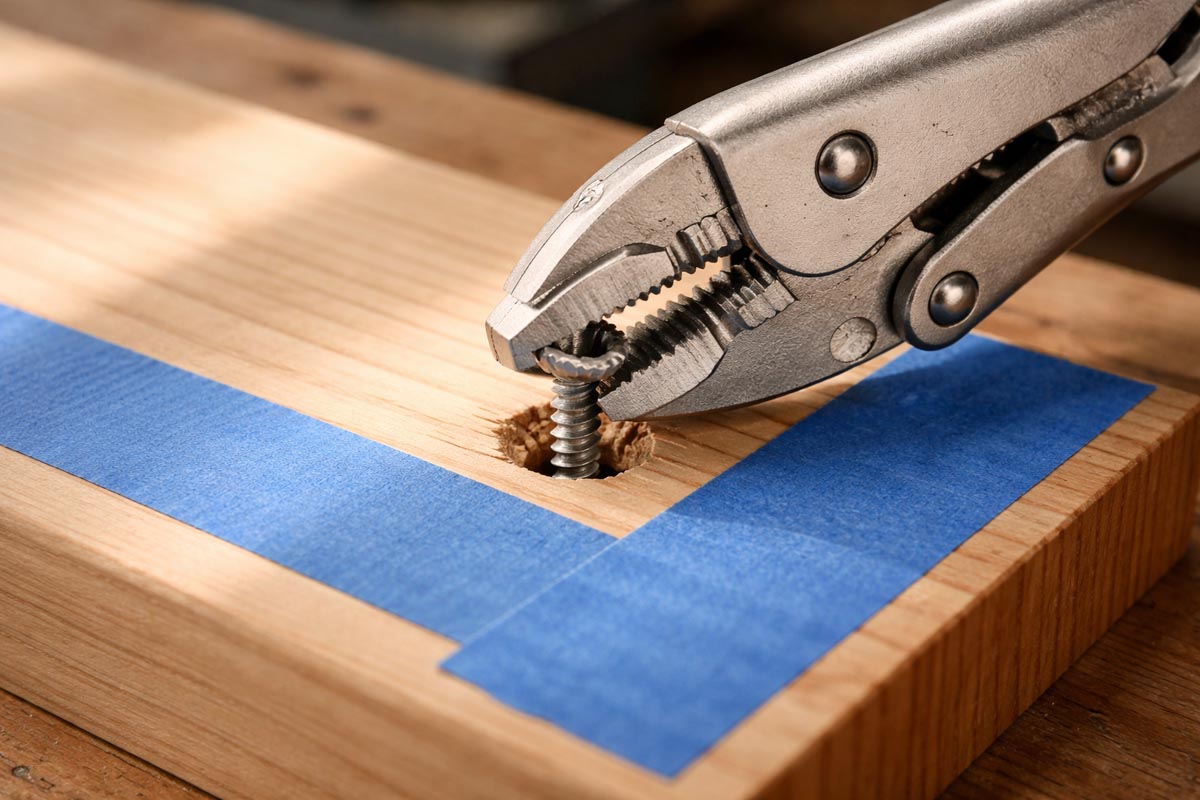
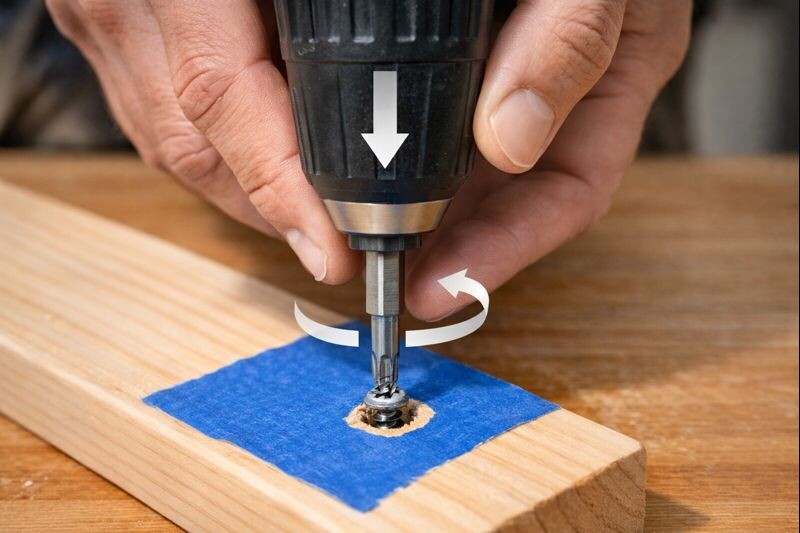
- If the surface is finished, tape around the screw with painter’s tape.
- Put on eye protection. Extractors and bits can snap.
- Clamp the piece if it can move.
If you’re building decor pieces like tiered tray stands, the parts are small and easy to twist in your hands. That’s where slips happen. Keep a clamp or bench hook in play (my checklist in essential safety gear for small wood builds lines up well with this kind of task).
Quick diagnosis: pick the right “level” of removal
Look at the screw head for 10 seconds and decide which lane you’re in.
Lane A: The head is slightly damaged: The bit still grabs a little. You can usually remove it with extra grip and better technique.
Lane B: The head is rounded out: The bit spins freely. Plan on a “grab” method or an extractor.
Lane C: The head is buried or countersunk: Pliers won’t reach. You’ll likely need an extractor or drill method.
Next, identify the head type.
- Phillips strips easily.
- Pozidriv looks like Phillips but has extra tick marks. Using Phillips in Pozidriv often strips it.
- Torx / star holds best, but can still strip with the wrong size bit.
Know more: How to Fix Loose Screws in Wood
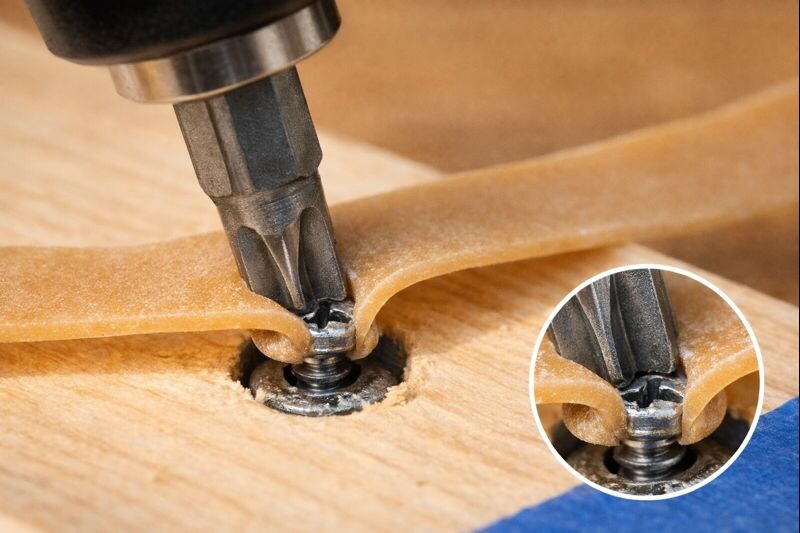
Method 1: Reset the bite with the correct bit and pressure
This sounds basic, but it’s the highest success move when the head isn’t fully rounded.
- Swap to a fresh, correct-size bit.
- Seat the bit fully into the head.
- Push straight down hard.
- Back the screw out slowly, with low drill speed.
Plus, switching to a hand screwdriver for the first “break loose” can help. A drill tends to cam out. Hands give you feel.
Method 2: Add grip with a rubber band or abrasive
If the bit is slipping but still sort of catching, add friction.
- Lay a wide rubber band over the screw head.
- Press the bit through the rubber band into the head.
- Back it out slowly.
No rubber band? Try a tiny pinch of fine abrasive like valve grinding compound, or even a little sanding dust. The goal is to stop the bit from skating.
Benefit: Minimal risk to the wood.
Drawback: Won’t help if the head is completely rounded.
Method 3: Tap the bit into the head
This is the “wake it up” move for slightly chewed Phillips heads.
- Place the correct bit in the head.
- Tap the back of the driver or bit holder with a hammer 2–3 times.
- Back the screw out with steady pressure.
Those taps can re-form the recess edges enough for one clean removal.
However, avoid this on delicate trim or brittle finishes. The shock can crack paint or dent soft pine.
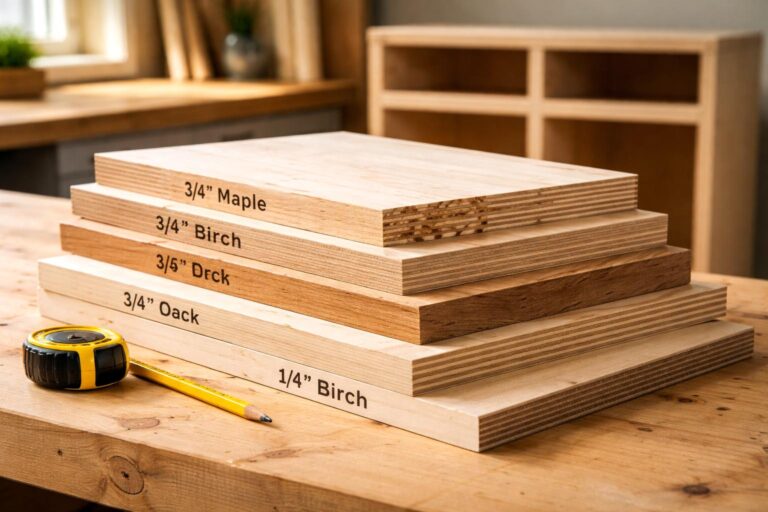
If you’re working with softwoods (common in rustic tray stands), it helps to understand how easily they bruise. The wood selection notes in choosing between pine, oak, and maple apply here too.
Method 4: Use a manual impact driver for stubborn screws
A manual impact driver is a heavy-duty tool that turns as you hit it.
- Fit the correct bit.
- Set the driver to “reverse.”
- Hold it straight and strike firmly with a hammer.
- Repeat until the screw breaks loose.
Benefit: Excellent for stuck screws without drilling.
Drawback: Needs space and solid support under the workpiece.
Method 5: Grab the head with locking pliers
If the screw head sits proud of the surface, this is fast.
- Clamp locking pliers tight on the screw head.
- Rock slightly left-right to break friction.
- Turn counterclockwise and remove.
Tape the jaws if you’re trying to keep the head pretty. In most builds, the screw is coming out because it’s already a problem, so cosmetics aren’t the priority.
Method 6: Cut a new slot in the head
This works well when the head is rounded but accessible.
- Use a Dremel with a cutoff wheel (or a small file).
- Cut a straight slot across the head.
- Use a wide flathead screwdriver to back it out.
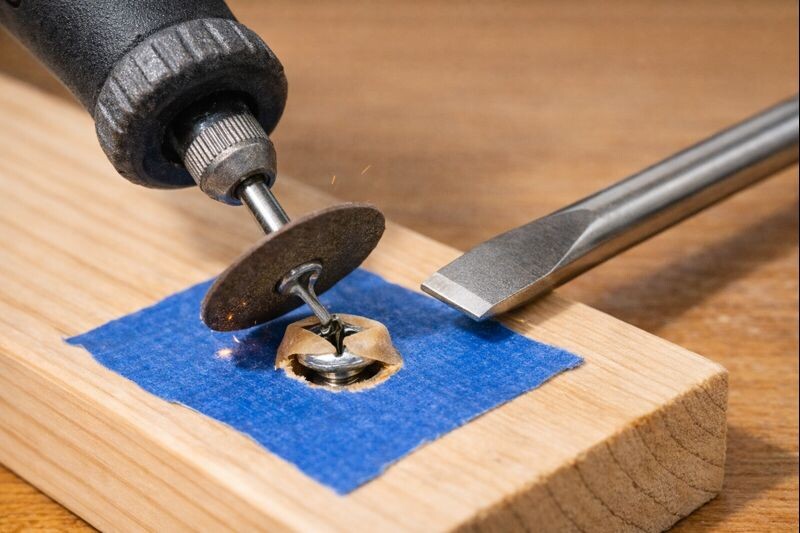
Benefit: Cheap and reliable.
Drawback: Sparks and dust. Protect the surface.
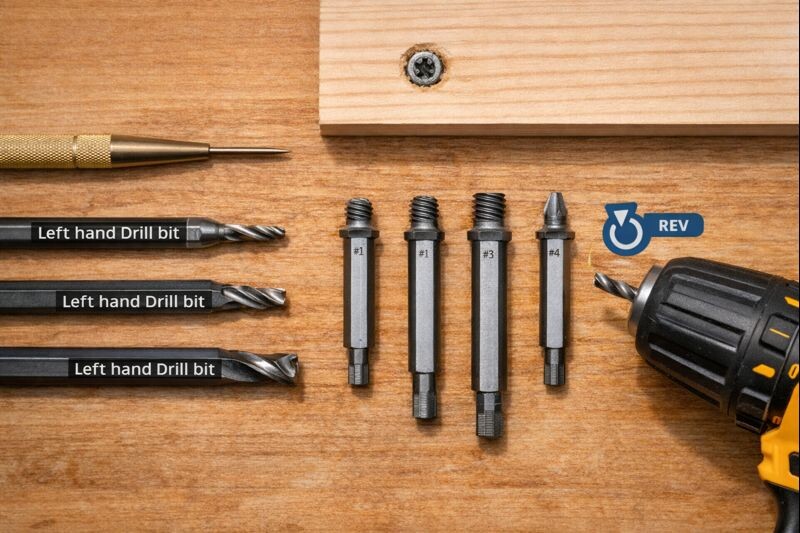
Method 7: Left-hand drill bit (often removes the screw by itself)
A left-hand bit drills counterclockwise. Sometimes the screw backs out during drilling.
- Center punch the screw head to keep the bit from wandering.
- Put a left-hand bit in your drill.
- Run the drill in reverse at low speed.
- Drill a shallow hole in the center of the head.
If you’re lucky, the screw will spin out before you ever use an extractor.
Benefit: Less force than extractors.
Drawback: Requires a steady hand and good centering.
Method 8: Screw extractor (the classic, when used correctly)
Extractors work, but they fail when people rush.
- Drill the pilot hole size recommended for your extractor.
- Keep the hole centered and straight.
- Tap the extractor in lightly so it bites.
- Turn slowly with a T-handle or wrench.
Go slow. If you snap an extractor, you now have hardened steel stuck in the screw. That’s a miserable problem.
Pro tip: Heat can help on stubborn hardware, but in wood it’s risky. Heat can scorch fibers or soften finishes. Skip it unless you truly know the material and finish.
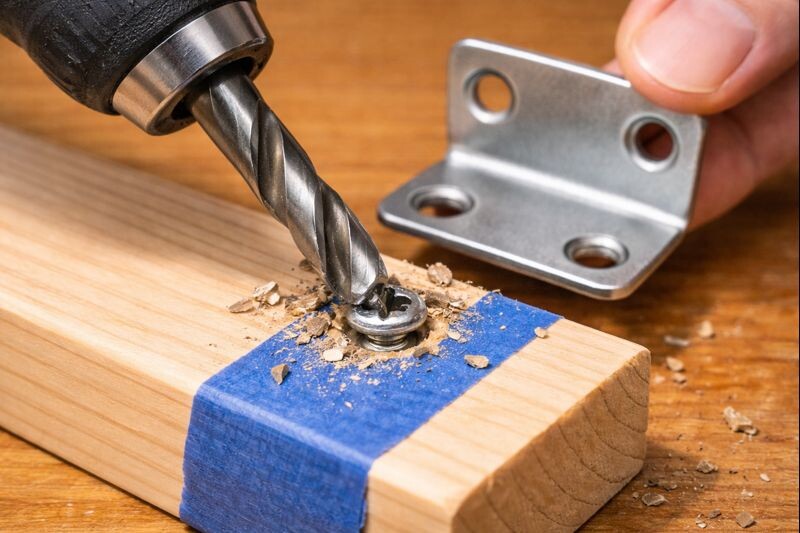
Method 9: Drill the head off (the “guaranteed” method)
When the head is too far gone and nothing else works, remove the head so the clamp force disappears.
- Choose a drill bit slightly larger than the screw shank (not the threads).
- Drill straight into the head until it separates from the shank.
- Lift off the part being held by the screw head.
- Grab the remaining shank with pliers and twist it out.
This is the method that saves a tray stand bracket when the screw head is stuck under a handle or plate.
Drawback: You may need to patch the hole afterward.
Learn more: How to Fix a Stripped Screw Hole in Wood
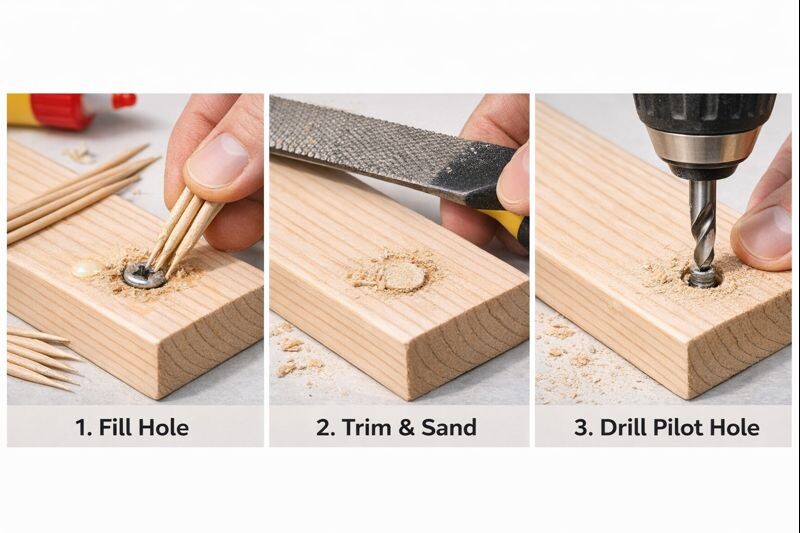
Repairing the hole after removal
Once the screw is out, don’t just drive a new one into the same damaged fibers and hope for the best. That’s how wobble starts.
If the hole is only a little loose:
- Dip toothpicks in wood glue.
- Pack them into the hole snugly.
- Snap flush and let dry.
- Re-drill a pilot hole.
If the hole is blown out or you need real strength:
- Drill the hole clean to a known dowel size (like 1/4″).
- Glue in a hardwood dowel.
- Flush trim and sand.
- Drill a new pilot hole in the plug.
This same plug approach is what keeps hardware tight on tiered tray builds. If a stand ever starts rocking after repairs, this is the fix that actually holds (and it pairs well with the stability tricks in stopping a tiered tray stand from wobbling).
A quick method guide table
| Method | Best for | Tools | Risk to wood | Notes |
|---|---|---|---|---|
| Correct bit + pressure | Light stripping | Fresh bit, driver | Low | Works more often than people expect |
| Rubber band / abrasive | Slight cam-out | Rubber band, compound | Low | Only if the head still has shape |
| Tap bit into head | Chewed Phillips | Hammer, bit | Medium | Avoid on delicate finishes |
| Manual impact driver | Stuck screws | Impact driver | Medium | Needs solid backing under the piece |
| Locking pliers | Head proud | Vise-grips | Low | Fast when accessible |
| Cut a new slot | Rounded head | Dremel/cutoff | Medium | Protect finish from sparks |
| Left-hand drill bit | Hard cases | Left-hand bits | Medium | Often backs out without extractor |
| Extractor | Fully rounded | Extractor kit | Medium-High | Slow turns prevent snaps |
| Drill head off | Last resort | Drill bits, pliers | Medium | Reliable, then patch hole |
Preventing stripped screws next time
A few habits keep this from happening again.
- Drill proper pilot holes, especially in hardwood.
- Countersink when the screw head needs to sit flush.
- Use quality screws. Soft, cheap screws strip and snap.
- Rub threads on wax or a bar of soap for smoother driving.
- Use the clutch on your drill. Stop before the head cams out.
- Keep driver bits fresh. A rounded bit is a stripping machine.
Plus, if you’re building tray stands or serving trays, wood movement and finish can change how screws behave over time. Finishing guides like sealing a wooden serving tray the right way help you avoid sticky, swollen fibers around hardware areas. For painted builds, a clean finish process also matters (see getting a smooth painted finish without brush marks).
If the project uses pine and you’re pre-finishing parts, keep blotching under control too, since uneven finish can build up around holes (my notes on preventing pine from blotching during finishing are useful there).
Final thoughts
Stripped screws feel like a small problem until they chew up a face board or loosen a joint. Start gentle, keep everything centered, and step up methods in order. When the screw finally comes out, take the extra minute to repair the hole correctly. That one step is what keeps the next screw tight, straight, and strong.