Marking Gauge vs Pencil: 5 Shop-Smart Ways to Boost Accuracy
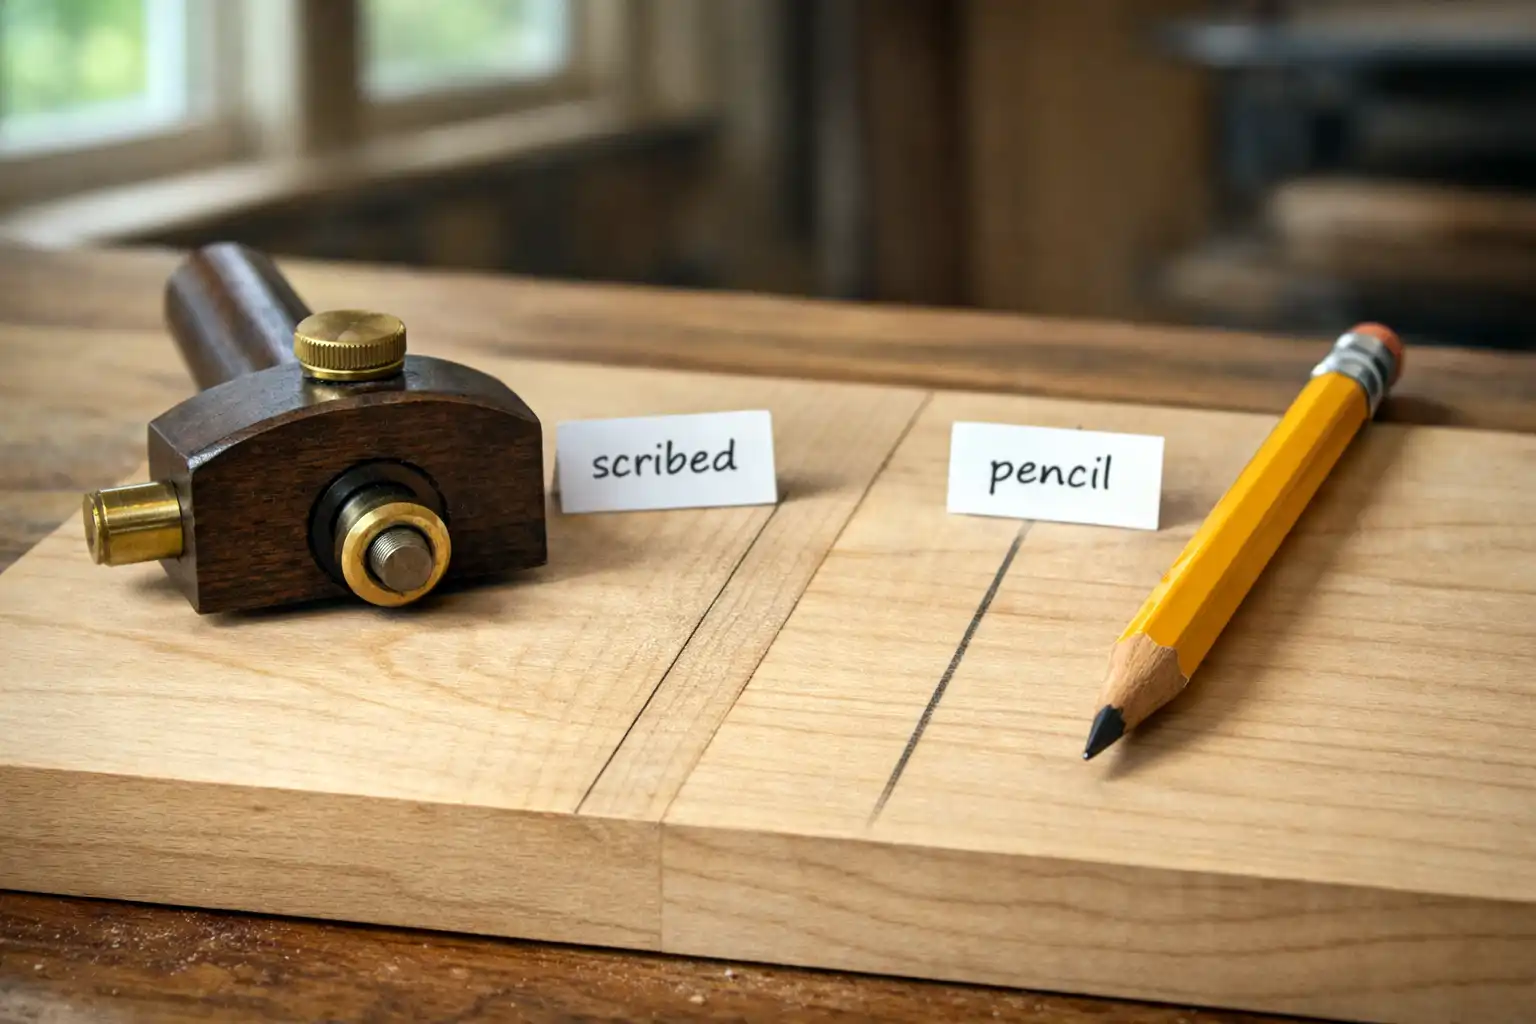
Marking gauge vs pencil comes down to one practical difference: a marking gauge cuts or scores a reference line, while a pencil draws a soft line that can smear and vary in width. Woodworkers use a marking gauge when joinery or tight-fitting parts depend on a crisp, repeatable baseline. Woodworkers use a pencil when the cut line needs to stay visible at a distance, or when the layout changes often. The best shops keep both on the bench and switch based on accuracy needs, surface condition, and the next tool in the workflow.
After you get your layout tool sorted, it helps to keep the rest of the bench predictable too, including your measuring and cutting basics. My overview of beginner woodworking tools covers the core setup that supports accurate layout work.
What does a marking gauge do that a pencil cannot?
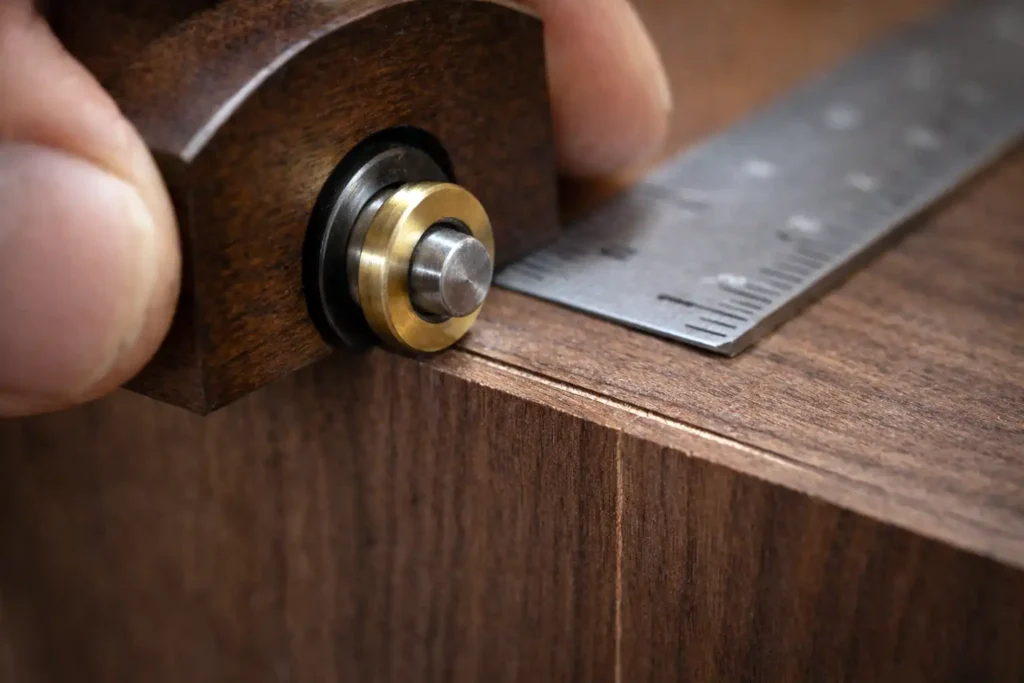
A marking gauge produces a line with a fixed offset from an edge, and the cutter physically scores the wood fibers. That scored line stays put when you handle the workpiece, and it gives a chisel or saw a small shoulder to register against. A pencil line sits on the surface, so its thickness, pressure, and smudging all affect where you actually cut.
In practice, a marking gauge improves repeatability. You set it once, reference the same face and edge, and then transfer the same distance across multiple parts without “walking” the measurement.
Read more: Differences Between Combination Square and Speed Square
What does a pencil do better than a marking gauge?
A pencil produces high contrast and quick marks, especially across rough-sawn stock or darker woods where a scored line disappears. A pencil also supports flexible layout. You can sketch, erase, adjust, and annotate without committing a cut into the surface.

A pencil wins when you need to see the line from standing height at the saw, or when the layout includes curves, tapers, and notes that a gauge cannot produce.
Accuracy: which tool places the line closer to the true measurement?
A marking gauge places the line closer to the true measurement when you reference from a known face and keep the beam tight to the edge. The cutter defines a single boundary. The “width” of the line is basically one edge.
A pencil creates a line with width. Even a sharp pencil leaves a mark that forces you to choose “cut on this side” each time. That choice introduces variation across parts, especially when the line is faint, wide, or smudged.
Visibility: why do scored lines sometimes vanish?
Scored lines can vanish on open-pored woods, figured grain, or surfaces that are rough or fuzzy from milling. Light rakes across the surface differently, so the score looks continuous in one angle and invisible in another. When visibility matters, many woodworkers darken the score with a pencil, or switch to a marking knife for cleaner contrast.
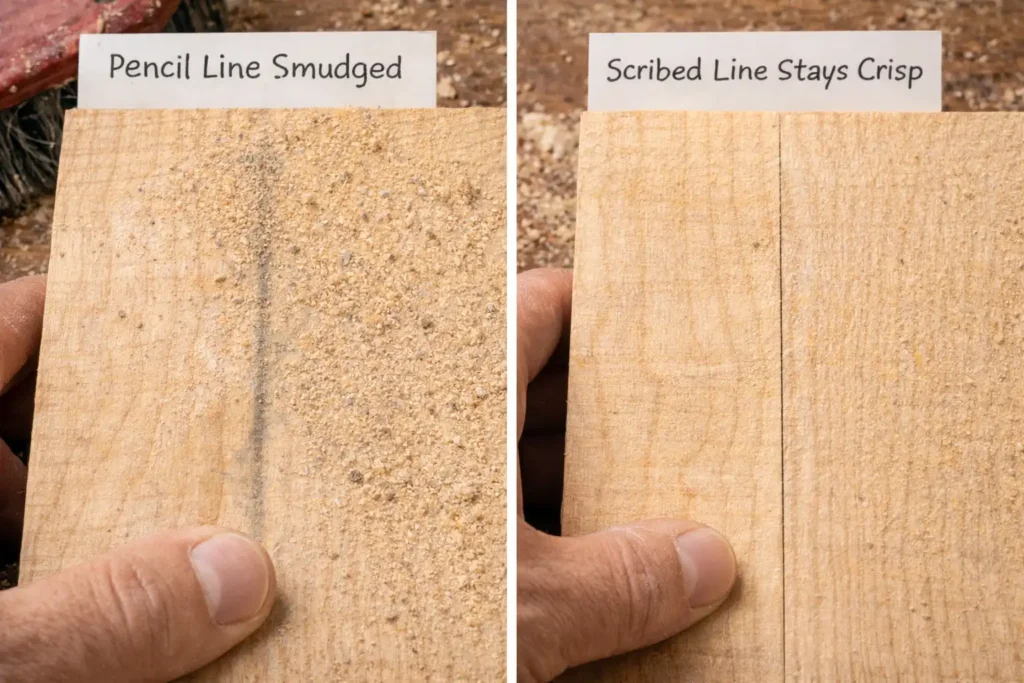
A pencil line stays visible, but it can disappear under sawdust. A quick brush, a shop vac pass, or a bit of blue tape beside the line can keep it readable at the saw.
Surface damage: does a marking gauge “ruin” the wood?
A marking gauge leaves a shallow cut. That cut becomes part of the reference system, so it is helpful on joinery surfaces and hidden edges. On show faces, the same cut can telegraph under some finishes, especially if you bruise the fibers by dragging a dull pin.
You avoid surprise marks by choosing the right cutter and using light passes. A wheel or knife-style gauge generally leaves a cleaner, more controlled score than a blunt pin on tricky grain.
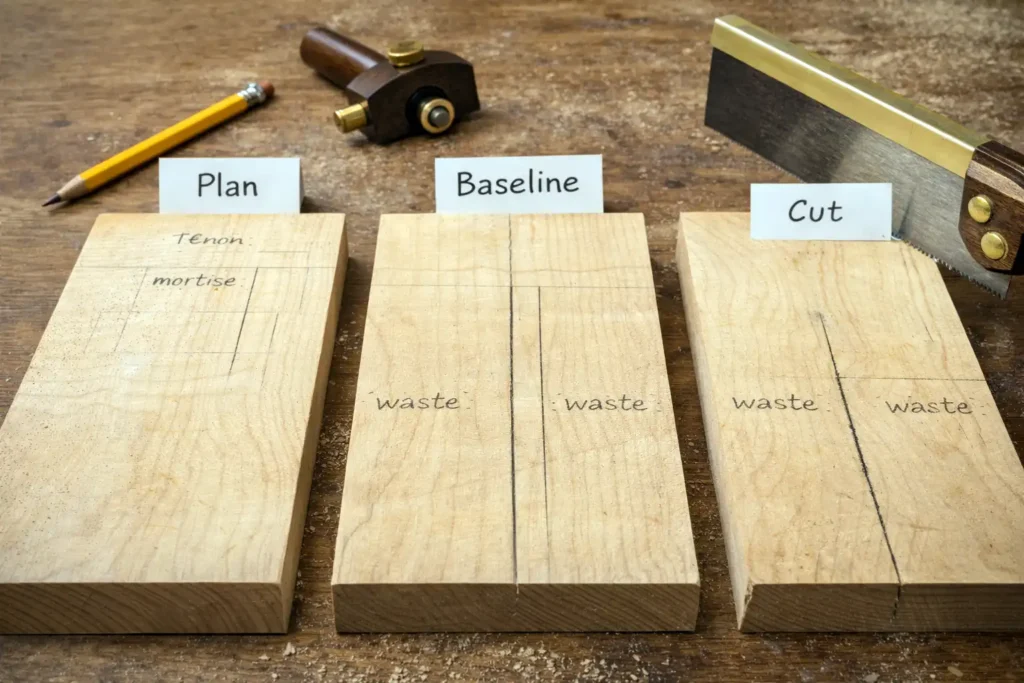
Joinery fit: which layout line helps chisels and saws track better?
A marking gauge helps chisels and saws track better because the scored line creates a tiny wall. A chisel can drop into the score and pare to a crisp boundary. A backsaw can start with less wandering because the teeth find that shoulder.
A pencil line can still work for joinery, but you need a consistent cutting habit. Many woodworkers “split the line” or cut to the waste side and then pare back. That takes attention, especially on small parts.
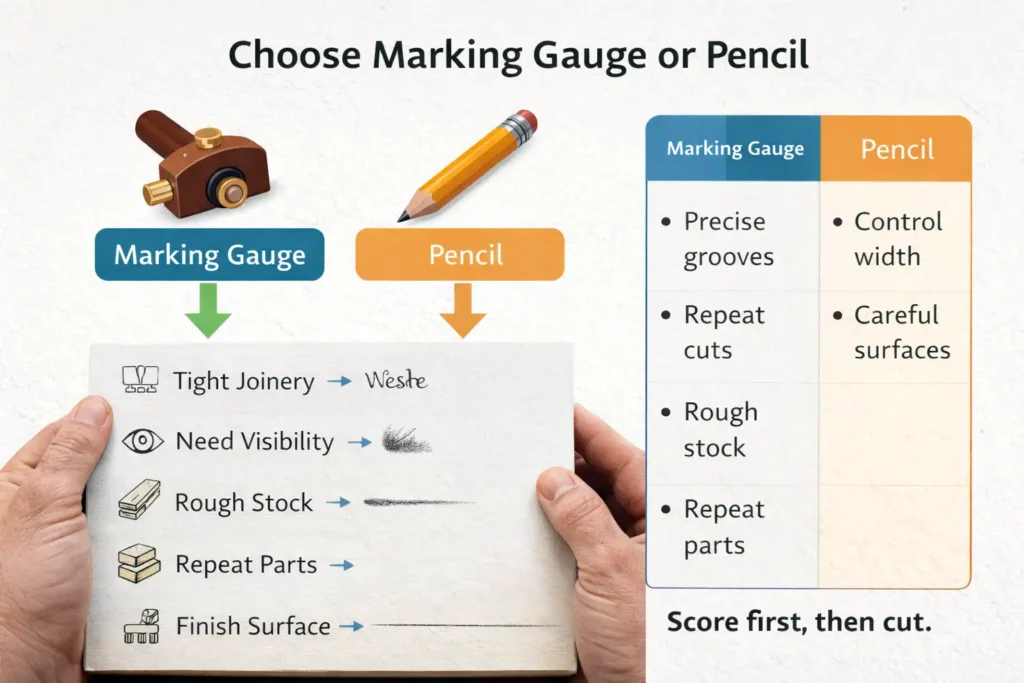
When should you choose a marking gauge?
Choose a marking gauge when the line defines a finished boundary or when multiple parts need the same offset from an edge.
Common marking gauge tasks include:
- Tenon shoulders and cheeks
- Dado and rabbet baselines
- Mortise walls (often paired with a mortise gauge or dual-pin gauge)
- Drawer and box parts where stack-up error shows quickly
- Repeat parts like tray rails, stretchers, and small frames
If your build involves powered cutting or hand chopping, eye protection and predictable workholding reduce mistakes during layout-to-cut transitions. My checklist of essential safety gear for tray stand applies to general shop work too.
When should you choose a pencil?
Choose a pencil when the layout changes, when the work is rough, or when visibility matters more than micro-accuracy.
Pencil shines for:
- Rough dimensioning at the miter saw or track saw
- Marking cut lists and part labels
- Layout on reclaimed lumber or textured faces
- Curves, arcs, and template tracing
- Stop points and “do not cut” notes
A mechanical pencil with a fine lead keeps the line tighter than a round carpenter pencil. A sharpened wooden pencil works well if you maintain a flat bevel and rotate it as you mark.
How do you use a marking gauge so it stays accurate?
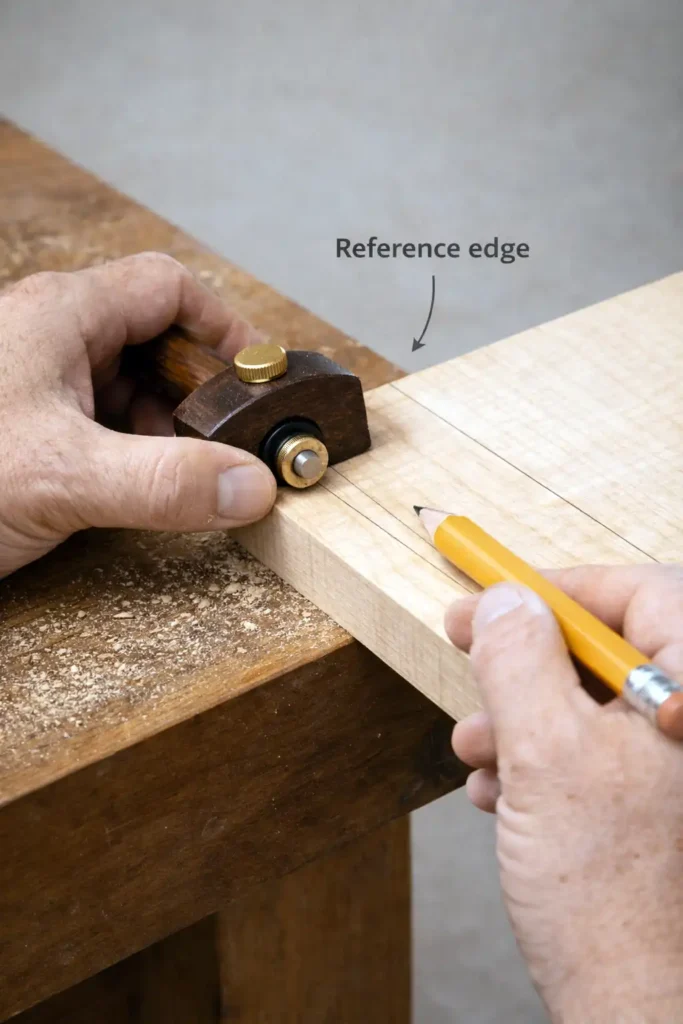
A marking gauge stays accurate when you set it from a reliable reference and keep the same face and edge against the fence.
- Joint or choose one reference face and one reference edge on each part.
- Set the gauge using a rule, story stick, or by referencing the mating part.
- Lock the gauge, then test on scrap from the same species.
- Run the fence tight to the reference edge and pull the gauge in smooth passes.
- Start with a light score, then deepen with a second pass if needed.
Two habits prevent most layout drift. First, reference from the same face every time. Second, keep steady fence pressure so the beam does not tip away from the edge.
Pin gauge vs wheel gauge: which one pairs better with “marking gauge vs pencil” decisions?
Pin-style gauges work well for general carpentry and rougher layout where the score is more of a guide than a finish boundary. They can tear fibers on reversing grain if the pin is dull or aggressive.
Wheel and knife-style gauges score cleaner on hardwoods and on cross-grain work. They often outperform a pencil for joinery because they leave a crisp boundary with less fuzz.
If you build trays, stands, or small furniture parts where show faces matter, a wheel gauge reduces cleanup and prevents ragged lines that telegraph into the finish.
A practical workflow that uses both tools
Most clean layouts use both tools in sequence.
Start with pencil to plan:
- Mark reference faces and edges
- Label parts and orientation
- Sketch joinery positions and limits
Then switch to the marking gauge to commit boundaries:
- Gauge baselines from the reference edge
- Scribe shoulders and walls that define the final fit
- Darken the score lightly with pencil only if visibility drops
This approach keeps flexibility early and locks accuracy when it counts.
Troubleshooting: why does your marking gauge wander or tear the grain?
A marking gauge wanders when the fence pressure varies or when the cutter drags unpredictably.
Common causes and fixes:
- Loose lock or beam flex: tighten the lock and check for play before each run.
- Dull pin or wheel: hone the cutter and take lighter passes.
- Wrong direction on grain: score lightly first, then deepen; on tough grain, try pulling in the direction that cuts cleaner.
- Fence not registering: re-joint the reference edge or use a planed strip as a temporary straight reference.
If you see torn fibers on the show face, stop and lighten the cut. A shallow score is often enough to guide the next tool.
FAQs about Marking Gauge vs Pencil
Is a marking gauge better than a pencil for beginners?
A marking gauge helps beginners make repeatable offsets from an edge, which reduces measuring errors across multiple parts. A pencil stays easier to see and easier to change. Beginners often do best by penciling the plan, then scribing only the final boundaries that affect fit.
Can I replace a marking gauge with a marking knife?
A marking knife can replace a gauge for some lines, especially when you register the knife against a straightedge. A gauge still wins for parallel lines at a fixed distance from an edge, because the fence sets the offset without repeated measuring.
Does a pencil line cause loose joints?
A pencil line can lead to looser joints if the cut varies between the near edge of the line and the far edge of the line across parts. You avoid that by choosing one rule and sticking to it, such as always cutting to the waste side and then paring to fit.