How To Remove Torx Screws From Wood: 5 Ways to Avoid Strips
To remove torx screws from wood, seat the correct Torx bit fully, press straight in, and back the screw out slowly, stepping up to an impact driver, pliers, or drilling the head off only if it’s stuck or stripped.
This guide walks through clean removal, then covers stuck screws, stripped star recesses, and snapped heads. You will see tool choices, surface protection tricks, and hole repair options so the workpiece stays intact.
Contents Here
- 1 What tools remove Torx screws without damaging wood?
- 2 How do I identify the correct Torx size and type before I try to remove it?
- 3 How do I remove a normal Torx screw from wood without damaging anything?
- 4 What if the Torx screw spins but won’t come out of the wood?
- 5 What if the Torx screw is stuck and won’t budge?
- 6 How do I remove a Torx screw with a stripped star recess?
- 7 How do I remove a Torx screw with a screw extractor or left-hand drill bit?
- 8 What if the Torx screw head breaks off in the wood?
- 9 How do I protect the wood and finish while removing Torx screws?
- 10 How do I fix the screw hole after I remove the Torx screw?
- 11 How do I prevent Torx screws from stripping in wood next time?
- 12 Final thoughts
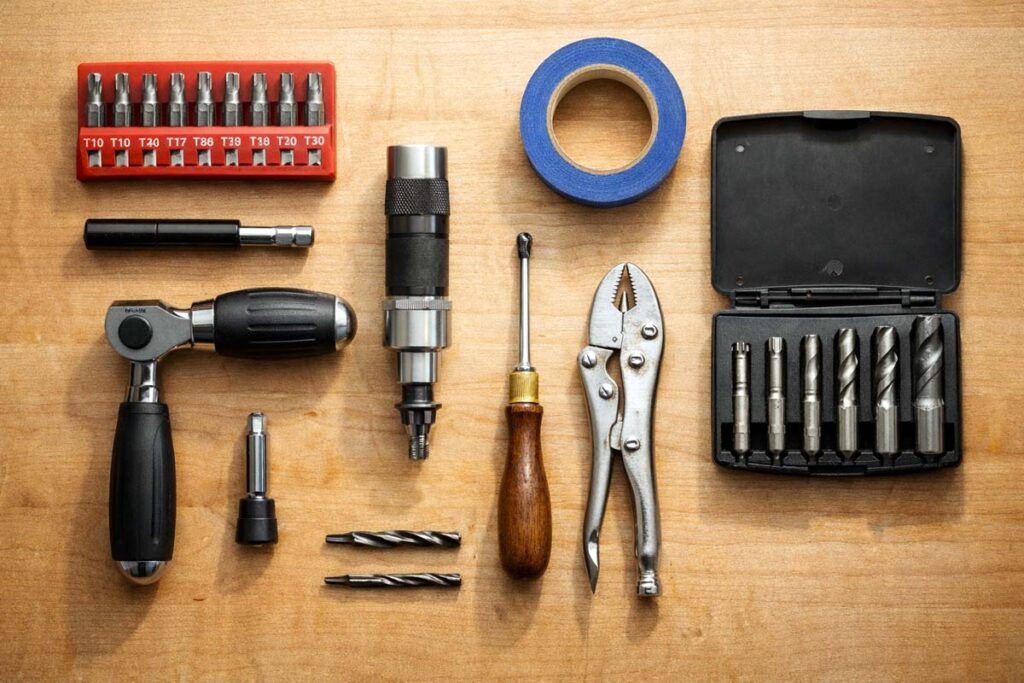
What tools remove Torx screws without damaging wood?
The cleanest removal uses a hand driver and a sharp bit, then steps up only as needed.
- Torx bit set (T10 through T30 covers most shop fasteners)
- Bit holder or 1/4-inch hex extension (helps keep the bit straight)
- Ratcheting screwdriver or small ratchet with bit adapter (more control than a drill)
- Manual impact driver (use on stubborn heads, not on fragile trim)
- Painter’s tape and thin cardboard or a plastic shim (surface protection)
- Scratch awl or dental pick (clears finish from the recess)
- Small hammer (seats the bit, taps the head)
- Locking pliers (grip a proud head or exposed shank)
- Left-hand drill bits (often back the screw out while drilling)
- Screw extractor set (last resort when the recess is gone)
Bit condition matters more than most people expect. Worn bits round fast. A quick bit check belongs in any basic tool care routine for beginners.
When you’re replacing damaged fasteners, torx head wood screws give you a deeper bit engagement that helps you back screws out without chewing up the recess.
How do I identify the correct Torx size and type before I try to remove it?
You identify the right Torx bit by finding the one that seats fully with almost zero wiggle. A sloppy fit rounds out the star points fast.
- Clean the recess first: Pick out paint, finish, sawdust, and rust with an awl, dental pick, or a stiff brush.
- Test-fit bits by hand: Push the bit into the head and try to rock it. If it rocks, go up a size.
- Check for security: Tstant Torx has a small center pin, and it needs a matching hollow-ended “TR” bit.
- Replace worn bits: Rounded bit tips slip even when the size is correct.
How do I remove a normal Torx screw from wood without damaging anything?
You remove a normal Torx screw cleanly by seating the bit fully, applying steady inward pressure, and turning slowly with control.
- Relieve load on the joint. If the screw is clamping two parts together under tension, clamp the parts or support them so the screw isn’t binding.
- Seat the bit hard. Press straight in so the bit bottoms out in the star.
- Start by hand if the work is delicate. A hand screwdriver gives the best feel and reduces sudden cam-out.
- If you use a drill/driver, set the clutch low. Increase only if the screw doesn’t move.
- Back the screw out in one smooth motion. Stop if you feel the bit slip, then reset the bit and try again.
Tip from the bench: Put one hand over the driver handle and the other on the grip. That keeps the bit aligned and your pressure steady.
What if the Torx screw spins but won’t come out of the wood?
A spinning Torx screw usually means the wood threads are stripped, not the Torx head. You need upward tension on the screw while you turn.
- Slip a putty knife under the head. Pry gently while you back the screw out.
- Use end-cutting nippers or locking pliers if the head is proud. Grab the head and pull upward while turning.
- Add a thin shim under the tool. A scrap of cardboard or veneer protects finished surfaces from pry marks.
- Plan to repair the hole. Once it’s out, jump to the “fix the hole” section below.
For hole repair steps, my dedicated guide on repairing a stripped screw hole in wood walks through toothpick, dowel, and plug options.
What if the Torx screw is stuck and won’t budge?
A stuck Torx screw usually breaks free when you increase bite, add a little shock, and reduce friction in the threads.
Can I free it up without drilling?
Yes, and this order keeps you from escalating too fast.
- Re-seat and tap the bit. Hold the driver straight and tap the handle end lightly with a hammer to seat the bit deeper.
- Try a “tighten then loosen” move. Turn the screw a hair tighter first, then reverse to loosen. This can crack loose debris in ta manual impact driver.** A manual impact driver converts a hammer strike into turning force while driving the bit into the head, which helps on stuck fasteners.
- Apply a small amount of penetrating oil (carefully). Keep it off raw end grain and finished faces as much as you can, and wipe immediately.
- Add gentle heat. Warm the screw head and surrounding area with a hair dryer or heat gun on low, then try again. Keep the heat moving to avoid scorching.
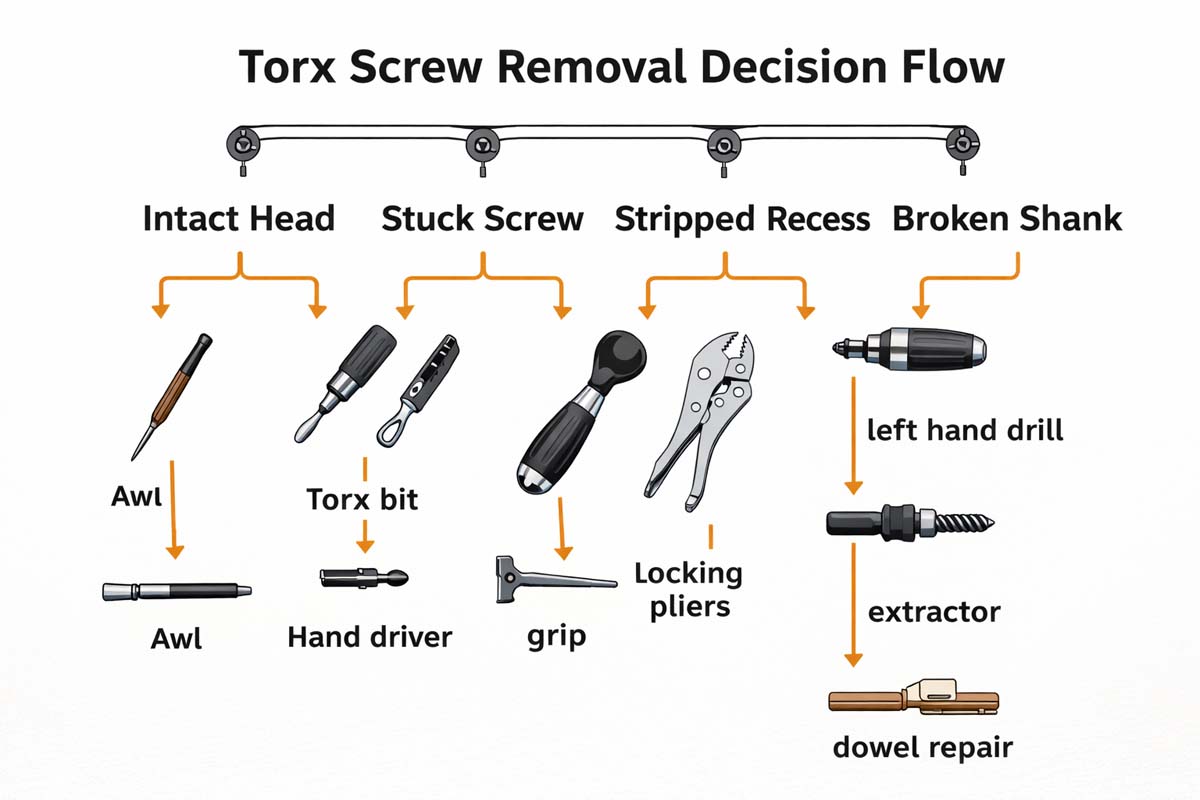
How do I remove a Torx screw with a stripped star recess?
You remove a stripped Torx head by restoring grip first, then switching to extraction methods if the star is too rounded.
Step 1: Restore grip (fastest wins)
- Hammer-seat a fresh bit. Use a new bit of the correct size and tap it in firmly.
- Try a slightly larger Torx or a snug alternate. Sometimes the next size up bites enough to move the screw, but stop immediately if it starts to ream the recess.
- Add fine abrasive for bite. A pinch of valve-grinding compound or fine sanding dust in the recess can increase friction. (Keep it off finished surfaces.)
Step 2: Grab the head (if it’s proud)
If the screw head sits above the surface, locking pliers often solve it in 30 seconds. Clamp hard on the head and turn slowly.
Step 3: Cut a slot (when the star is gone)
A rotary tool can cut a straight slot across the head so a large flathead driver can turn it. This method works best on screws that sit proud.
Step 4: Drill the head off (reliable last step)
Drilling the head off removes the clamping force so you can lift the part and deal with the remaining shank.
- Use a bit slightly larger than the screw shank.
- Drill straight down until the head separates.
- Lift the hardware off.
- Grab the remaining shank with pliers and back it out, or use an extractor if it won’t turn.
Extractor kits are a common recommendation for severely stripped heads.
If you want a deeper walk-through (including photos and the “stop before it gets worse” signs), see my guide on getting a stripped screw out without wrecking the board.
How do I remove a Torx screw with a screw extractor or left-hand drill bit?
You remove a stubborn Torx screw with an extractor by drilling a controlled pilot hole, then turning the extractor counterclockwise until the screw backs out.
- Center punch the screw head. This keeps the bit from wandering.
- Drill a pilot hole straight. Use a sharp bit and low speed.
- Use a left-hand drill bit if you have one. Left-hand bits can sometimes spin the screw out during drilling.
- Insert the extractor and turn counterclockwise. Use steady pressure and avoid snapping the extractor.
- Stop if the extractor feels like it’s twisting. A broken extractor is hardened steel and becomes a bigger problem than the screw.
What if the Torx screw head breaks off in the wood?
A broken screw leaves the shank in the wood, and your best approach dephank sits proud or flush.
- If the shank sticks up: Grip it with locking pliers and turn it out slowly.
- If the shank is flush or below: Drill a small pilot hole in the center and use an extractor, or drill around it and plug the area if appearance matters.
My dedicated repair guide on removing a broken screw from wood cleanly covers the plug-and-patch approach for furniture and trays.
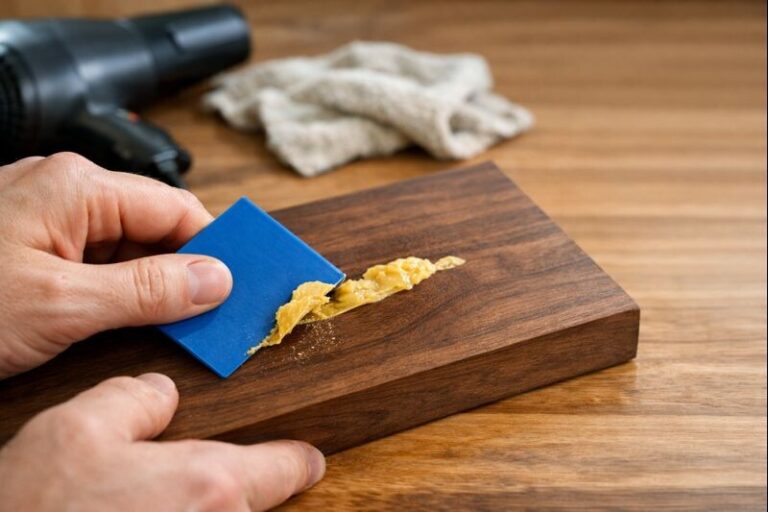
How do I protect the wood and finish while removing Torx screws?
You protect wood by supporting the work, shielding the surface, and keeping tools from skating.
- Clamp the workpiece. Movement causes bit slip and finish dents.
- Use painter’s tape around the screw head. Tape protects the finish from accidental tool contact.
- Add a thin sacrificial shim under pry tools. Cardboard, veneer, or a playing card prevents a crescent-shaped dent.
- Keep the driver perfectly vertical. A tilted bit strips heads and chews the rim of countersinks.
How do I fix the screw hole after I remove the Torx screw?
You fix a screw hole by rebuilding wood fibers so the next screw has solid material to bite.
- For a slightly loose hole: Glue in toothpicks or a hardwood sliver, let it dry, trim flush, then re-drive.
- For a strdwood or load-bearing parts: Drill and glue in a hardwood dowel, then re-drill a pilot hole.
- For a visible project face: Use a wood plug that matches the grain direction, then re-drill.
This is the same repair sequence I use on tray stands and serving trays. If you want the full decision tree, use my guide on fixing a chewed-up screw hole the right way.
How do I prevent Torx screws from stripping in wood next time?
You prevent stripping by matching the bit, drilling the right pilot hole, and controlling torque.
- Use a fresh, snug-fitting Torx bit. Proper fit reduces slip and head damage.
- Drill a pilot hole in hardwood. A pilot hole reduces driving torque and head damage risk.
- Countersink when the head seats flush. A clean countersink prevents the head from binding.
- Lubricate threads for hardwood. A quick rub on paste wax or a bar of soap reduces friction.
- Use the clutch on your driver. Let the clutch stop the tool before the head starts to deform.
If you’re dialing in pilot holes and screw sizing, my guide on wood screw sizing and common charts helps you match fastener length and gauge to the project.
Final thoughts
Removing Torx screws from wood is mostly about patience and fit: start with the correct bit, keep the driver square, and only step up to impact, pliers, or drilling when the screw earns it. If you get stuck at the “spins but won’t lift” stage or you end up with a damaged hole, repair the wood first so the next screw holds like it should. Good luck, and holler if you want help choosing the cleanest method for your specific project.