How to Plug Hole in Hardwood with Dowel: 7 Tight, Clean Steps
To plug a hole in hardwood with dowel, drill the hole clean and round to match the dowel, brush a thin coat of wood glue on the hole walls and dowel, tap it in snug, let it cure, then flush-trim and sand smooth.
A dowel repair beats filler when the hole is deep, the part takes stress, or the surface gets a clear finish. In this guide I cover tool choices, sizing, grain matching, glue control, and clean trimming. You also get fixes for common plug failures like gaps, split dowels, and shiny glue spots.
Contents Here
- 1 What makes a dowel plug repair hold in hardwood?
- 2 What tools and materials give a clean plug?
- 3 How do you size the hole and dowel for a tight fit?
- 4 How do you plug the hole step by step?
- 5 How do you match grain and color so the plug blends?
- 6 How long does glue need before trimming and sanding?
- 7 What if the hole goes all the way through, or sits near an edge?
- 8 Troubleshooting: why did the plug fail?
- 9 When is a dowel plug better than wood filler?
- 10 Final check before finish
What makes a dowel plug repair hold in hardwood?
A dowel plug repair holds when the dowel’s long grain bonds to long grain inside a clean, round hole. Hardwood gives strong sidewalls, but it resists compression, so fit matters more than force.
A factory dowel pin often runs within plus or minus 0.005 inch on diameter. A hole that is ragged or tapered leaves glue-starved pockets, and those pockets read as gaps after sanding.
If the hole sits near a joint or fastener, a dowel plug also acts like a small wooden patch that shares load through the surrounding fibers. Chicago Dowel describes dowel pins as increasing shear and tensile strength in joints. Before you plug that hole, it helps to understand what a dowel rod is and why woodworkers use it for repairs.
For a quick refresher on dowel stock, see my guide to what a wooden dowel is and how it’s made.
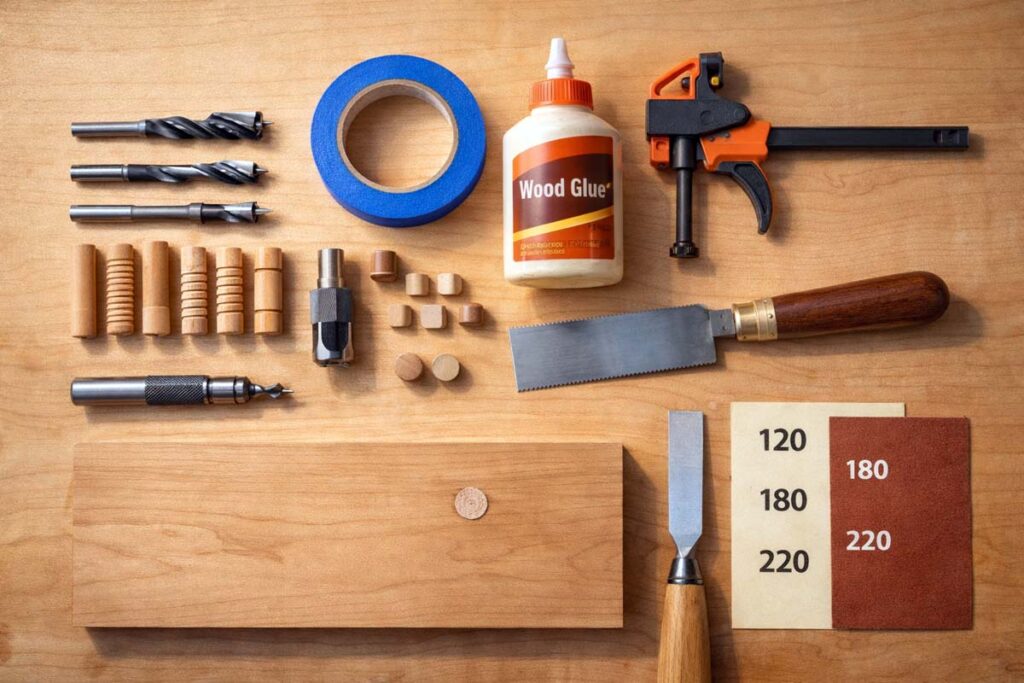
What tools and materials give a clean plug?
A clean plug comes from sharp cutting edges and controlled trimming.
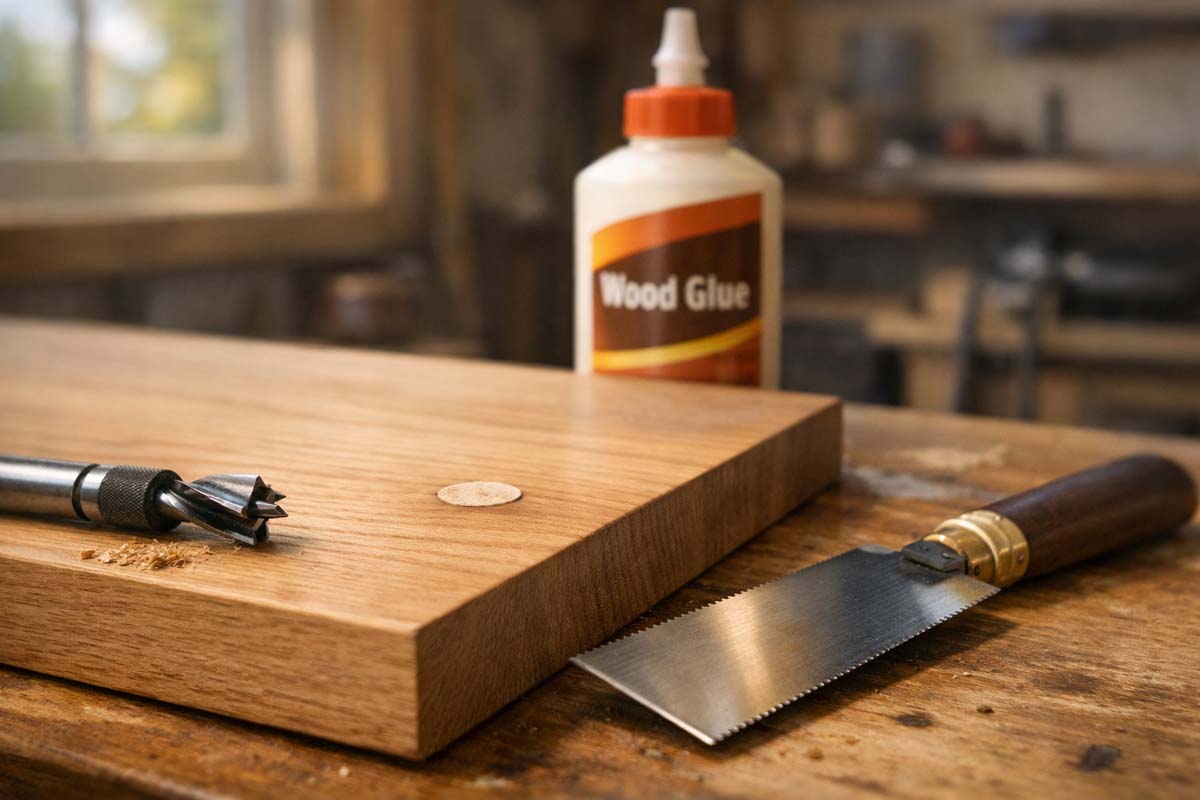
Tools
- Brad-point bit or Forstner bit in the dowel’s nominal size
- Drill press, or a handheld drill guided by a square block
- Flush-cut saw or fine pull saw
- Sharp chisel for paring
- Sandpaper: 120, 180, 220 grit
- Clamps or a caul and tape for light pressure
Materials
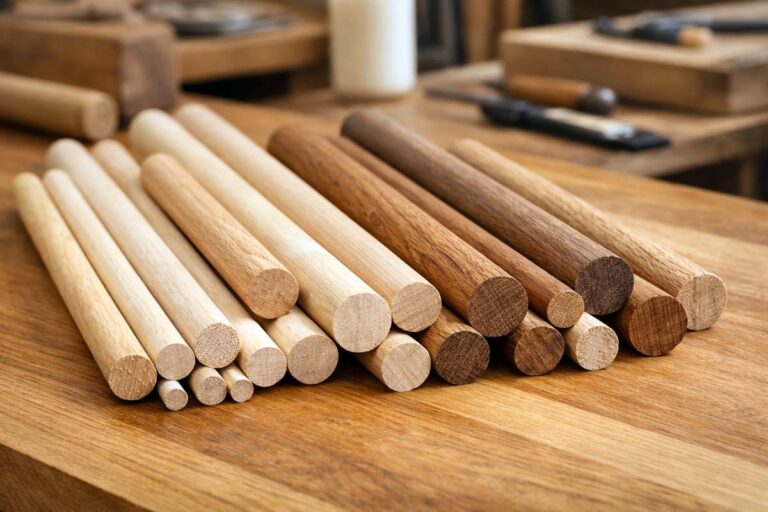
- Hardwood dowel or straight-grain scrap cut with a plug cutter
- PVA wood glue
- Painter’s tape, wax paper, and a damp rag
If you want glue and clamp notes specific to dowel work, start with how PVA glue behaves in dowel joints.
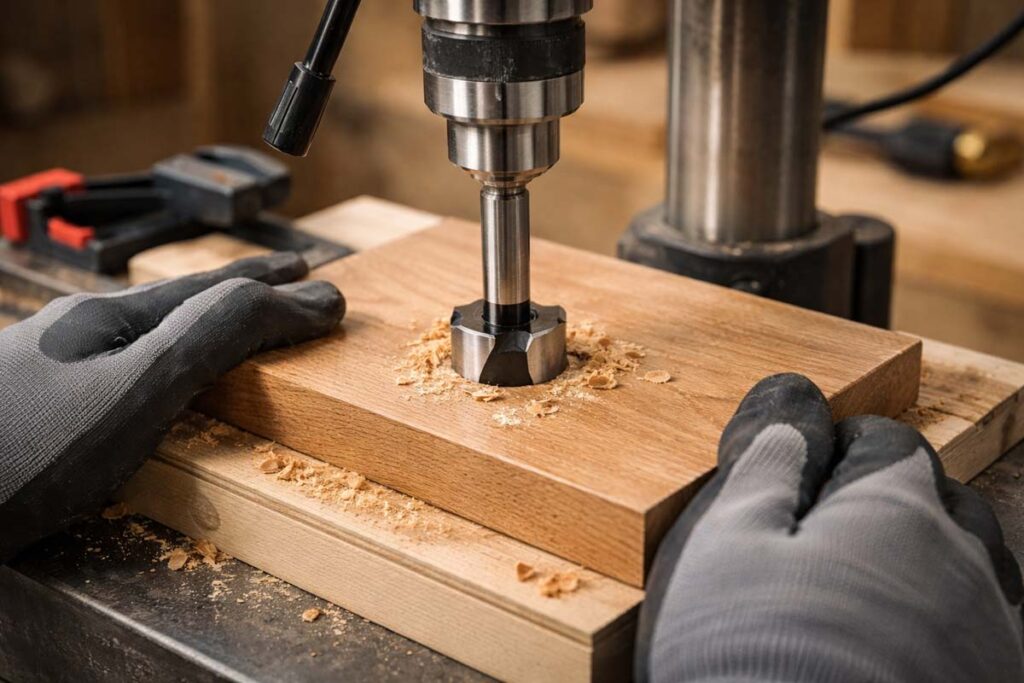
How do you size the hole and dowel for a tight fit?
A tight fit starts by choosing a dowel diameter that respects the board thickness. Chicago Dowel recommends a dowel about one-third of the wood thickness, and never over one-half. That ratio keeps the plug strong without weakening the surrounding wood.
Then true the hole.
- Drill the hole to a clean cylinder using a brad-point or Forstner bit.
- Keep the drill square to the face so the dowel seats evenly.
- Target a snug hand fit: the dowel slides with firm finger pressure and stops on its own.
If the dowel feels loose, switch to a grooved dowel pin or cut your own plug from matching hardwood. Grooves spread glue and let trapped air escape.
How do you plug the hole step by step?
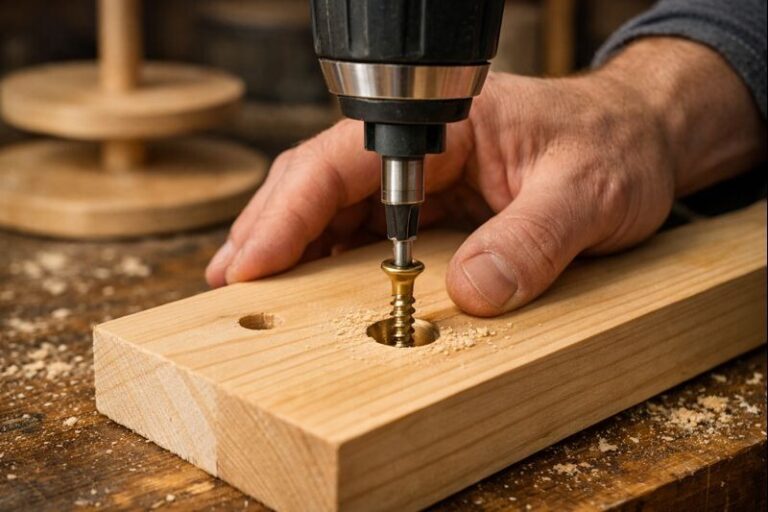
- Mark the grain direction: Line up the dowel’s grain with the board’s grain when the hole sits in a visible face. End grain telegraphs under clear finish.
- Square up the hole: Drill out the damaged hole to the next clean diameter. Use a backing board to reduce blowout.
- Dry fit the dowel: Push the dowel in by hand. Stop when it sits a little proud, about 1/16 to 1/8 inch.
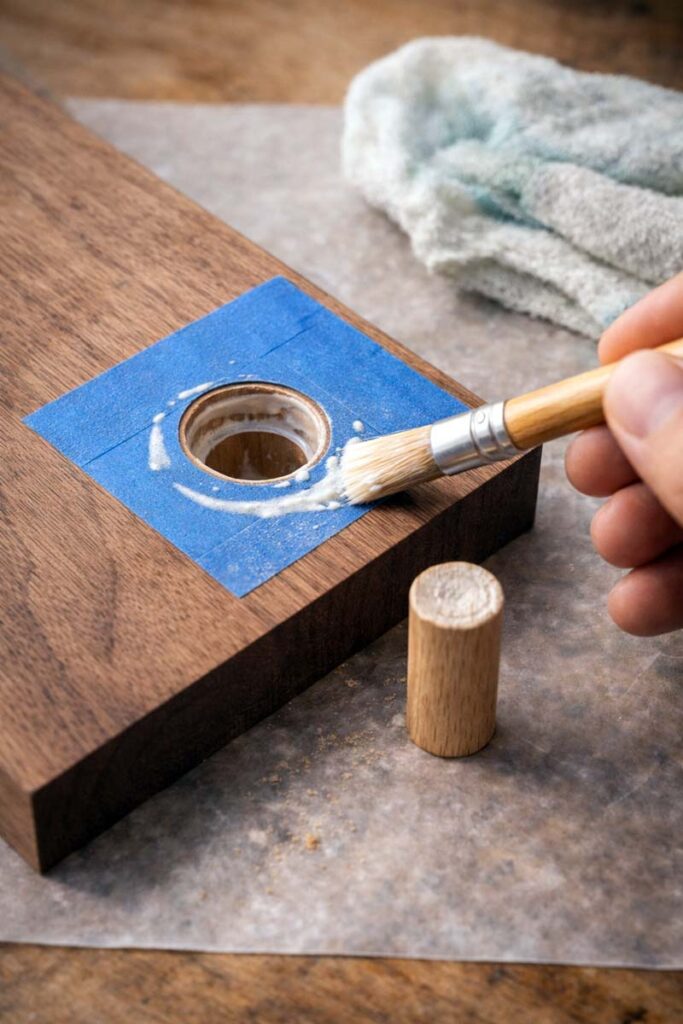
- Set glue control: Wrap painter’s tape around the hole, and lay wax paper under the work. This keeps squeeze-out off the surface.
- Apply glue to the sidewalls: Brush a thin coat inside the hole and around the dowel. Cover the full wall without puddles.
- Leave a glue relief space at the bottom: Chicago Dowel recommends leaving 1/16 inch of space in the bore for glue dispersion. That space reduces hydraulic lock.
- Seat the dowel: Tap the dowel with a mallet and a scrap block. Stop when it bottoms out and stays centered.
- Clamp with light pressure: Clamp enough to close the joint without crushing fibers. Titebond’s technical sheet lists typical required clamping pressure for hardwoods at 175 to 250 psi. On a small plug, use firm hand-tight pressure, not a crank-down.
- Work inside the assembly window: Titebond Original lists an open assembly time of 4 to 6 minutes at 70°F and 50% RH. Assemble and clamp within that window.
- Trim the plug flush: After the glue sets, saw the dowel close to the surface with a flush-cut saw. Pare the last fibers with a chisel.
- Sand and blend: Sand 120, then 180, then 220 grit. Use a flat block to avoid a dish.
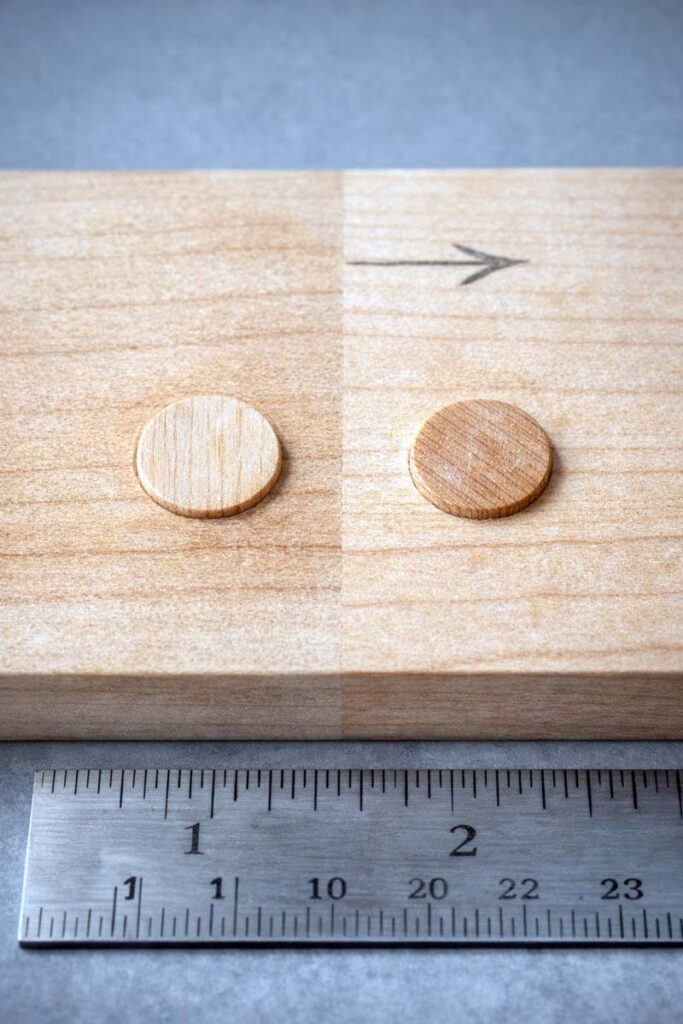
How do you match grain and color so the plug blends?
A plug blends when the wood species, grain direction, and pore pattern match the surface.
Use these rules:
- Cut plugs from offcuts of the same board when the repair sits in the middle of a visible face.
- Rotate the plug so grain lines flow in the same direction as the surrounding board.
- Use straight-grain stock for tight-grain species like maple and birch.
- Use plug cutters on matching stock for open-pore woods like oak and ash.
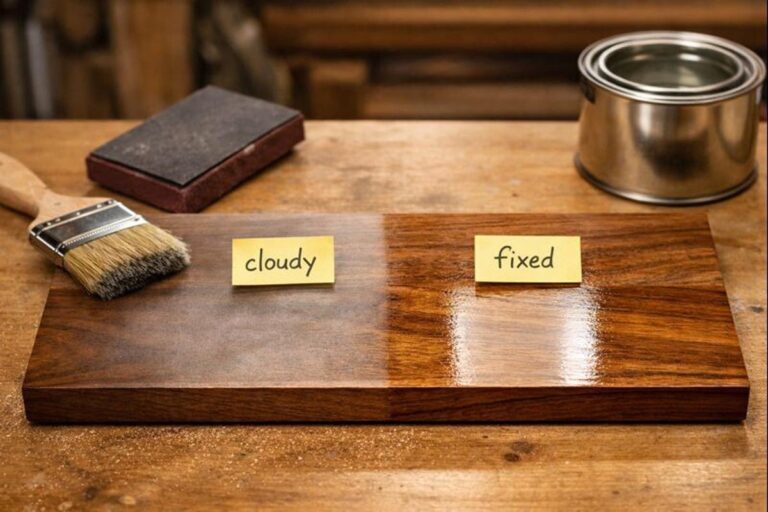
If you plan to stain the repair, glue cleanup matters. Dried glue blocks stain and leaves a light halo. For stain planning, see whether wood glue takes stain and how to prevent blotches.
How long does glue need before trimming and sanding?
PVA glue trims clean when it has set, but it sands and machines best after full cure.
Titebond notes that water-based glues take 24 hours to fully cure before machining. Treat plug trimming and sanding as machining when you want a flat, invisible blend.
A practical schedule:
- Handle and light trim after the glue holds the dowel without movement.
- Flush trim and sand after a full 24 hours at room temperature.
For more timing detail, use my guide on how long to wait before sanding a glued repair.
What if the hole goes all the way through, or sits near an edge?
A through-hole plugs best from both faces.
Through-hole approach
- Drill the hole clean and square.
- Fit two short dowels, one from each face.
- Stop each plug 1/16 inch shy of meeting, leaving glue relief space.
- After cure, trim both faces flush.
Edge or corner approach
- Use a dowel that stays under one-half the thickness to protect the edge fibers.
- Add a caul that spans the edge to prevent splitting while seating the plug.
- If the edge already split, glue and clamp the split first, then drill and plug.
If the hole is from a countersunk screw, a wood plug or dowel plug both work. This walkthrough pairs well with options for hiding screw holes in finished wood.
Troubleshooting: why did the plug fail?
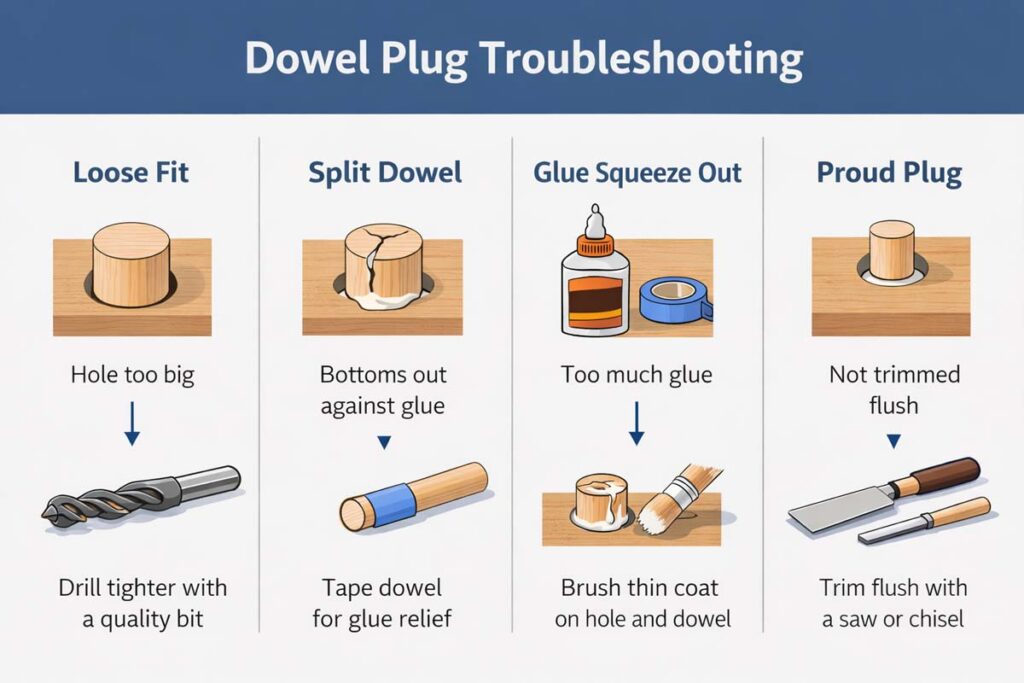
Why is there a gap around the dowel?
A gap forms when the hole is out of round, the dowel is undersize, or glue starves a section.
Fix
- Drill the hole to the next clean size.
- Switch to a dowel with tighter tolerance, or cut a plug from matching stock.
Why did the dowel split while driving it?
A dowel splits when it is too tight, the hole has no glue relief, or you drive across short grain.
Fix
- Re-drill the hole to a clean cylinder.
- Leave 1/16 inch space at the bottom for glue and air.
- Chamfer the dowel end with sandpaper before insertion.
Why does the plug look lighter after staining?
A light ring points to glue on the surface or glue squeezed into pores.
Fix
- Mask around the hole before gluing.
- Wipe squeeze-out while wet with a damp rag.
- Pare, then sand, instead of smearing glue across the surface.
Why does the plug sit proud after sanding?
A proud plug often comes from sanding a soft surrounding area more than the harder dowel, or from a dowel that swelled.
Fix
- Block sand the area flat.
- Let the board reach room moisture before final sanding. Chicago Dowel lists dowel pin moisture content at 6% to 8%.
When is a dowel plug better than wood filler?
A dowel plug fits best when you need real wood fibers across the repair.
Use a dowel plug when:
- The hole is deeper than 1/4 inch.
- The part takes load, like a chair rung or table apron.
- The surface gets a clear finish where filler stays visible.
Use filler when:
- The damage is shallow and cosmetic.
- The surface gets paint.
If you are repairing fastener damage, compare this method with how to fix a stripped screw hole in wood.
Final check before finish
Before you topcoat, run this checklist:
- The plug sits flush under a straightedge.
- There is no glue sheen around the repair.
- The sanding scratches match the rest of the surface at 180 to 220 grit.
- The plug’s grain runs in the same direction as the board.
A clean dowel plug repair takes a few careful minutes, and it lasts as long as the surrounding hardwood when the fit and glue control are right.