How to Make Mini Wooden Signs for Tiered Trays: 7 Easy Steps
Mini wooden signs for tiered trays are one of the quickest ways to make a display feel intentional instead of “stuff placed on a stand.” They’re small, so mistakes show fast. However, the build is simple when the sizes stay consistent and the lettering stays bold. This guide walks you through picking the right wood, cutting clean blanks, adding crisp words, and sealing everything so the signs hold up season after season.
Contents Here
- 1 What makes a “good” mini tiered-tray sign
- 2 Best wood for mini signs (and what to avoid)
- 3 Tools and materials checklist
- 4 Mini sign sizing that actually fits a tiered tray
- 5 Step-by-step: how to make mini wooden signs
- 5.1 Step 1: Pick a theme and keep the words short
- 5.2 Step 2: Cut your blanks clean and consistent
- 5.3 Step 3: Square the edges and sand flat
- 5.4 Step 4: Decide on your edge profile
- 5.5 Step 5: Prep for paint or stain
- 5.6 Step 6: Apply the background color
- 5.7 Step 7: Add lettering (four reliable methods)
- 5.8 Step 8: Optional distressing (use a light hand)
- 5.9 Step 9: Seal the sign so it doesn’t get sticky
- 5.10 Step 10: Make a simple stand (so the sign can display)
- 6 Batch-making mini signs without wasting time
- 7 Quick comparison table: lettering method pros and cons
- 8 Troubleshooting: the problems people actually hit
- 9 Where these signs look best on a tiered tray
- 10 Final thoughts
What makes a “good” mini tiered-tray sign
A mini sign has one job: read clearly from a few feet away.
That means the sign needs the right size, a flat face, and high-contrast lettering.
Keep these rules in mind:
- Short wording wins. One to three words reads best on a small face.
- Thicker looks higher-end. Thin craft wood can look flimsy on a tiered tray.
- Square edges read cleaner. Soft edges are fine, but rounded corners can make text look cramped.
- Matte finishes look more “handmade.” Gloss can feel plastic-y and shows brush marks.
If you all want a sign to lean on a tray, plan for a base block or mini easel from the start. A sign that can’t stand up tends to get buried behind decor.
Best wood for mini signs (and what to avoid)
Mini signs are small, so wood movement isn’t a huge deal. Still, weak or fuzzy woods can make lettering look rough.
Good options:
- Poplar: smooth, paints well, easy to cut clean
- Pine (select boards): affordable, easy to find, takes paint fine
- Birch plywood (1/4″ or 3/8″): stable and flat, great for batches
- Maple: crisp edges, great if you stain instead of paint
Wood to be careful with:
- Cheap MDF: cuts dusty, corners ding easily, hates moisture
- Construction pine with knots: knots bleed through paint and can chip at the edges
- Very soft craft panels: fuzzy grain makes lettering look blurry
If you need help choosing between common boards, use the same logic outlined in this guide on picking lumber for tray builds: choosing between pine, oak, and maple for small projects.
Tools and materials checklist
Keep this tight. Too many products just create extra steps.
Tools
- Miter saw, table saw, or a simple hand saw with a miter box
- Sanding block (or random orbit sander for batches)
- Painter’s tape and a sharp pencil
- Small square or combo square
- Clamps (even two helps)
Materials
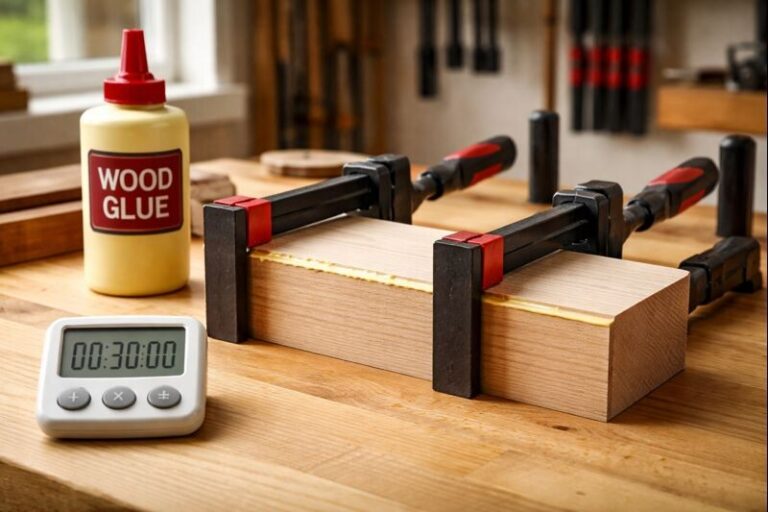
- Wood for blanks (1/4″–1/2″ thick is the sweet spot)
- Wood glue (for bases)
- Acrylic paint or stain
- Primer (optional, but helpful for pine)
- Paint pen, stencil, vinyl, or transfer paper for lettering
- Clear topcoat (water-based poly, spray acrylic, or wax)
For basic shop upkeep that keeps cuts cleaner (and reduces tear-out), this maintenance guide is worth a skim: simple tool care for woodworking newbies.
Mini sign sizing that actually fits a tiered tray
Most tiered trays look best when signs are small enough to leave breathing room.
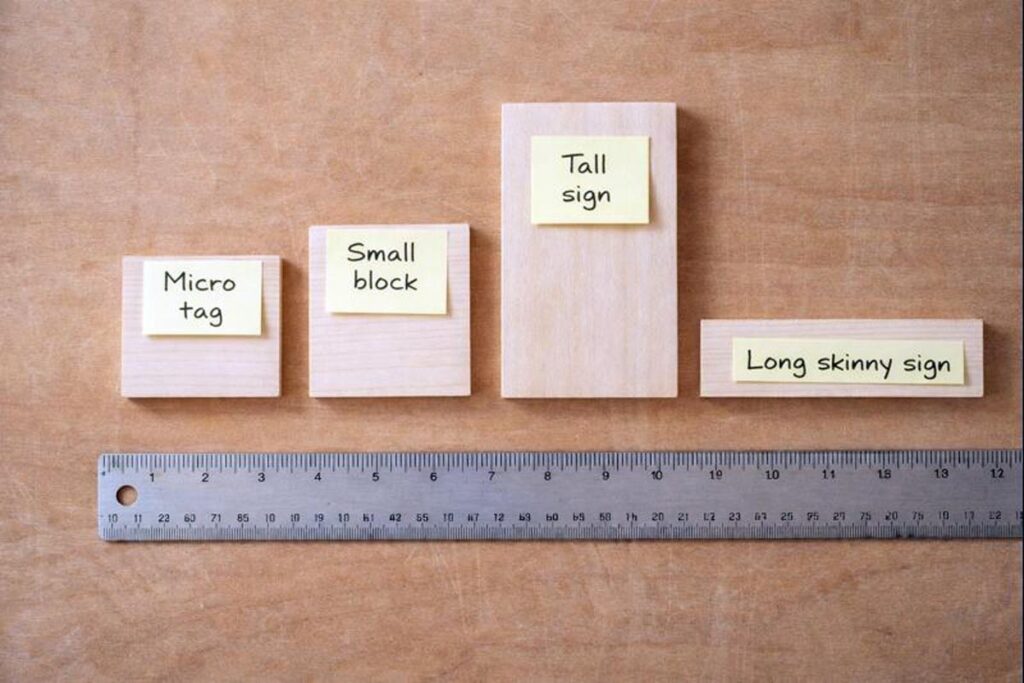
Here’s a practical sizing table that works on most 2-tier and 3-tier setups.
| Sign style | Common use | Finished size (W x H) | Thickness |
|---|---|---|---|
| Micro tag | tuck-in filler | 2″ x 1″ | 1/4″ |
| Small block sign | front-row statement | 4″ x 2″ | 3/8″–1/2″ |
| Tall mini sign | lean against taller decor | 3″ x 5″ | 3/8″–1/2″ |
| Long skinny sign | shelf-style spacing | 6″ x 1.5″ | 3/8″ |
Step-by-step: how to make mini wooden signs
Step 1: Pick a theme and keep the words short
Choose a theme that matches the tray’s season or room.
Then lock the wording.
Good mini sign wording rules:
- Stick to 1–3 words
- Use all caps for tiny signs (it reads cleaner)
- Avoid thin script fonts on anything under 4″ wide
If a beginner tries to squeeze six words on a 4″ sign, he usually ends up with cramped letters and uneven spacing.
Step 2: Cut your blanks clean and consistent
Consistency is what makes a set look “store-bought” in a good way.
Cutting tips that help:
- Cut long strips first, then crosscut into blanks.
- Mark the “show face” with a pencil so the best side becomes the front.
- Keep the grain running left-to-right for block signs (it looks calmer).

Safety note: tiny pieces are risky near blades. Use a stop block and keep hands away from the cut line. A push stick isn’t optional. For a quick safety checklist, reference essential safety gear and setup tips for tray builds.
Step 3: Square the edges and sand flat
Flat faces make lettering look sharp.
Use this sanding sequence:
- 120 grit to level saw marks
- 180 grit to smooth
- 220 grit for paint-ready surfaces
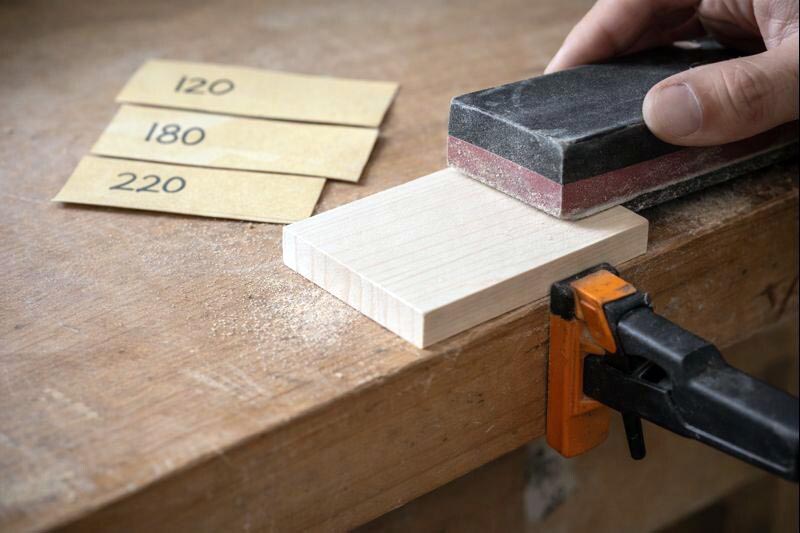
Don’t round everything over by accident. Use a sanding block and keep it flat on the face. Lightly break the sharp edges with one or two passes, that’s it.
Step 4: Decide on your edge profile
This is optional, but it changes the look.
Three easy options:
- Square edge: clean farmhouse and modern looks
- Light chamfer: looks finished without looking “fancy”
- Round-over: works well for kid-safe decor or softer themes
If you don’t have a router, a chamfer can be done with sandpaper by tipping the block at a consistent angle.
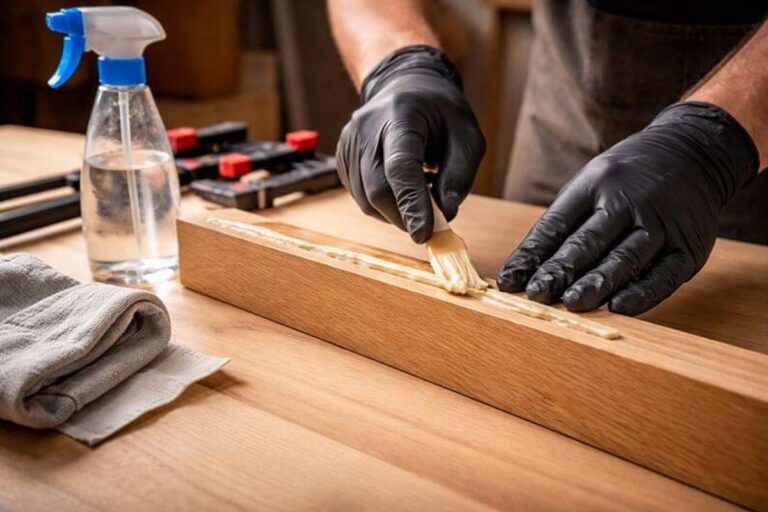
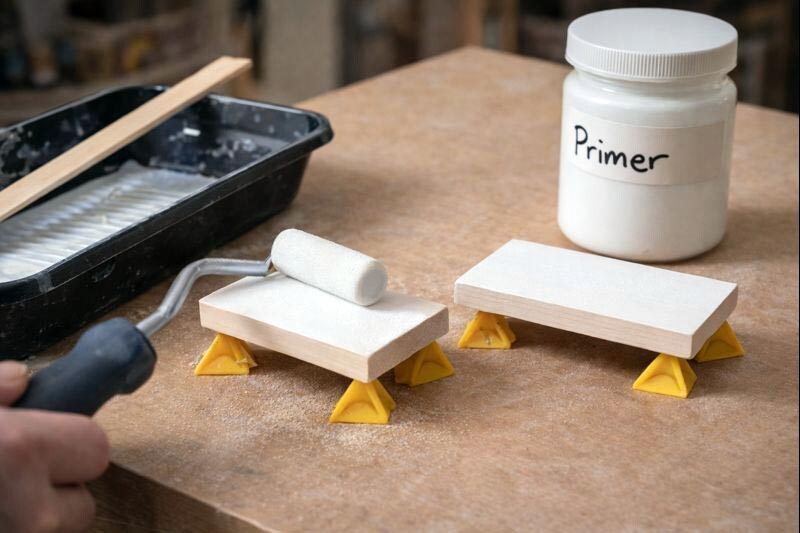
Step 5: Prep for paint or stain
Paint shows flaws less than stain, but stain looks more like real wood.
If painting:
- Use primer on pine if you want a clean white.
- Lightly sand the primer after it dries.
If staining:
- Use a conditioner on softwoods to avoid blotchy patches.
- Wipe stain evenly and don’t let it puddle on the ends.
And, If you plan to use walnut for a darker look, finishing matters. This walkthrough helps avoid dull, muddy results: practical finishing steps for walnut surfaces.
Step 6: Apply the background color
Keep backgrounds simple so text pops.
Two coats usually beat one thick coat.
- Thin coats reduce brush marks.
- Let each coat dry fully before the next.
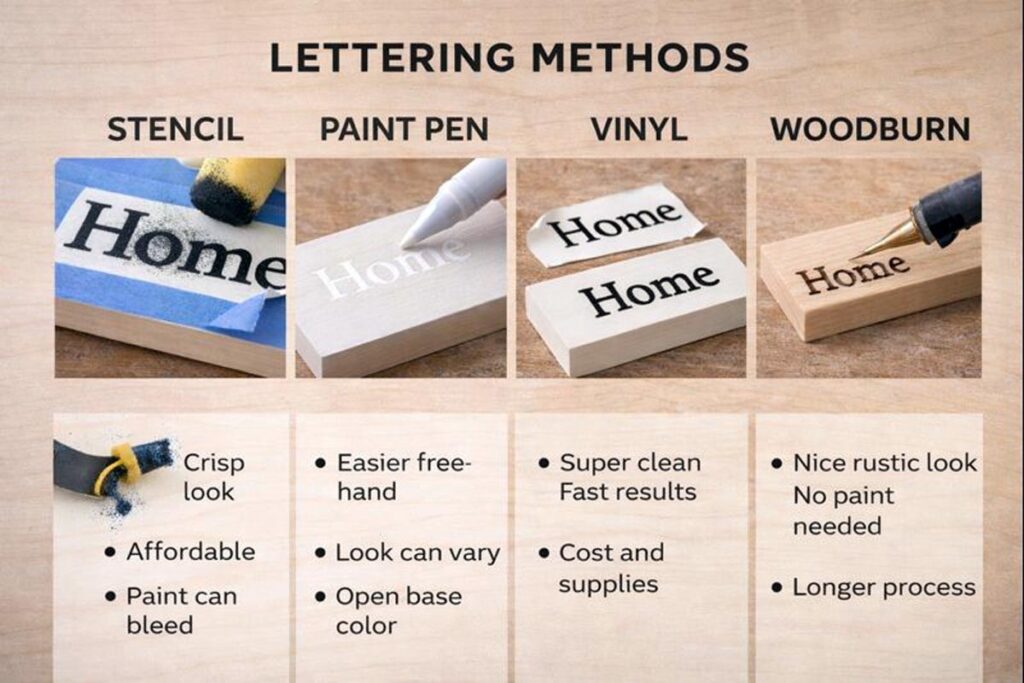
Step 7: Add lettering (four reliable methods)
Method A: Stencils (best for clean, repeatable results)
How:
- Seal the stencil edge with a light coat of the background color.
- Dab paint lightly with a sponge or stiff brush.
- Peel the stencil while paint is slightly tacky.
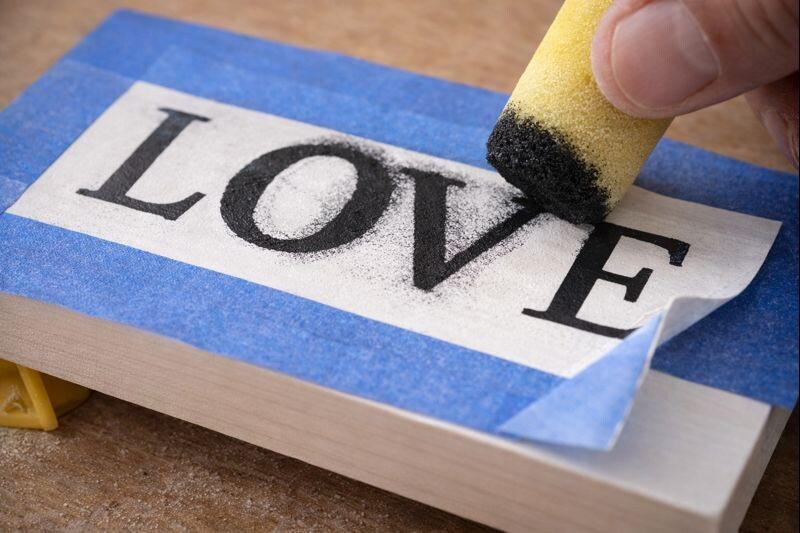
Benefits:
- sharp edges
- easy to repeat for sets
Drawbacks:
- requires patience to avoid bleed
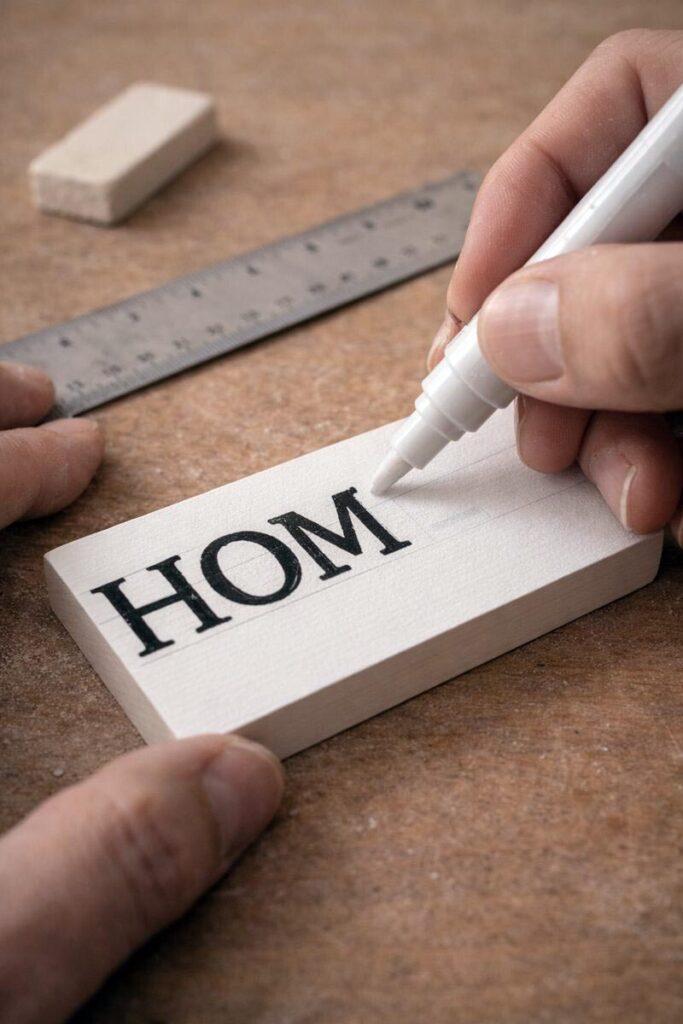
Method B: Paint pen (fastest for beginners)
How:
- Pencil light guidelines first.
- Write slowly, then fill in thicker strokes.
Benefits:
- quick setup
- easy touch-ups
Drawbacks:
- cheaper pens can streak on sealed surfaces
Method C: Vinyl letters (crispest edges)
How:
- Apply vinyl after the background fully cures.
- Burnish edges well, then seal lightly.
Benefits:
- extremely clean lines
Drawbacks:
- looks less “handmade” if overused
Method D: Woodburning (best for rustic trays)
How:
- Practice on scrap first.
- Burn letters in one steady pass.
- Light sand soot marks after cooling.
Benefits:
- permanent
- no peeling ever
Drawbacks:
- easy to scorch a small sign
Step 8: Optional distressing (use a light hand)
Distressing should add character, not chaos.
Simple ways:
- Sand corners lightly after paint dries.
- Tap edges with a small chain for tiny dents.
- Rub dark wax into corners for an aged look.
However, don’t distress before lettering. You’ll lose clarity.
Step 9: Seal the sign so it doesn’t get sticky
Tiered trays sit in kitchens, bathrooms, entryways. Humidity happens.
Good sealers for mini signs:
- Water-based polyurethane (matte/satin): durable and clear
- Spray acrylic: fast and even, great for lettering protection
- Furniture wax: soft, low-sheen, but not as durable
Avoid heavy glossy coats unless the tray style calls for it.
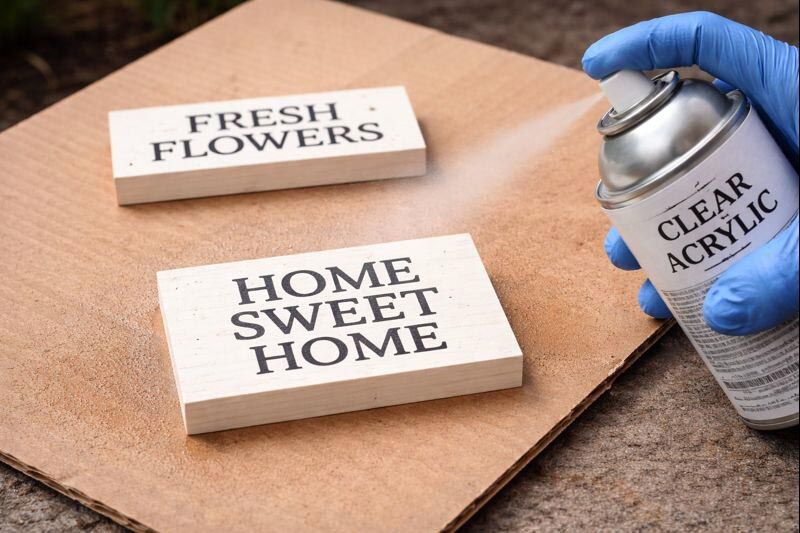
Common issue: “sticky” feel after sealing usually comes from thick coats or not enough cure time. Thin coats fix most of that.
Step 10: Make a simple stand (so the sign can display)
A mini base block is the most reliable way to display signs on a tiered tray.
Easy base block method
- Cut a block: about 2″ wide x 3/4″ deep x 3/4″ tall.
- Cut a slot centered on top:
- Use a table saw kerf, or
- Use a handsaw kerf and widen gently with sandpaper.
- Test fit. The sign should slide in snug, not forced.
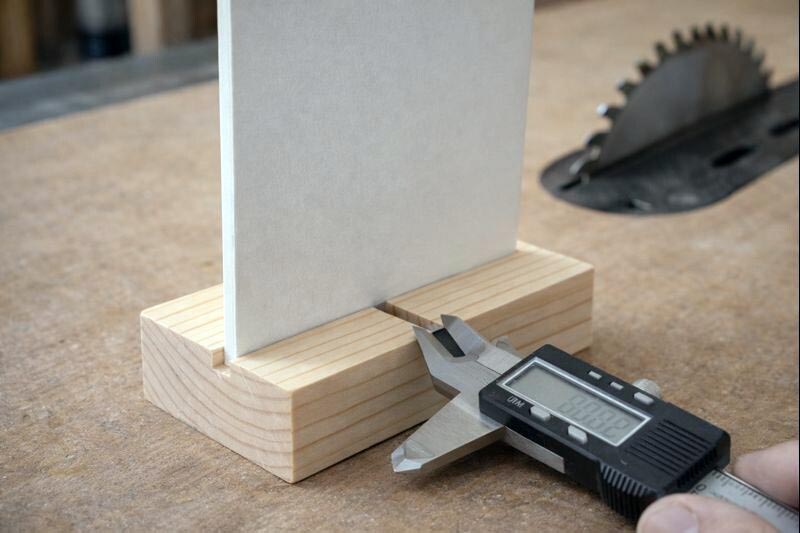
If you all prefer a “leaning” look, skip the base and use a tiny easel. Still, bases stay put better when people bump the tray.
For more on how trays are typically arranged and what heights look balanced, this styling guide helps: practical tips for decorating a tiered tray without crowding it.
Batch-making mini signs without wasting time
Mini signs are perfect for batch work. That’s how sets stay consistent.
Batch workflow:
- Cut all blanks first.
- Sand everything together.
- Paint all backgrounds together.
- Letter in one method for the whole set.
- Seal together at the end.
If you run short on supplies mid-build, these swaps can save a trip: material substitutes that work in DIY tray projects.
Quick comparison table: lettering method pros and cons
| Lettering method | Best for | Pros | Cons |
|---|---|---|---|
| Stencil | sets and repeats | clean edges, consistent | bleed risk if rushed |
| Paint pen | quick one-offs | easy, cheap | streaking on some topcoats |
| Vinyl | modern, crisp | sharpest lines | can look too perfect |
| Woodburn | rustic themes | permanent, no peeling | practice needed |
Troubleshooting: the problems people actually hit
Paint bled under the stencil: Use less paint. Dab, don’t brush. Seal stencil edges with the background color first.
Letters look crooked: Add pencil guidelines. Even one faint line keeps spacing clean.
Edges look fuzzy after cutting: Switch to a sharper blade, sand before painting, and consider poplar or birch ply for cleaner edges.
The sign warped: Thin wood plus wet paint can curl. Use thicker stock, paint both sides lightly, and dry flat.
Topcoat smeared the lettering: Let paint cure longer. Then mist a light spray coat first before brushing any sealer.
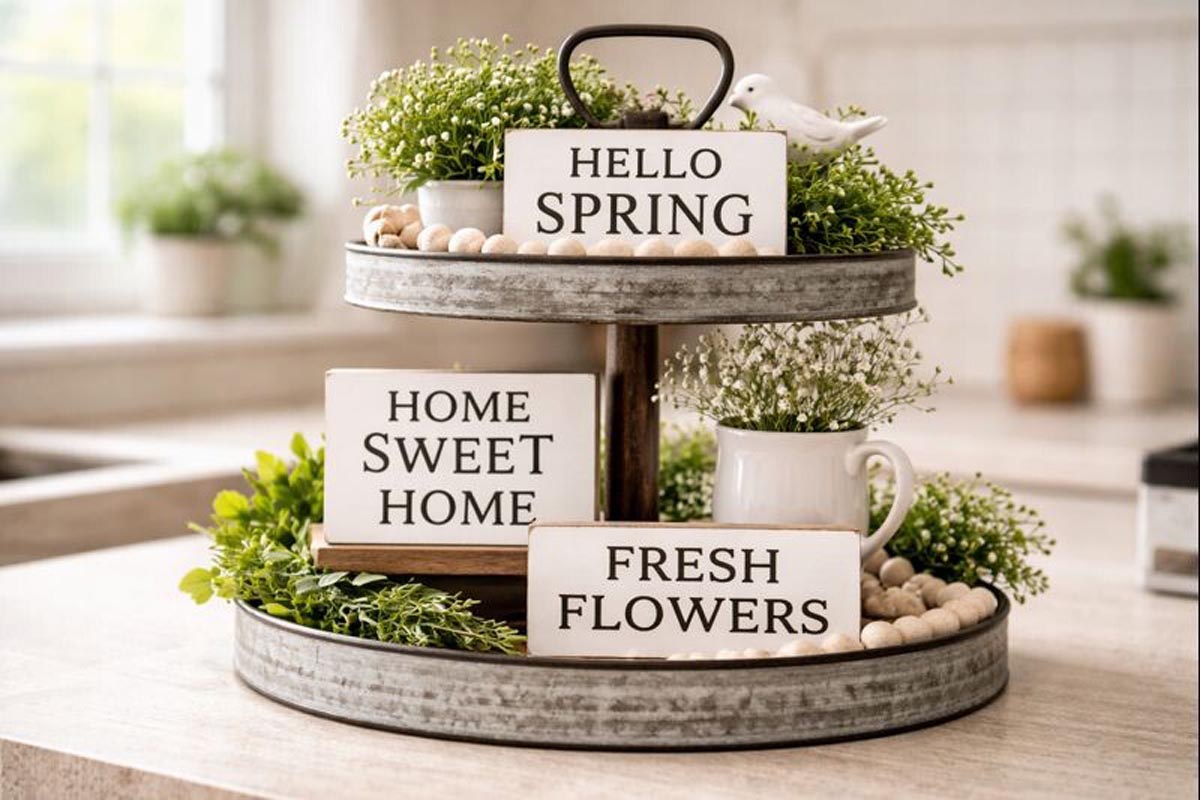
Where these signs look best on a tiered tray
Mini signs work best when they anchor a “scene.”
Simple placement rules:
- Put one statement sign near the front.
- Use smaller tags as fillers near the back.
- Don’t stack three signs in one cluster. One is usually enough.
If the tray is the project you’re building around, these guides help dial in the stand and tray size:
Final thoughts
Mini wooden signs for tiered trays are small, but they teach big skills: clean cuts, flat sanding, neat paint, and readable lettering. Keep the words short, the contrast strong, and the finish thin. Plus, once the first batch looks good, the next sets get faster because the sizing and workflow are already dialed in.