How to Make Dowels: 7 Smart Ways to Avoid Splits and Blowouts
To make dowels, rip straight-grained wood into square blanks slightly oversize, chamfer the lead end, size them round with a dowel plate (or a drill-driven dowel maker/lathe), then cut to length, chamfer both ends, and test-fit in a scrap hole before gluing.
Store-bought dowels work for plenty of projects, but homemade dowels let you match species, control moisture, and dial in a slip fit or press fit. In this guide I cover four shop-friendly ways to make dowels: a dowel plate, a drill-driven dowel maker, a lathe, and a simple drill-and-sandpaper setup for short pins. You’ll also learn sizing, end prep, and glue tips.
Contents Here
- 1 Dowel-making at a glance
- 2 What a dowel is and why making your own helps
- 3 Choose wood that stays straight and bonds well
- 4 Pick a dowel size that fits the joint
- 5 Safety setup before you start sizing dowels
- 6 Method 1: Make dowels with a dowel plate
- 7 Method 2: Make long dowels with a drill-driven dowel maker
- 8 Method 3: Turn dowels on a lathe
- 9 Method 4: Make short dowel pins with a drill and sandpaper
- 10 Cutting, chamfering, and grooving dowels for better glue-up
- 11 How to glue dowels so they seat fully
- 12 Using dowels as wood plugs and repair pins
- 13 Troubleshooting common dowel problems
- 14 FAQs about Dowels
Dowel-making at a glance
- Pick straight-grained wood that matches your project.
- Mill a blank slightly oversized (square or octagonal).
- Round and size it with your chosen method.
- Cut to length, then chamfer the ends.
- Test-fit in a scrap hole before committing to the workpiece.
What a dowel is and why making your own helps
A dowel is a round wood pin or rod that aligns parts, adds glue surface, or repairs holes. Homemade dowels help when you need a specific species, a precise diameter, or long grain that runs the full length of the pin. Long-grain dowels resist snapping better than short-grain plugs, and they take glue evenly when the fit stays consistent from end to end.
I make my own dowels most often for three jobs: (1) tight alignment in small assemblies, (2) color-matched exposed pegs, and (3) repairs like filling a stripped screw hole before re-driving a fastener.
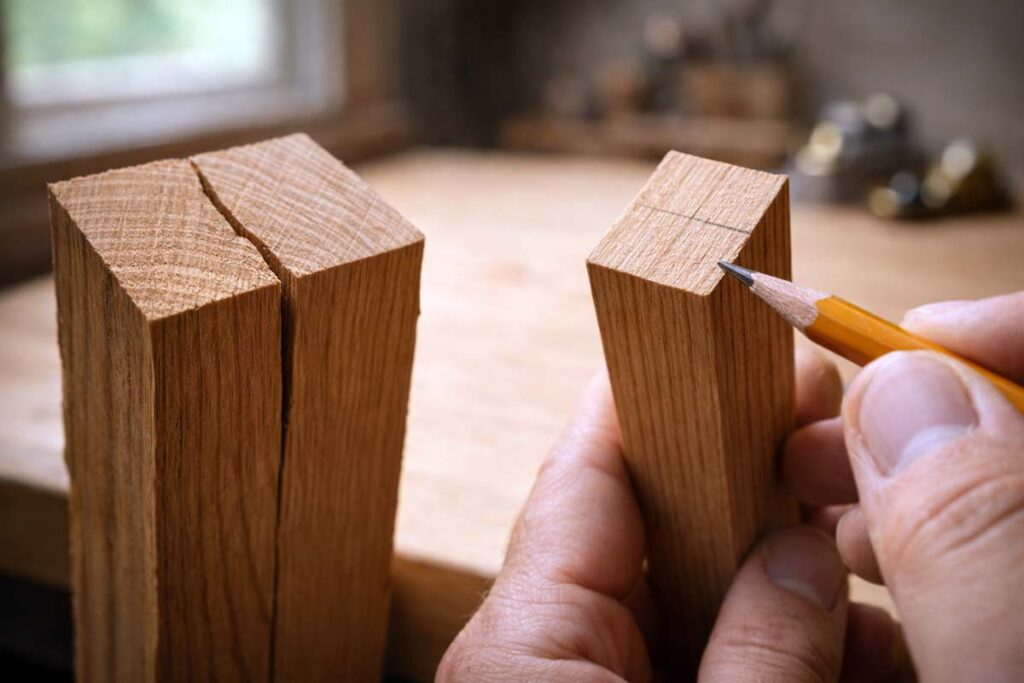
Choose wood that stays straight and bonds well
Wood choice controls two outcomes: how the dowel machines, and how it behaves after it leaves the tool. A dowel with runout (grain diving out the side) breaks easier and tends to split when you drive it into a snug hole. Straight grain and consistent moisture solve most of that.
- Grain direction: Use straight grain along the full length. Split stock from a billet when possible; splitting follows the grain and reduces runout.
- Moisture content: Match the dowel’s moisture to the project’s service environment. Indoor furniture parts typically run in a single-digit moisture range, and commercial wooden dowel pins are commonly produced in that same neighborhood.
- Species match: Match the dowel species to the project for color and movement. Mixing species works for hidden joinery, but it increases the odds you’ll see a ring or witness line under finish.
If you’re deciding between common rack woods, start with this guide on choosing pine, oak, or maple for small woodworking parts. It helps you predict dent resistance and glue behavior before you cut blanks.
For visible dowels, I also avoid wild grain hardwood scraps. A “pretty” offcut often has interlocked grain that tears when you size it, especially through a plate.
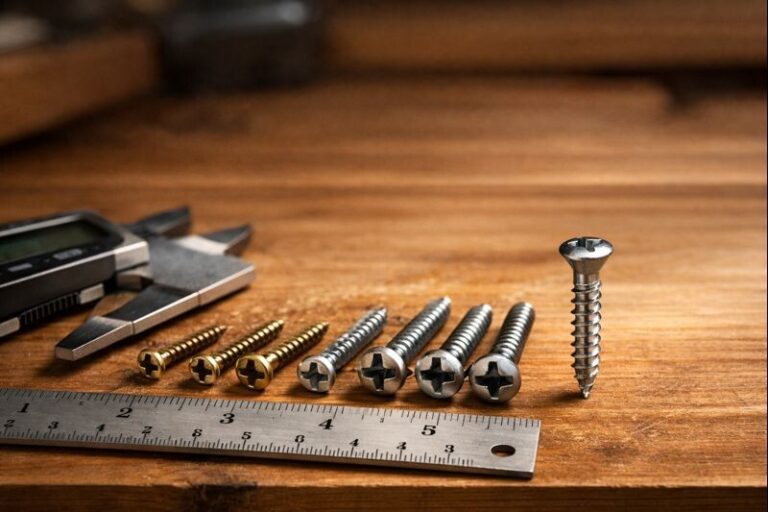
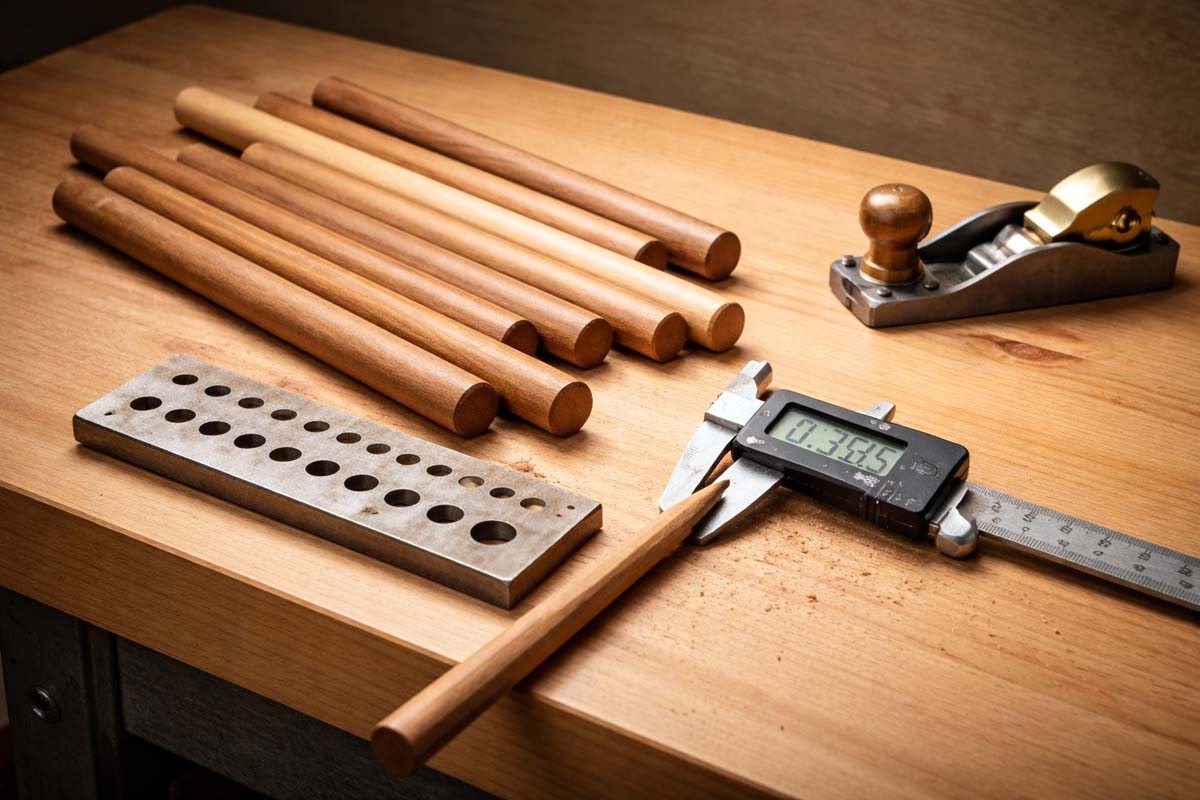
Pick a dowel size that fits the joint
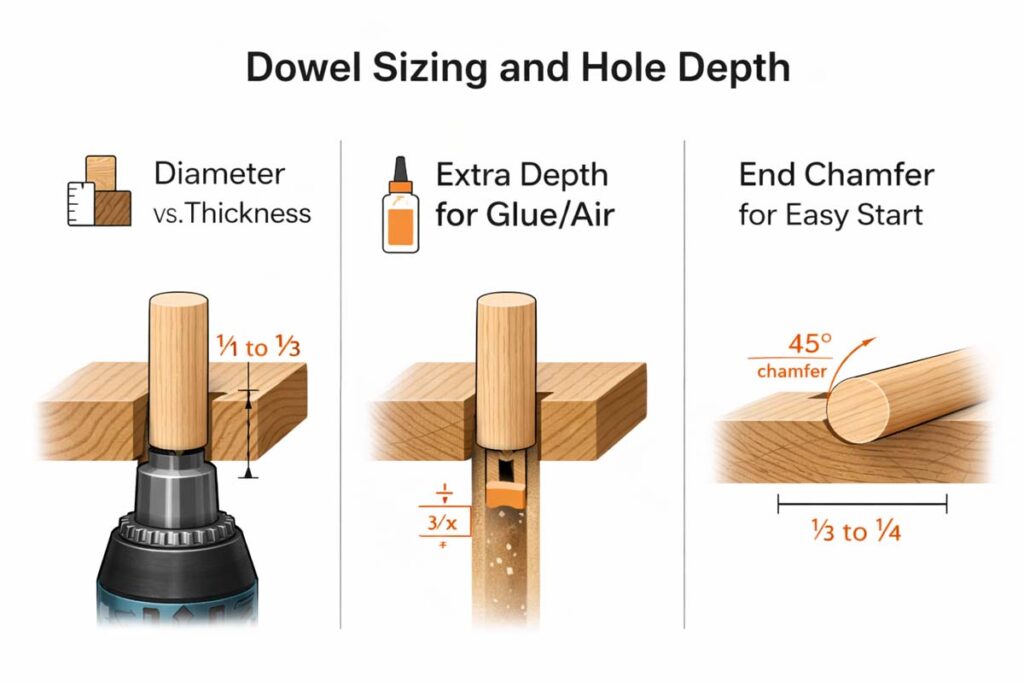
Dowel diameter controls two forces: the shear area inside the joint and the wedge force that tries to split the surrounding wood. A practical sizing rule keeps you out of trouble: choose a dowel around one-third of the wood thickness, and avoid oversizing in thin parts. Length matters too; leave space at the bottom of the hole for glue and air so the dowel seats fully.
- Diameter: Aim near 1/3 the thickness for typical edge joints and face joints. Stay conservative in narrow rails and near edges.
- Length: Use enough length to get purchase in both parts, but leave a small gap in the hole bottom so hydraulic pressure doesn’t fight you.
- Fit: Dry-fit first. A dowel that needs a sledgehammer to seat usually splits something later.
When you’re using dowels as hidden joinery, a slip fit that seats by hand pressure (plus a light clamp) usually behaves better than an all-out press fit. For exposed pegs, a light tap fit looks clean and stays put.
Safety setup before you start sizing dowels
Dowel-making concentrates a lot of cutting action into a small footprint. The parts are narrow, and narrow parts love to twist, whip, or launch if they catch. A clean setup prevents that.
- Wear eye protection and manage dust at the source.
- Keep blanks long enough to hold safely, then cut to final length after sizing.
- Use clamps, a vise, or a proper mounting method for plates and jigs—no freehand bracing against your hip.
- Keep cutters sharp; dull edges burn and grab.
If you need a quick refresher on PPE and basic shop habits, see basic shop safety gear for cutting and sanding. And if your cutters leave burn marks or tear-out, this guide on keeping cutters sharp and rust-free will save you time fast.
Method 1: Make dowels with a dowel plate
A dowel plate sizes a slightly oversized blank by shearing off the high spots as you drive it through a hole. This method shines for short to medium lengths and for dowels that need long grain. It’s also a solid way to “true up” store-bought dowels that arrive a hair oversized or fuzzy.
- Mount the plate over relief space. Clamp it over a dog hole or mount it over relief holes so the dowel has somewhere to exit.
- Prepare the blank. Start with straight-grained stock. Plane it close to size. A slightly faceted blank is fine; the plate removes facets quickly.
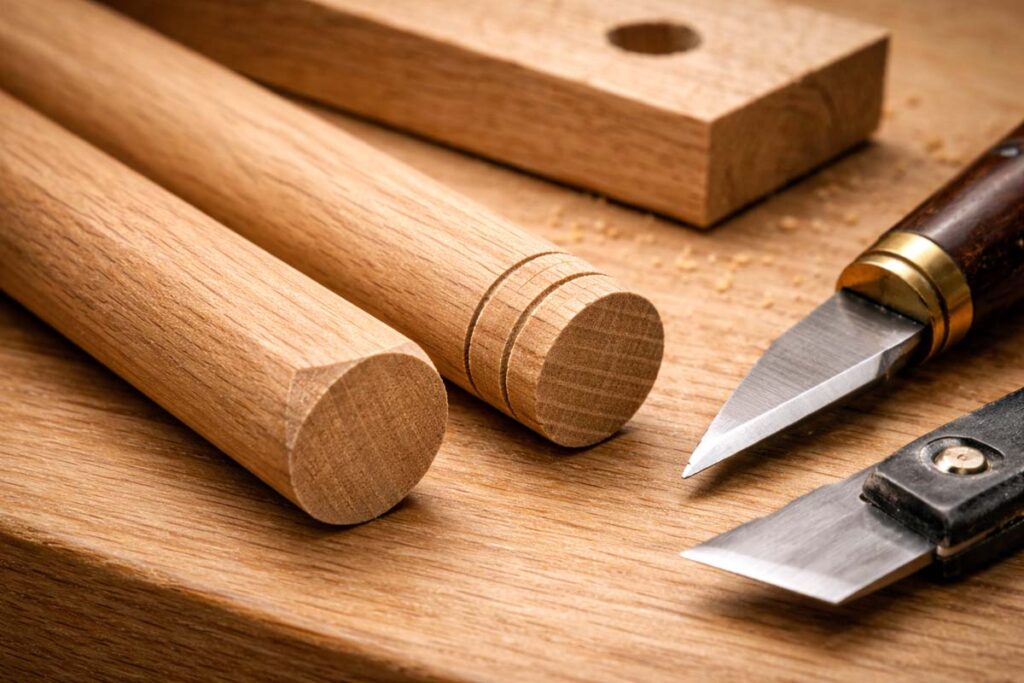
- Chamfer the leading end. Cut a small taper with a knife or block plane so the blank starts cleanly.
- Drive the blank through. Use controlled hammer taps. Keep your holding hand back from the plate face.
- Check diameter and finish. If it feels too aggressive, back up and reduce the blank closer to size before another pass.
- Cut to length and chamfer both ends. Save the cleanest middle section for critical joinery.
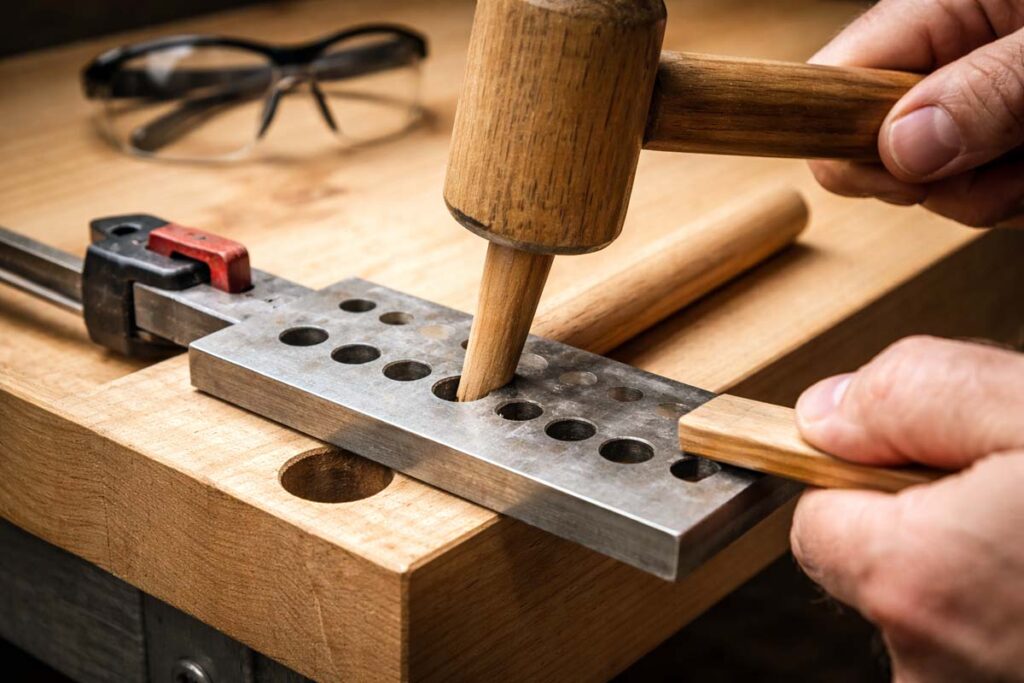
Shop note: If you want the strongest dowels from a plate, split a billet, then plane the split face down to a square. Splitting keeps the grain running true.
Method 2: Make long dowels with a drill-driven dowel maker
A drill-driven dowel maker rounds square stock as the drill spins the blank through cutting blades. This method earns its keep when you need long dowels in a specific species, or you want repeatable diameters without turning.
The Veritas-style dowel maker approach starts with square stock ripped slightly oversized, then uses a drill to drive it through a body that holds a roughing cutter and a sizing cutter. The “right” setting varies by wood because fibers spring back differently from one species to another.
- Rip straight square stock oversized. Keep it consistent end to end. Straight stock feeds cleaner and leaves a better surface.
- Mount the dowel maker solidly. Bolt it down or secure it through a bench dog hole system so it cannot shift under torque.
- Support the dowel as it exits. Use V-block supports or similar stands along the run so the dowel does not whip.
- Run a test piece. Feed at a steady pace. Measure the diameter and adjust the finishing cutter until the size matches your hole and fit goal.
- Make production dowels. Keep drill speed high and feed steady. Avoid stopping mid-cut; stopping often leaves ridges or burnishing.
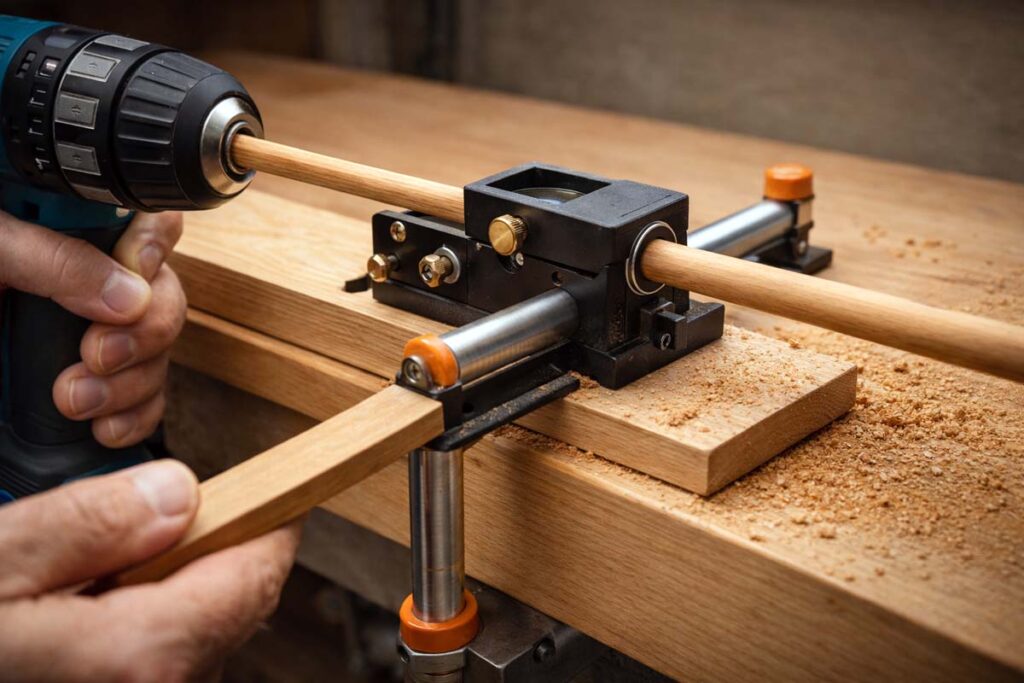
Whip control matters here. Long, thin dowels behave like a skipping rope when they spin. Supports placed at predictable intervals keep the work controllable and protect the blank from snapping.
Method 3: Turn dowels on a lathe
A lathe gives the most control over diameter, taper, and finish. It’s also the best route when you need a precise slip fit across multiple dowels that all match each other.
- Cut a blank. Start with straight-grained square stock slightly oversized in thickness and longer than final length.
- Mount between centers. Use a drive center and a live center, or a chuck if the blank is short and stable.
- Rough to round. Use a spindle roughing gouge to make a cylinder.
- Size to diameter. Use calipers and light passes. Sneak up on final size so you don’t overshoot.
- Sand with support. Sand with the lathe running at a safe speed, then break the edges and chamfer the ends.
- Cut to length off the lathe. A small stop block at the saw gives repeatable pins.
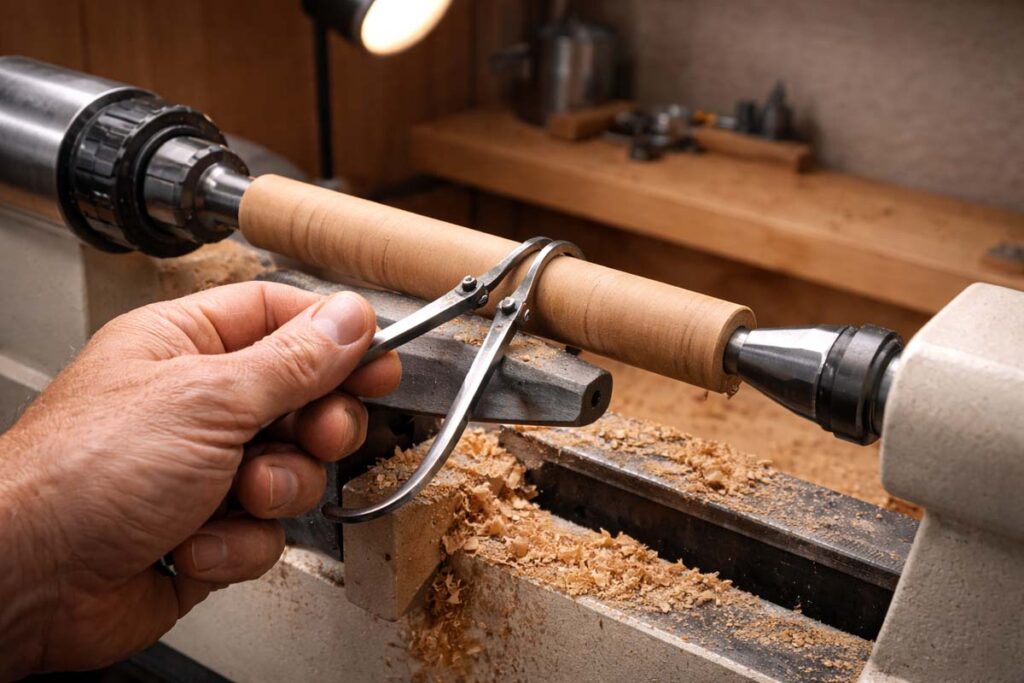
If you plan to glue these dowels, stop sanding at a reasonable grit. A slick, burnished dowel reduces glue grab. A clean, lightly sanded surface bonds reliably.
Method 4: Make short dowel pins with a drill and sandpaper
This method works for short pins, quick repairs, and “good enough” alignment dowels. It relies on spinning a blank and sanding it to size. It is slower than a plate and less accurate than a lathe, but it works when the shop is basic.
- Cut a straight blank. Start with a small square strip with straight grain.
- Chuck it carefully. Clamp one end in a drill chuck. Keep the stick short to reduce wobble.
- Knock corners down first. Use a block plane or sandpaper to turn the square into an octagon before you try to make it round.
- Sand to size. Use a sanding block and check often with calipers or a test hole in scrap.
- Cut clean pins. Cut the good middle section into lengths, then chamfer the ends.
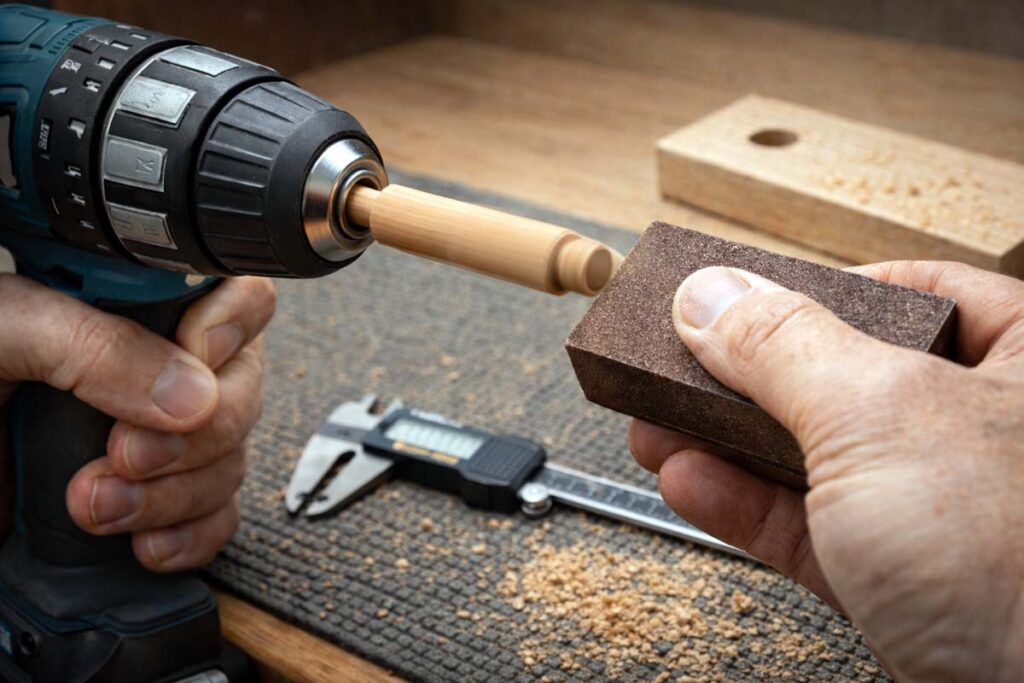
Safety note: Keep your fingers off the spinning stock. Hold sandpaper on a block, and keep the work short enough that it doesn’t flex.
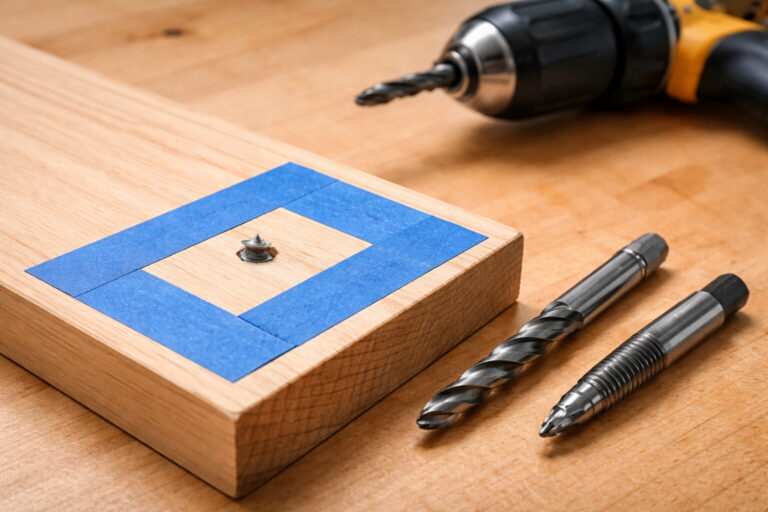
Cutting, chamfering, and grooving dowels for better glue-up
A well-sized dowel still needs clean ends and a path for glue and air. That prep prevents hydraulic lock and reduces splitting.
- Chamfer both ends: A small bevel helps the dowel start and reduces edge crushing.
- Add glue channels if needed: Store-bought dowels often have spiral or multi-grooves to spread glue. You can mimic this with a few shallow knife lines along the length.
- Score the surface lightly: A few light scratches increase glue wetting without weakening the dowel.
If your dowels will show on the surface, finish your end grain cleanly. This guide on sanding end grain without fuzzy tear-out helps you avoid that “dark ring” look around exposed pegs.
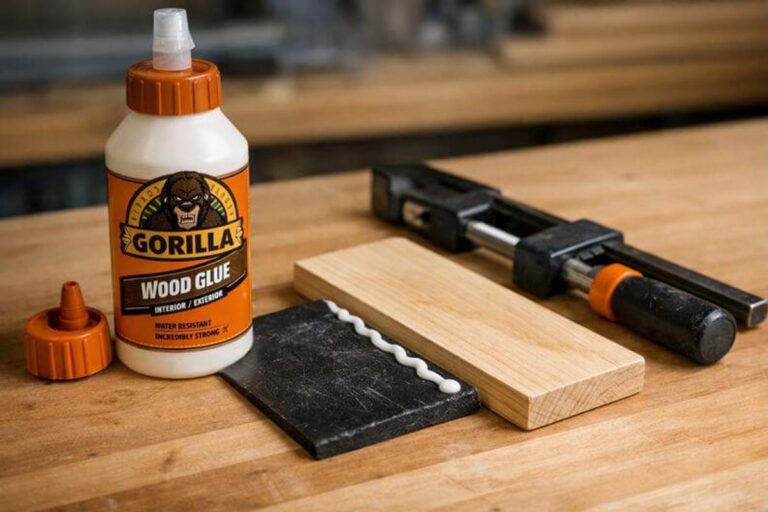
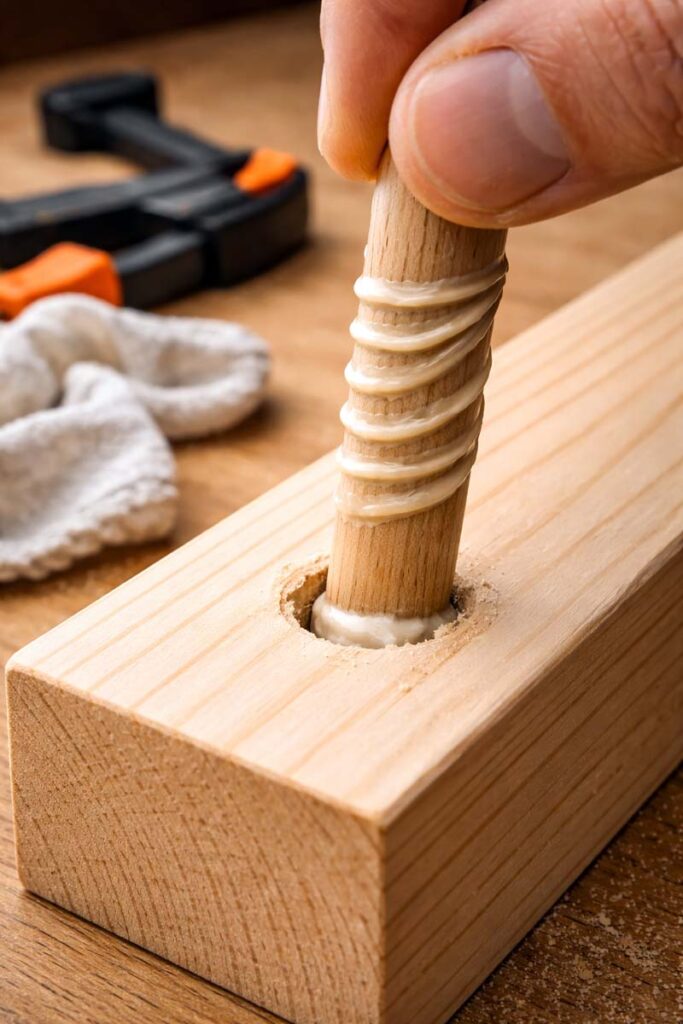
How to glue dowels so they seat fully
Good dowel glue-ups rely on three controls: hole size, glue amount, and assembly time. Drill straight holes, leave a small pocket of space at the hole bottom, then apply glue evenly and assemble within the glue’s open time. Clamp pressure pulls parts tight; it doesn’t compensate for sloppy holes.
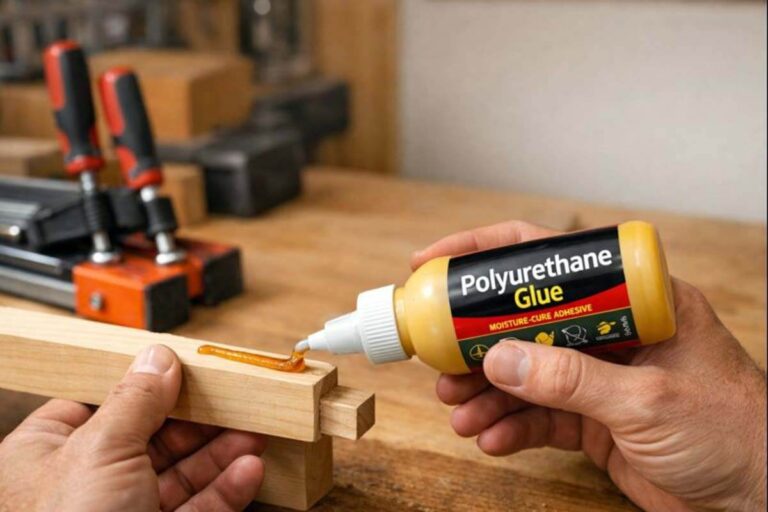
For glue choice, start with picking the right glue for dowel joinery. Then focus on controlling squeeze-out with this guide on how to meter wood glue so joints don’t ooze.
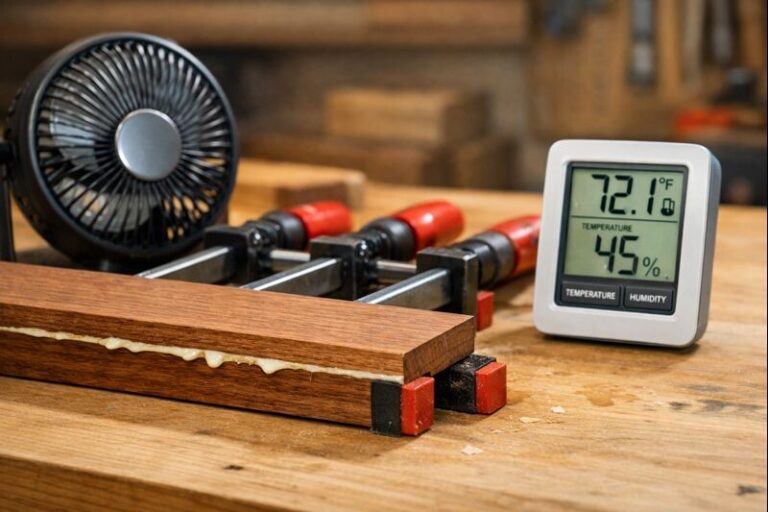
After assembly, timing matters. If you’re unsure when it’s safe to handle a glued joint, use understanding initial set time before you move the assembly and how long to keep clamps on a glued joint as your baseline references.
When squeeze-out hardens where you don’t want it, this walkthrough on removing dried glue squeeze-out after it cures keeps you from tearing fibers while you clean up.
Using dowels as wood plugs and repair pins
Dowels double as plugs: you drill a clean hole, glue in a dowel, then flush-cut and sand. This hides a screw head or rebuilds damaged material so you can re-drill and re-fasten.
For hiding hardware, these two guides help: making and using wood plugs to hide screws and choosing wooden plugs for screw holes that blend in.
For repairs, a dowel is one of the cleanest fixes for a blown-out fastener hole. Here’s the matching repair walkthrough on repairing a stripped screw hole with a glued-in dowel.
Troubleshooting common dowel problems
- Dowel won’t start in the plate: Add a clearer chamfer and reduce the blank closer to size before driving it through.
- Dowel comes out faceted: Your blank is too square or your feed is uneven. Plane closer to round first, then take another pass.
- Dowel burns or shines: The cutter is dull or the feed pauses. Sharpen and feed steadily.
- Dowel splits while driving: Grain runout or too-tight sizing causes wedge force. Switch to straighter grain and aim for a slip fit plus glue.
- Dowel seats halfway and stops: Glue and air have nowhere to go. Leave bottom clearance in the hole and add light glue channels.
- Joint feels loose after glue-up: Hole is oversized or dowel is undersized. Make a fresh dowel and test-fit in scrap before drilling the real part.
FAQs about Dowels
What’s the easiest way to make dowels at home?
The easiest method is a dowel plate, because it sizes a near-round blank with controlled hammer taps and no spinning stock. Prepare straight-grained wood close to the final size, chamfer the leading end, then drive it through the correct hole. Cut the finished dowel to length after sizing so you handle longer, safer pieces during the process.
Do homemade dowels hold better than store-bought dowels?
Homemade dowels hold better when they have straight long grain and a consistent fit to the drilled hole. Many store-bought dowels work fine, but some have runout or inconsistent diameter. A shop-made dowel also matches your project species and moisture more closely, which improves appearance and reduces seasonal movement surprises in exposed pegs.
What wood works best for dowels?
Straight-grained hardwoods like birch, maple, and beech machine cleanly and resist crushing in a tight hole. Softwoods work for alignment pins and light-duty assemblies, but they dent easier and compress under clamp pressure. The best choice is straight-grained stock that matches the project’s species and service conditions, especially for visible pins.
How tight should a dowel fit in the hole?
A dry-fit dowel should seat with firm hand pressure or light tapping, then slide out without shredding fibers. That fit leaves room for glue and avoids splitting the surrounding wood. If the dowel needs heavy pounding, reduce diameter slightly or add glue channels and bottom clearance so the dowel seats fully without hydraulic lock.
Should you sand dowels before gluing?
Light sanding is fine when it removes raised grain and fuzz. Over-sanding to a polished surface reduces glue wetting, especially with fast-setting PVA glues. A cleanly cut dowel from a plate or sharp cutter often glues best with minimal sanding, followed by a quick chamfer on the ends and a dry-fit test.