How to Identify Walnut Wood: 10 Steps to Avoid Costly Mistakes
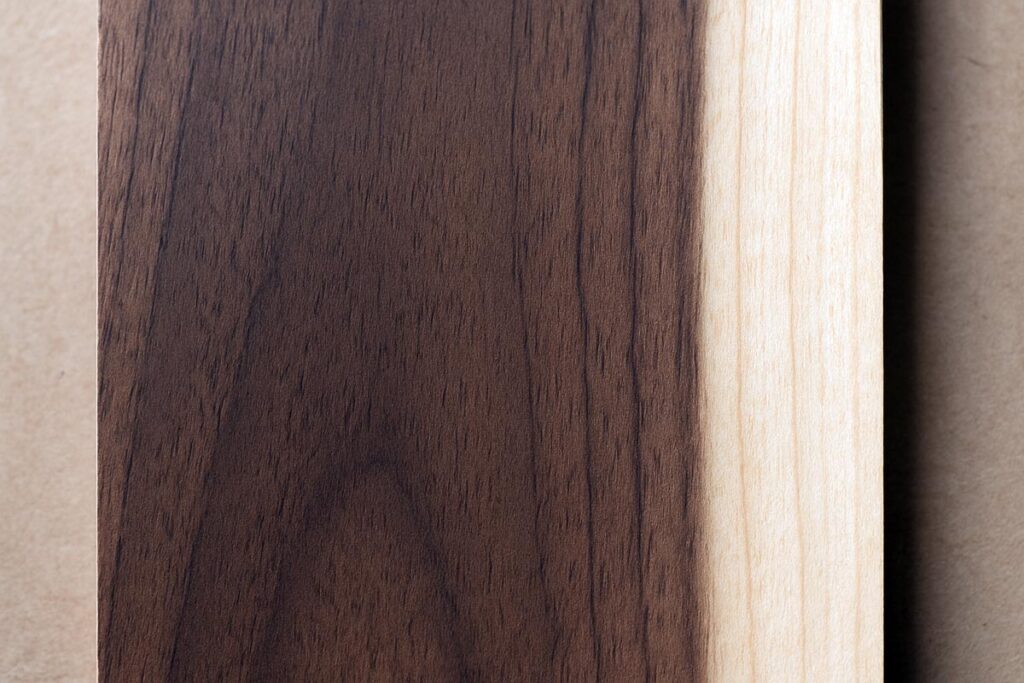
To identify walnut wood, focus first on the contrast between its dark brown heartwood and light creamy sapwood, then follow the step-by-step checks below on grain, pores, weight, and simple shop tests to confirm whether the board is truly walnut.
Real walnut usually shows a clear contrast between darker brown heartwood in the center and lighter, creamy sapwood near the edges. After that, grain pattern, pore size, weight, and a quick wipe test will confirm what you’re holding. The aim is simple: avoid paying walnut prices for stained softwood, avoid mismatching repairs, and know exactly what goes into the project. Walk through the steps below, and he can spot walnut with a lot more confidence.
Contents Here
- 1 What Walnut Wood Actually Is
- 2 Why it matters to correctly identify walnut
- 3 Basic walnut traits to keep in mind
- 4 Step 1 – Expose clean, fresh wood
- 5 Step 2 – Read the color the right way
- 6 Step 3 – Study the face grain
- 7 Step 4 – Inspect the end grain and pore structure
- 8 Step 5 – Check weight and hardness in the hand
- 9 Step 6 – Do a quick wipe test with mineral spirits
- 10 Step 7 – Use smell as a backup clue
- 11 Step 8 – Consider where the wood came from
- 12 Step 9 – Separate walnut from common look-alikes
- 13 Step 10 – When to call it “unknown hardwood”
- 14 FAQs about To Identify Walnut Wood
- 15 Final thoughts
What Walnut Wood Actually Is
When people say “walnut” in furniture or lumber, they usually mean American black walnut (Juglans nigra). It’s a hardwood native to the eastern United States and is unusual as one of the few naturally dark commercial woods from this region.
You’ll also see:
- English/European walnut (Juglans regia) – more common in gunstocks and veneers, usually a bit lighter and more varied in color.
- Claro walnut – hybrid stock, often very figured, used in high-end work.
- “Peruvian walnut” – often not a true walnut species; usually a Central or South American hardwood with a similar look.
But in day-to-day lumber shopping in the U.S., “walnut” almost always means black walnut, so that’s what I’ll focus on. The ID tricks below still mostly apply to the other walnuts, though the exact color can shift.
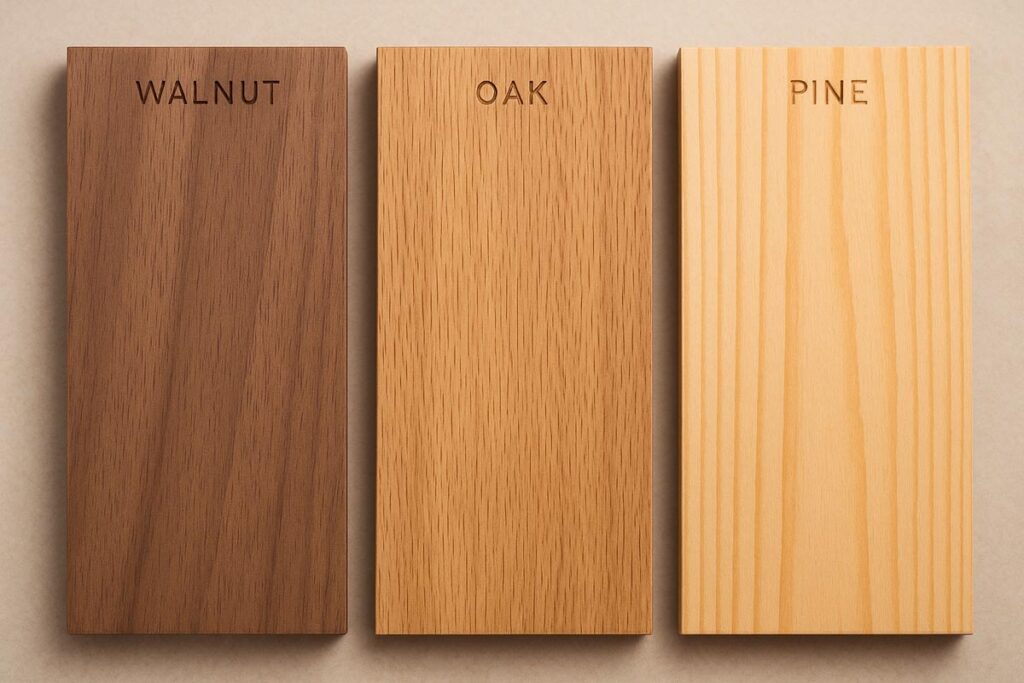
Black walnut heartwood typically runs light to dark chocolate brown, sometimes with gray, purple, or reddish hints. The sapwood is much lighter: pale cream or yellowish. That strong contrast is one of your first big clues.
Why it matters to correctly identify walnut
Before doing anything else, it helps to be clear on why you want a solid answer:
- Money: Walnut usually costs more than oak, poplar, or pine. If someone sells “walnut” that’s really stained softwood, he’s overcharging you.
- Color matching: If you repair or extend a walnut table, using the wrong species will look off forever.
- Finishing: Walnut takes finish differently from oak or maple. Pores, color, and absorption are not the same.
- Safety and expectations: Some people react to walnut dust. Also, when you say “this is walnut,” people expect a certain look and value.
So the job is not just curiosity. It affects your budget, design, and reputation.
Basic walnut traits to keep in mind
Before the first step, keep a few base traits in your head:
- Heartwood: Medium to dark brown, often with cooler gray or faint purple tones.
- Sapwood: Creamy white to light yellow, usually on the outer edges of boards.
- Grain: Mostly straight, medium texture, open pores but not as rough as oak.
- Weight: Heavier than softwoods, similar to many oaks.
- Smell: Mild, earthy, sometimes slightly “nutty” when freshly cut.
Every step below just checks one or more of these traits.
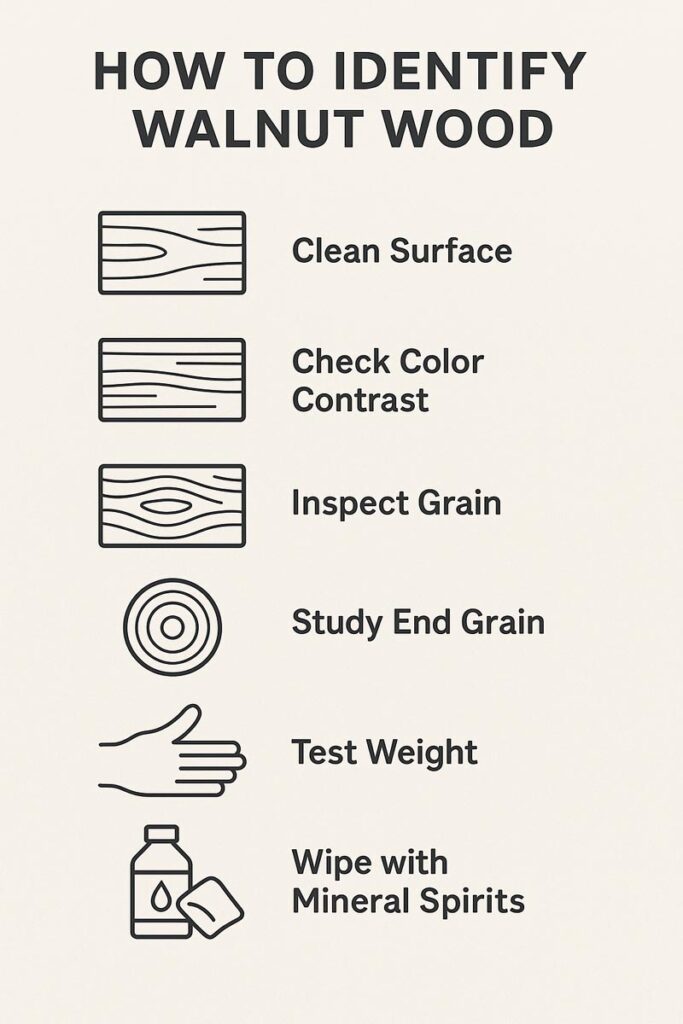
Way to identify walnut wood in my given below infographic:
Step 1 – Expose clean, fresh wood
You cannot identify wood through dirt, lacquer, or 30 years of grime.
- Pick a small, discreet area: end of a board, underside of a shelf, or back edge of a panel.
- Use a sharp hand plane, card scraper, or 120–150 grit sandpaper.
- Remove just enough material to reach clean, fresh fibers.
Once the old finish and oxidation are gone, the real color and grain show up. Everything else depends on this step.
Step 2 – Read the color the right way
With fresh wood exposed, check the color in good, natural or white light.
You’re mainly looking for:
- Heartwood: Medium to dark brown. Often a cooler tone, sometimes with gray or purplish hints.
- Sapwood: Light cream or pale yellow, usually along one or both edges of a board.
That contrast between dark interior and pale edges is a big clue. If the board is dark from edge to edge with no lighter strip and came cheap, stain is probably doing the heavy lifting.
Remember:
- Freshly cut walnut often looks lighter and slightly gray.
- Oil or clear finish will deepen and warm the color.
- Old walnut can fade in strong sunlight and look softer or washed out.
Color is a starting point, not the final verdict.
Also learn: 7 Steps to Finish Walnut Wood
Step 3 – Study the face grain
Grain tells more truth than color. Look closely at that fresh patch.
Typical walnut grain:
- Mostly straight to gently wavy lines.
- Medium texture: more open than maple, less coarse than oak.
- Occasional streaking or subtle figure, but not loud striping in standard boards.
Compare that to common impostors:
- Stained oak: Strong, visible rays crossing the grain on many faces. The pores are larger and the texture feels rougher.
- Stained pine or fir: Very bold earlywood/latewood bands, like wide, repeating growth stripes.
- Stained poplar: Grain looks softer and blurrier, with less distinct lines.
If the grain doesn’t look like walnut, do not let the color convince you.
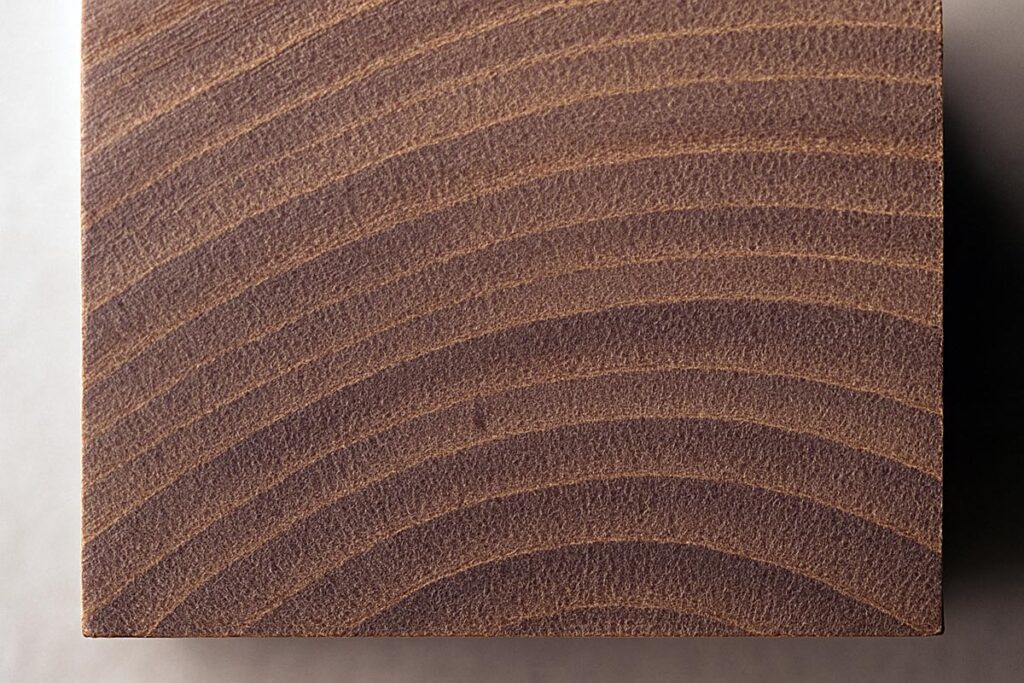
Step 4 – Inspect the end grain and pore structure
End grain is one of the best ways to confirm what you’re seeing.
- Find a cut end or make a small new crosscut if you have offcut to spare.
- Lightly sand the end grain to about 120–150 grit so the structure is clear.
- Use good light; a small magnifier helps but isn’t required.
On walnut, end grain usually shows:
- Medium-sized pores that are easy to see, but not huge.
- Pores mostly arranged in bands near the earlywood, but not as dramatic as oak.
- Very small rays, not bold pale streaks like you see in oak.
If the end grain is almost poreless and super fine, you may be holding maple or birch. If the pores are huge with strong rays, you’re probably looking at oak. Walnut sits in the middle.
Step 5 – Check weight and hardness in the hand
Now use feel as another clue.
- Walnut is heavier than pine, fir, or most cheap softwoods.
- It’s similar in weight to many oaks, sometimes a bit lighter.
- It dents under firm fingernail pressure, but not as easily as pine.
Pick up a piece large enough to feel some heft. If it feels suspiciously light for its size and dents with almost no effort, it’s probably not walnut, no matter how dark it looks.
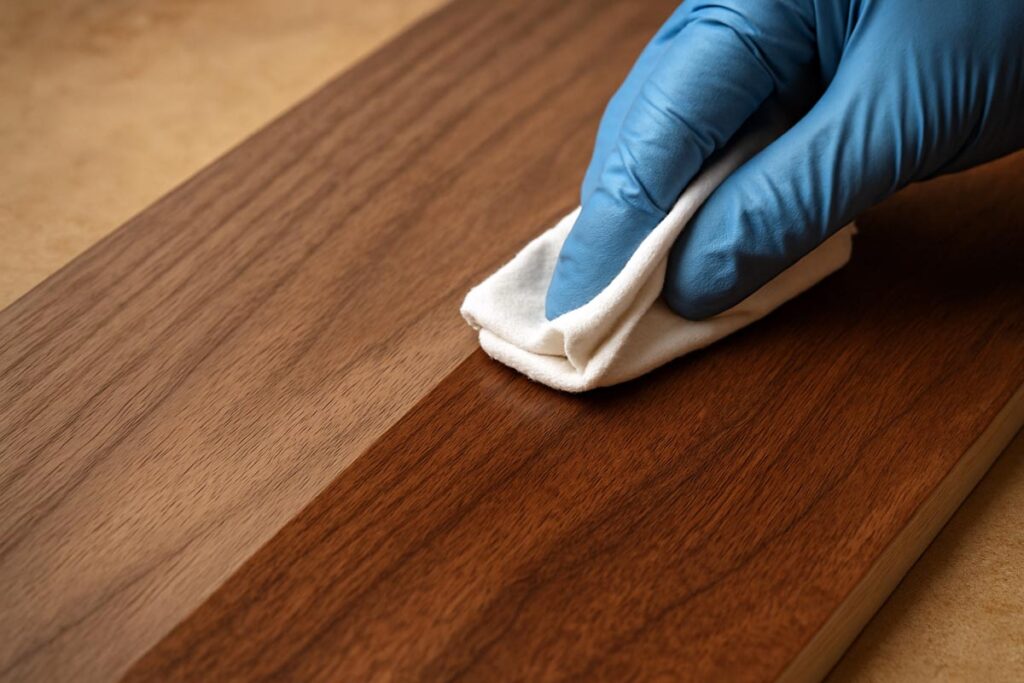
Step 6 – Do a quick wipe test with mineral spirits
When the surface is still confusing, a wipe test helps reveal what finish will do.
- Put a little mineral spirits on a clean rag.
- Wipe the fresh sanded area lightly.
- Watch how the grain and color “pop” for a minute.
On walnut, that patch jumps to a richer brown with visible pores and clean grain lines. On stained softwood, the stain may smear, or the grain will still look like pine or fir underneath. Let the area dry completely before gluing or finishing.
Step 7 – Use smell as a backup clue
Smell is not a primary test, but it supports the other signs.
- Freshly cut or sanded walnut has a mild, earthy smell. Some people describe it as slightly nutty.
- Pine smells sharp and resinous.
- Oak can smell a bit acidic or tannin-heavy.
Make a small cut or sanding pass, step out of the dust cloud, and take a short whiff. If the smell screams “pine tree,” that dark “walnut” board probably isn’t walnut.
Step 8 – Consider where the wood came from
Context helps you decide how much to trust what people say.
Ask yourself:
- Did it come from a hardwood dealer that labels species clearly?
- Is it an old piece that someone just calls “walnut” because it’s dark?
- Is it trim or furniture from a big-box store labeled “walnut finish”?
“Walnut finish” is a color name, not a species label. True walnut lumber and solid walnut furniture usually sit at a higher price point. When something is cheap and only described by color, be cautious.
Step 9 – Separate walnut from common look-alikes
Here’s a quick breakdown so you can tell walnut from the usual suspects.
Walnut vs. stained oak
- Oak: Strong rays, big pores, and often more reddish or golden underneath.
- Walnut: No bold rays, smoother overall look, cooler brown heartwood.
Walnut vs. stained pine or fir
- Softwood: Very strong earlywood/latewood lines and very soft under a fingernail.
- Walnut: More even hardness and weight, more subtle growth rings.
Walnut vs. stained poplar
- Poplar: Softer grain edges and sometimes odd underlying green or purple patches.
- Walnut: Cleaner brown heartwood with consistent tone and clearer pore pattern.
Walnut vs. mahogany/sapele
- Mahogany/sapele: Generally warmer red-brown, often with ribbon or stripe on quartered faces.
- Walnut: Cooler chocolate brown, purple or gray hints, more subdued figure in average boards.
Run each mystery board through these comparisons. It becomes easier to rule things out.
Step 10 – When to call it “unknown hardwood”
Sometimes, even after all these checks, the pieces don’t line up:
- Color looks about right, but the end grain is wrong.
- Grain looks okay, but weight and smell feel off.
- The story behind the wood doesn’t match the claimed species or price.
In that case, the honest move is to label it “unknown hardwood” and treat it that way. You can still build shelves, jigs, or shop furniture with it. Just avoid mixing it into a project that’s supposed to be clear, confirmed walnut.
FAQs about To Identify Walnut Wood
How to identify black walnut wood?
Black walnut typically shows dark chocolate brown heartwood with occasional gray or purplish tones and pale cream sapwood at the edges. The grain is open but not as coarse as oak, with a smooth, even texture when planed and a medium-heavy overall feel.
How can someone quickly tell walnut from stained pine?
Expose fresh wood, then check weight and grain. Walnut feels heavier, has medium pores, and shows smoother grain lines. Stained pine is lighter, dents very easily, and has strong earlywood/latewood stripes that repeat like clear bands.
Is light-colored walnut still real walnut?
Yes. Fresh walnut can look lighter and gray before finish, and sun-faded boards may be softer in tone. As long as the heartwood–sapwood contrast, grain, pores, and weight match walnut, lighter color alone doesn’t mean it’s fake.
Does walnut always have a strong smell?
No. Walnut has a mild, earthy odor when freshly cut or sanded, but it’s not very strong. Smell helps mainly when it clearly rules out pine or other resinous softwoods. Use it as backup, not as the only test.
Can you rely only on color to identify walnut?
No. Color is easy to fake with stain. Many woods can be darkened to look “walnut colored.” Always confirm with grain, end grain, pores, weight, and basic context like source and price before deciding.
Final thoughts
Identifying walnut doesn’t require lab equipment. It just takes a routine you repeat every time: expose fresh wood, read the color with sapwood and heartwood in mind, study the grain, inspect end grain, feel the weight, and use a quick wipe test when needed. Each of those steps adds one more piece to the puzzle until the board either clearly fits walnut or clearly doesn’t.
The more walnut you handle, the faster this process runs in your head. In the beginning, move slow and deliberate. After a while, you’ll spot real walnut in a stack from several feet away and only confirm with a couple of quick checks.