How to Fix a Stripped Screw Hole in Wood: 5 Proven Fixes That Last
Fix a stripped screw hole in wood starts with slowing down and figuring out why the screw stopped biting. Most of the time, the wood fibers are crushed, the pilot hole was off, or the screw was over-tightened.
The good news is you don’t have to scrap the project. With a few reliable shop fixes, the joint can end up stronger than it was the first time.
Contents Here
- 1 What a “stripped” screw hole really means
- 2 Why screw holes strip in the first place
- 3 Before fixing: do a quick 60-second assessment
- 4 Tools and supplies that cover 95% of fixes
- 5 Choosing the right repair method
- 6 Fix 1: Toothpicks (or skewers) + wood glue
- 7 Fix 2: Hardwood dowel plug (the “do it once” repair)
- 8 Fix 3: Epoxy fill (for ugly damage or questionable wood)
- 9 Fix 4: Threaded inserts (best for removable hardware)
- 10 Fix 5: The quick alternatives that sometimes make sense
- 11 The pilot hole rule that prevents most strip-outs
- 12 Extra prevention tips that actually work
- 13 FAQs about to Fix a Stripped Screw Hole in Wood
- 14 Final thoughts
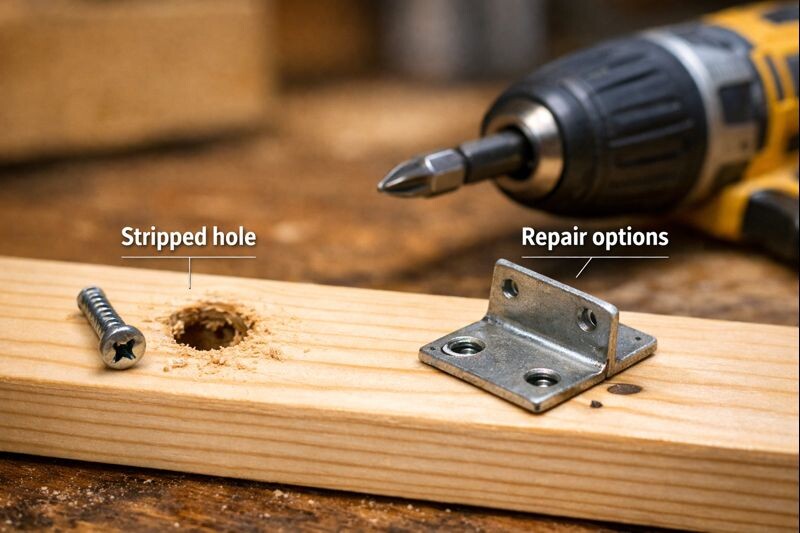
What a “stripped” screw hole really means
A screw holds because its threads grab intact wood fibers.
When a hole strips out, those fibers get torn, crushed, or widened. The screw can spin with almost no resistance, and the parts won’t pull tight.
You’ll usually notice one of these:
- The screw spins but doesn’t snug down
- The head tightens for a second, then pops loose
- The joint feels wobbly even with the screw “tight”
- The screw backs out easily with your fingers
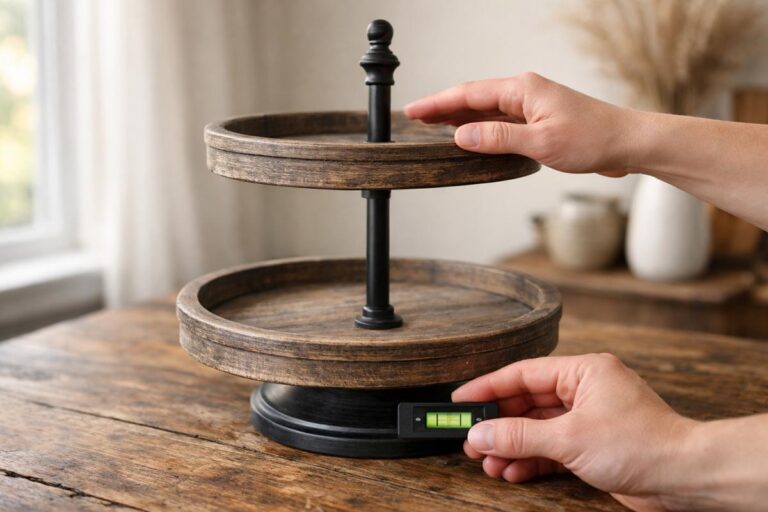
If this is happening on a tiered tray stand post, handle, or center rod bracket, it’s worth fixing correctly. Movement tends to grow over time. If your build is already rocking, the step-by-step stability checks in this guide to stopping a tiered tray stand from wobbling can help too.
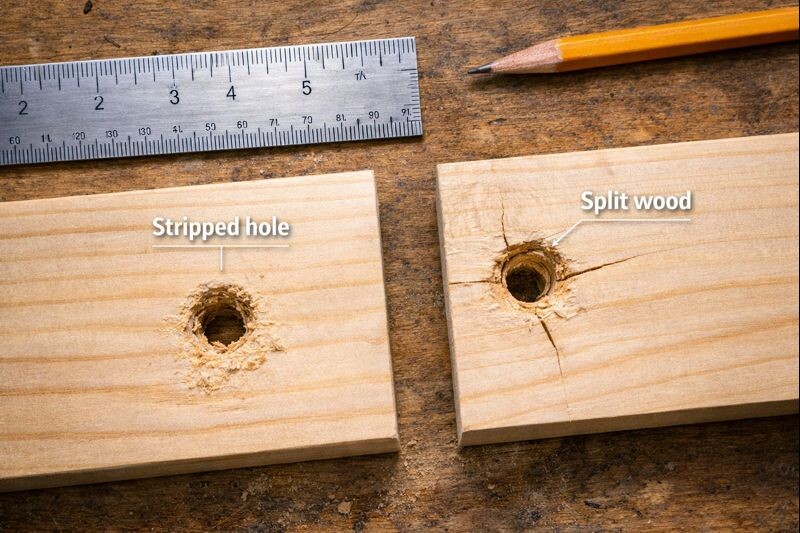
Why screw holes strip in the first place
This is the short list I see most often in the shop:
- No pilot hole (or the wrong size). Too small splits wood; too large strips.
- Soft wood in a high-stress spot. Pine and poplar crush more easily than hardwoods.
- Over-tightening. Especially with an impact driver or worn bit.
- Screw threads don’t match the material. Fine threads in softwood don’t bite as well.
- End grain fastening. Screws into end grain hold worse than side grain.
- Repeated removal. Hardware that’s taken on and off chews the fibers.
If the project wood choice is part of the problem, these comparisons help set expectations: choosing between pine, oak, and maple and best wood types for sturdy tiered tray stands.
Before fixing: do a quick 60-second assessment
This is the part that saves time later.
- Identify the job the screw is doing: Is it holding a hinge, pulling two parts tight, supporting weight, or just locating a piece?
- Check the hole location: If it’s too close to an edge, a bigger fix (like a dowel plug) is safer than forcing a larger screw.
- Look for splits: If the wood is cracked, clamping and gluing the split comes first, then fix the hole.
- Decide if you need the hole in the same spot: If hardware needs to align (like a bracket), keep the location. If not, shifting the screw can be the simplest win.
Tools and supplies that cover 95% of fixes
You won’t need all of this every time, but having the basics ready helps.
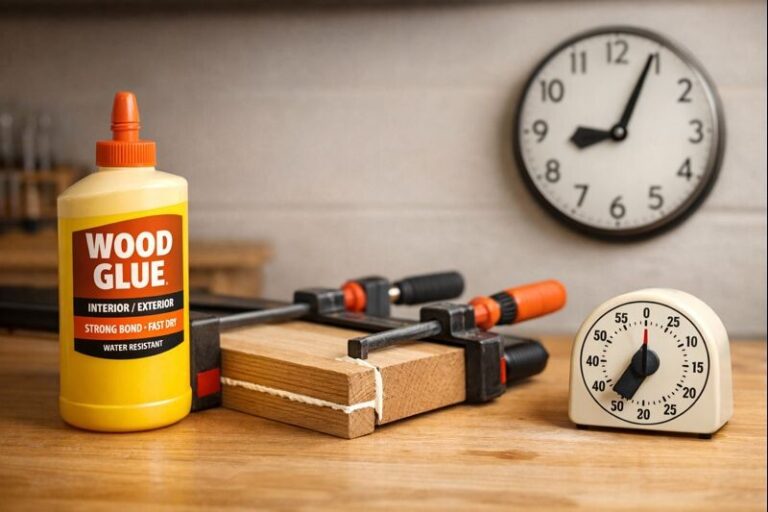
- Wood glue (PVA) and/or thin CA glue
- Toothpicks, bamboo skewers, or matchsticks (wood only)
- Drill and bits (including a bit that matches your dowel size)
- Flush-cut saw or chisel
- Sandpaper (120–220)
- Hardwood dowel (or a dowel rod you can cut)
- Clamps (even a small quick clamp helps)
- Optional: epoxy, threaded inserts, wood filler (for cosmetic-only spots)
For safer, cleaner work habits—especially with CA glue and drilling—this checklist is worth a quick skim: essential safety gear for tray stand builds. For keeping bits sharp and drivers from chewing screw heads, this helps too: tool maintenance for woodworking newbies.
Choosing the right repair method
Here’s a practical way to decide. “Strength” below means how well the repaired hole will hold under load.
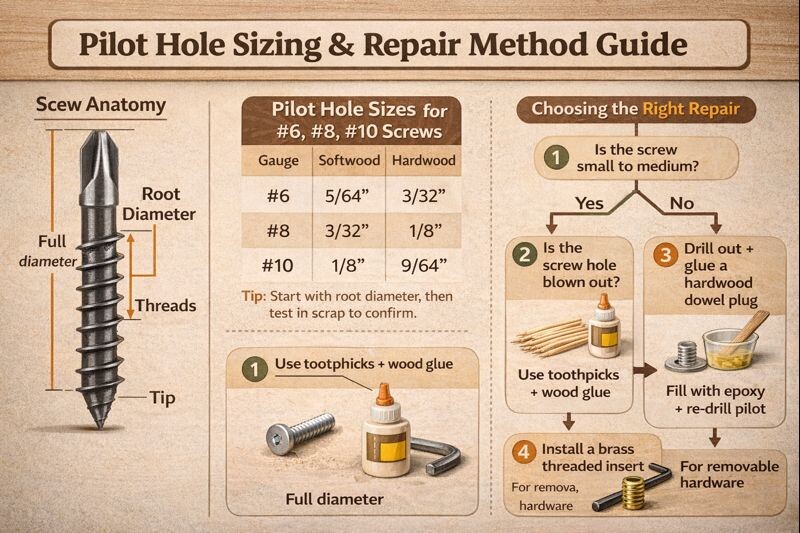
| Repair method | Best for | Strength | Cure time | Can remove screw later? |
|---|---|---|---|---|
| Toothpicks + wood glue | Light to medium-duty screws, quick repairs | Medium | 30–60 min to handle, 24 hrs full | Yes |
| Hardwood dowel plug | High stress joints, repeated use, stripped badly | High | 1–24 hrs (glue dependent) | Yes |
| Epoxy fill + re-drill | Damaged/punky wood, odd shapes, larger voids | High | 4–24 hrs | Usually |
| Threaded insert | Hardware removed often (handles, knobs, tray posts) | Very high | Immediate | Yes (best option) |
| Longer/thicker screw | When there’s solid wood deeper | Medium–High | Immediate | Yes |
| Move the screw location | When alignment isn’t critical | Medium–High | Immediate | Yes |
If you’re fixing a tray stand build, the main guide for hardware layout and drilling order can prevent repeat problems: making a tiered tray stand.
Fix 1: Toothpicks (or skewers) + wood glue
This is the fastest reliable fix for a screw hole that’s only slightly stripped.
When to use it
- The hole is enlarged but not blown out
- The screw is small to medium
- The joint isn’t a heavy structural connection
- You want a clean, invisible repair
Step-by-step
- Back the screw out and clean the hole: Pick out loose crumbs. A small drill bit spun by hand can knock out fuzz.
- Dry fit toothpicks or a skewer: Snap a few toothpicks so they’re close to the hole depth. For a bigger hole, use a bamboo skewer split into strips.
- Add glue: Coat the toothpicks lightly with wood glue. Don’t flood the hole. Too much glue can hydraulic-split thin stock.
- Pack the hole tight: Push toothpicks in until snug. The goal is firm resistance, not forcing.
- Trim flush: Cut them off level with the surface. A chisel or flush-cut saw works well.
- Let it set, then re-drive: Wait at least 30–60 minutes before driving a screw. For best hold, wait overnight.
- Drive the screw by hand first: This reduces the chance of stripping again. Once it bites, switch to a driver on a low clutch setting.
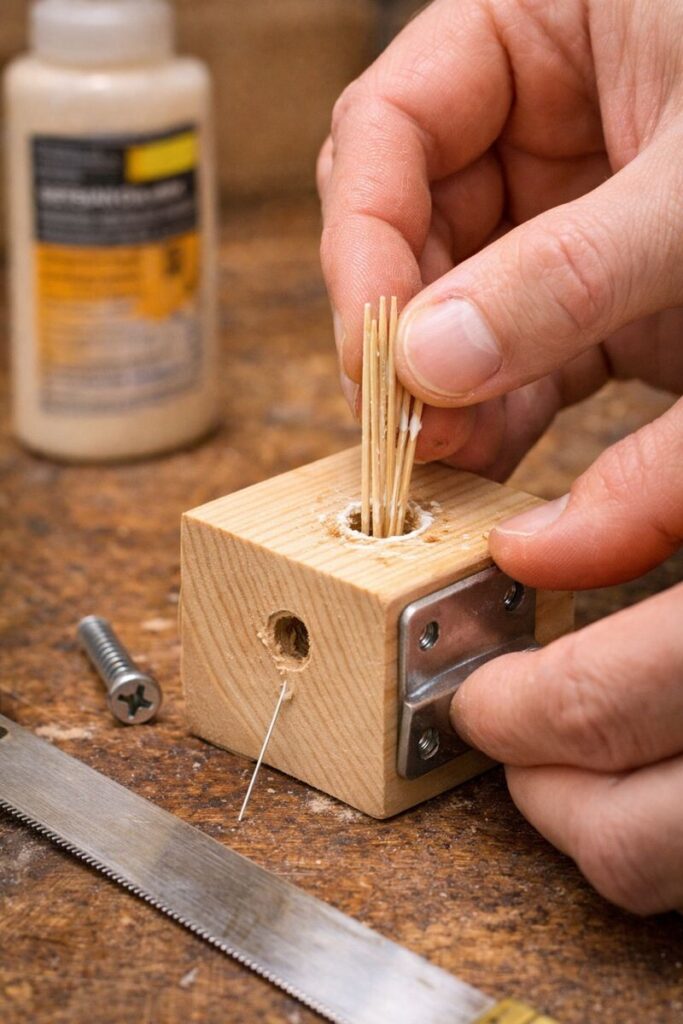
Benefits and drawbacks
- Benefit: quick, cheap, surprisingly strong for many situations
- Drawback: not ideal for heavy load, repeated removal, or large screws
Tip: If the screw goes into end grain, this method helps, but it won’t turn end grain into a “forever” joint. For end-grain prep that keeps plugs and repairs cleaner, the technique in sanding end grain smooth is useful.
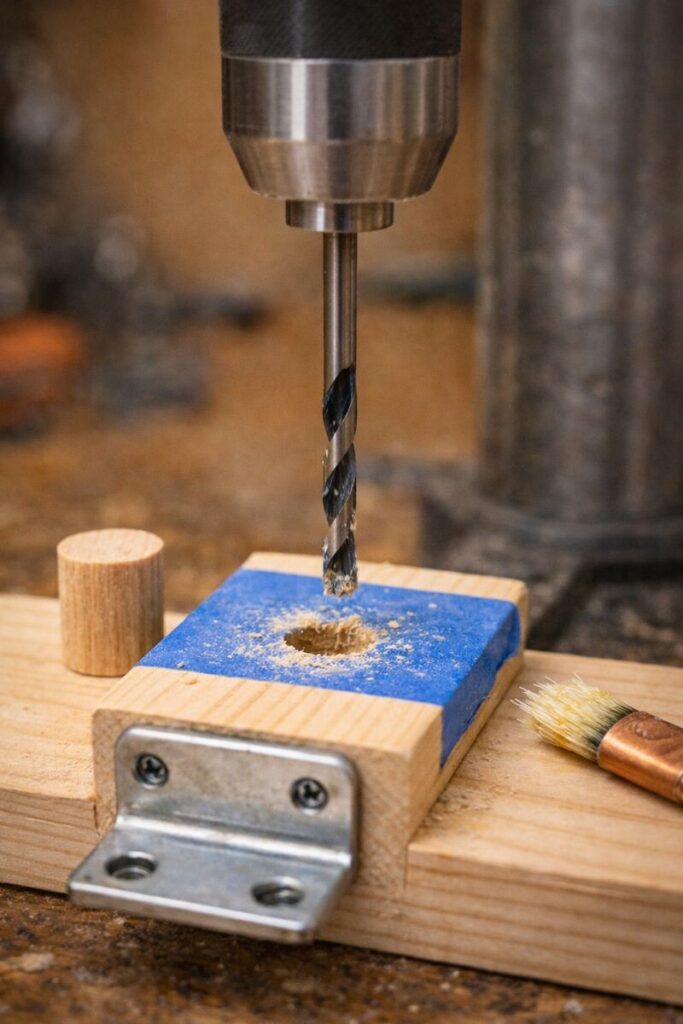
Fix 2: Hardwood dowel plug (the “do it once” repair)
If the hole is badly stripped, or the screw matters (hinges, tray stand uprights, load-bearing braces), a dowel plug is the most dependable wood-to-wood repair.
When to use it
- The screw hole is blown out
- The joint sees movement or weight
- You need long-term strength
- The screw will be removed occasionally
Step-by-step Fix a Stripped Screw Hole in Wood
- Choose a dowel size: Pick a dowel slightly larger than the damaged area. 1/4″ and 3/8″ are common.
- Drill out the damaged hole cleanly: Use a brad-point bit if possible for a clean cut. Drill straight. If the surface is visible, tape around the area to reduce tear-out.
- Cut a dowel plug to length: Cut it a hair longer than the hole depth so it can be trimmed flush after glue-up.
- Glue the plug: Coat the sides of the dowel with wood glue. Avoid puddles at the bottom.
- Insert and align grain (optional but nice): If the dowel has visible grain and the surface will be seen, align it so it looks natural.
- Clamp if needed: If it’s a tight fit, tapping it in may be enough. If the piece is thin or split-prone, clamp lightly.
- Let cure, then trim flush: After curing, flush cut and sand smooth.
- Re-drill a proper pilot hole: This is the step that makes the repair last. Drill the pilot based on screw root diameter, not the thread diameter.
Benefits and drawbacks
- Benefit: strongest “wood” repair, holds like new wood because it is new wood
- Drawback: takes more tools and time, and it’s harder in tight corners
Fix 3: Epoxy fill (for ugly damage or questionable wood)
Epoxy shines when the hole is irregular, the wood is soft/punky, or there’s not enough clean material for a dowel to glue well.
When to use it
- The hole is ragged or oversized
- The wood is soft, damaged, or crumbly
- You need strong holding power and don’t mind a synthetic core
Step-by-step
- Clean and rough up the inside: Epoxy bonds better to a rough surface than polished fibers.
- Tape the backside if the hole goes through: Painter’s tape works as a dam.
- Mix epoxy thoroughly: Follow the ratio exactly. Poor mixing means weak cure.
- Fill the hole and let it settle: Use a stick to push epoxy into voids. Tap the piece lightly to pop bubbles.
- Let it cure fully: Don’t rush this. “Hard to the touch” isn’t always “ready to drill.”
- Re-drill the pilot hole: Drill slowly. Epoxy drills differently than wood. Keep the bit straight.
Benefits and drawbacks
- Benefit: very strong in damaged wood, fills irregular shapes
- Drawback: more permanent and messy, and mistakes are harder to undo
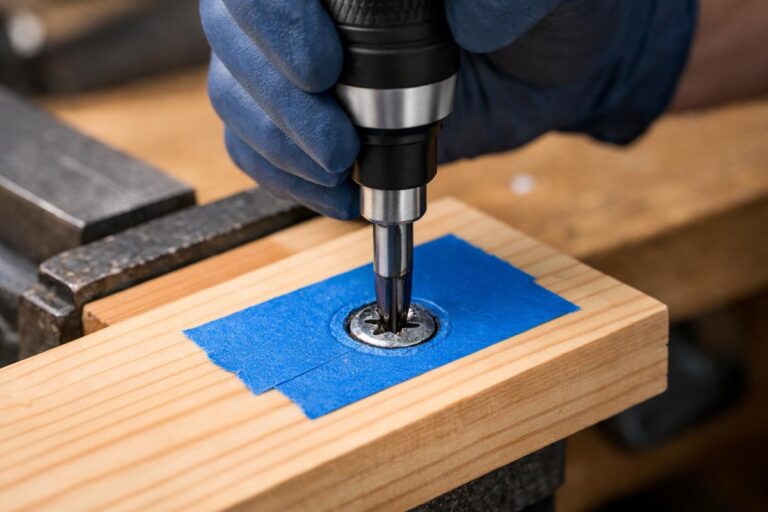
Fix 4: Threaded inserts (best for removable hardware)
If a screw will be removed often—think handles, knobs, tray stand posts, or any spot you expect to service—threaded inserts are the cleanest long-term move.
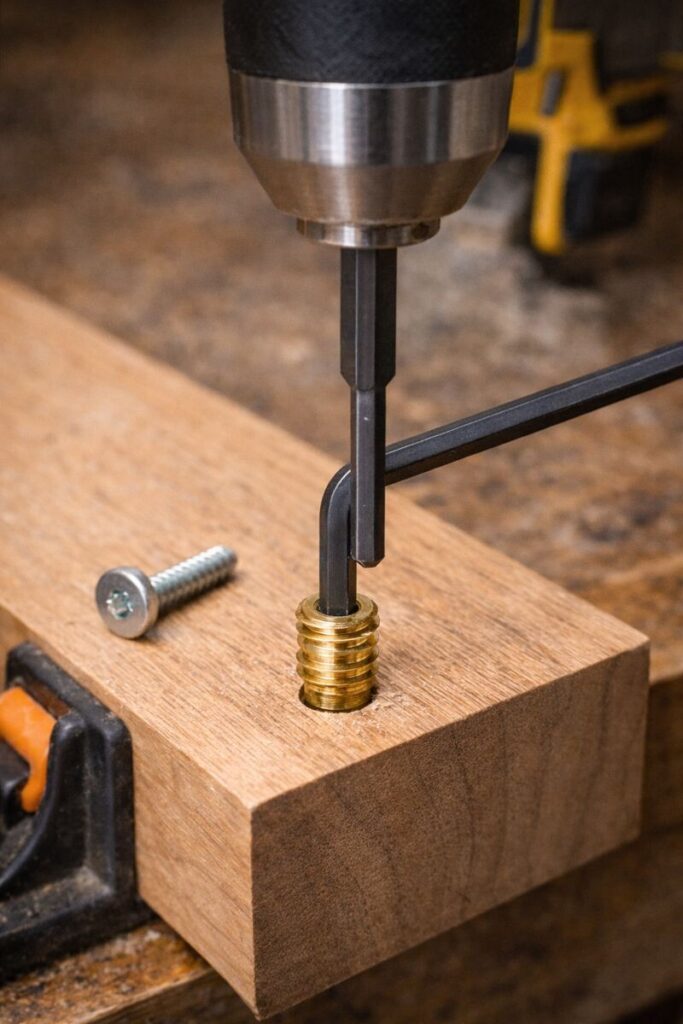
Step-by-step
- Pick the insert style: Brass inserts are common. Some are hex-drive, some are slotted.
- Drill the correct hole size: Too small can split the wood. Too large won’t grip.
- Add wax to the insert threads: A little paste wax helps it drive without tearing fibers.
- Drive the insert straight: Keep it square. Stop when it’s flush, not buried.
- Use machine screws after that: You get repeatable tightness without stripping wood fibers again.
This is a great upgrade for tray builds that get handled daily. If readers are styling and re-styling often, the decor guides like tiered tray decorating ideas pair nicely with “build it to survive real life.”
Fix 5: The quick alternatives that sometimes make sense
These aren’t always the “best,” but they’re real-world useful.
Use a longer screw
If there’s solid wood deeper, a longer screw can reach fresh fibers and hold well.
This works especially well in thick legs, posts, and blocks. Still drill a pilot hole.
Go up one screw size
A slightly thicker screw can bite into fresh wood.
However, edge distance matters. If you’re near an edge, this can split the board.
Move the screw location
If alignment allows it, shifting the screw 3/8″–1/2″ into fresh wood can be the cleanest fix.
Old hole can be plugged for looks.
The pilot hole rule that prevents most strip-outs
A good pilot hole makes the screw cut threads without forcing the wood apart.
- In hardwood, pilot holes often need to be a touch bigger than you’d expect.
- In softwood, slightly smaller pilots help threads bite without crushing fibers.
Practical tip: match the pilot to the screw’s root diameter (the shank without threads). Then test in scrap. If the screw takes too much force to drive, the pilot is too small.
Extra prevention tips that actually work
- Use the clutch on your driver. Start low and increase only if needed.
- Use proper screws. Cheap screws strip heads and encourage over-driving.
- Lubricate screws in hardwood. A quick rub on wax or soap reduces friction.
- Avoid end-grain fastening when possible. Add a block, use a bracket, or change the joint.
- Pre-drill for hinge screws and small screws. These strip fast.
If you’re building or repairing finished pieces, keep finishing steps in mind too. Repairs can change how a clear coat sits, and this troubleshooting guide can save frustration: why clear coats get cloudy.
FAQs about to Fix a Stripped Screw Hole in Wood
Can wood filler fix a stripped screw hole?
Wood filler is mainly cosmetic and does not provide reliable thread strength. For holding power, use wood glue with toothpicks, a hardwood dowel plug, epoxy, or a threaded insert. Those options rebuild structure instead of just filling space.
Should a stripped screw hole be repaired before re-finishing a project?
Yes, repair first. Drilling, trimming plugs, and sanding can damage a fresh finish and create witness lines. Once the hole is solid and flush, final sanding and topcoat work will look cleaner and last longer.
Is CA glue strong enough for a stripped screw hole repair?
CA glue can reinforce fibers quickly, especially in soft wood, but it is not the best choice for heavy loads by itself. For dependable strength, pair it with a plug method or choose a hardwood dowel and wood glue.
Can a larger screw always solve the problem?
Not always. A larger screw can split the wood, especially near edges or in thin stock. If the hole is severely damaged, a dowel plug or insert is safer. If the wood is thick and healthy, a longer screw can be a better quick fix.
Final thoughts
A stripped screw hole looks like a setback, but it’s usually a simple fiber problem with a predictable fix.
For light duty, glue and toothpicks get you back in business fast.
For anything that matters, a hardwood dowel plug or a threaded insert turns the repair into a real upgrade.
Pick the method that matches the load, let adhesives cure fully, and the joint will stay tight for years.