How Are Screws Sized: 5 Easy Checks Before You Buy Another Box
How screws are sized is something you want to understand before driving anything into a tray stand, cabinet, or wall. Screw sizes confuse a lot of good builders because the label on the box rarely matches what you’re actually trying to do in wood.
In the shop, screw sizing comes down to three things: the screw’s thickness, its length, and its thread style. Once those are clear, picking the right screw for a tray stand build gets a whole lot simpler, and your joints stay tight instead of working loose over time.
Contents Here
- 1 What “screw size” actually means
- 2 Diameter: why you see #6, #8, #10, and M4, M5
- 3 Length: how screw length is measured (and where people get tricked)
- 4 Threads: coarse vs fine, and why it matters in wood
- 5 The “gauge + length” format you’ll see on boxes
- 6 A simple screw sizing table for tray stand work
- 7 Head styles: what changes in real woodworking
- 8 Drive types: why Torx and square save your sanity
- 9 How to choose the right screw size step by step
- 10 Benefits of sizing screws correctly
- 11 Drawbacks and common mistakes to avoid
- 12 Where screw sizing matters most on a tray stand
- 13 Quick checklist: screw sizing for clean results
- 14 FAQs about Screws Sized
- 15 Final thoughts on Screws Sized
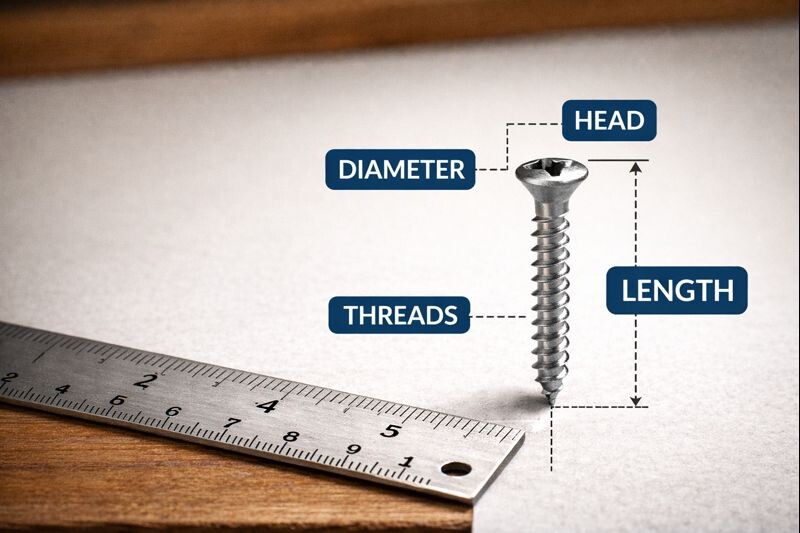
What “screw size” actually means
A screw “size” is not one single measurement. It’s a set of specs.
Most packages are describing:
- Diameter (thickness)
- Length
- Thread type or pitch (how tight the threads are)
- Sometimes head style and drive type (Phillips, Torx, square, etc.)
If you only read the length and ignore the diameter, you can end up with screws that snap, strip, or split your wood.
Diameter: why you see #6, #8, #10, and M4, M5
In the U.S. (imperial), wood screws use “# sizes”
Common wood screw diameters are labeled with a number sign:
- #4 (small hardware, light duty)
- #6 (light fastening, trim, small craft builds)
- #8 (general woodworking sweet spot)
- #10 (heavier duty, thicker parts, more bite)
- #12 (structural-ish woodworking use, less common for décor builds)
As the number goes up, the screw gets thicker. That’s the part that gives you holding power in wood.
For tray stands, #8 and #10 handle most real-world loads without looking bulky.
In metric, screws use “M sizes”
Metric screws use M followed by the diameter in millimeters.
- M4 = 4 mm diameter
- M5 = 5 mm diameter
- M6 = 6 mm diameter
Metric is straightforward: the number is the diameter.
If a tray stand kit ships with metric hardware, match it with metric replacements. Mixing systems usually ends in sloppy fit or stripped parts.
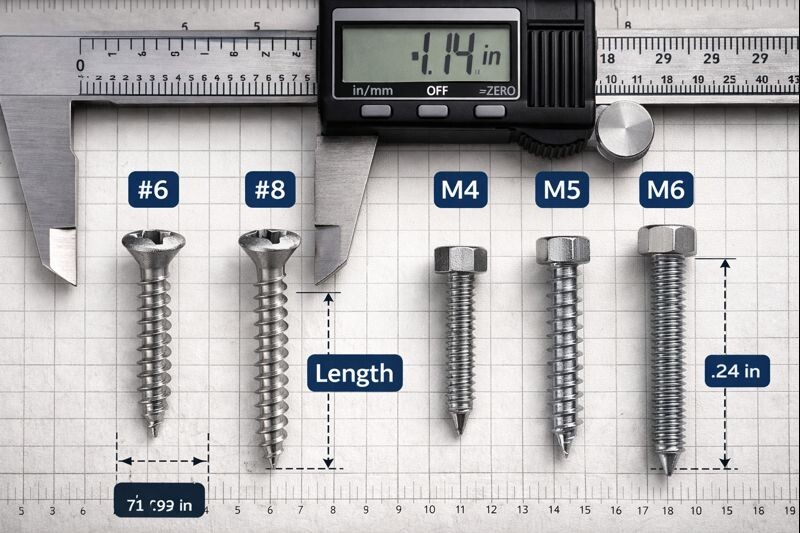
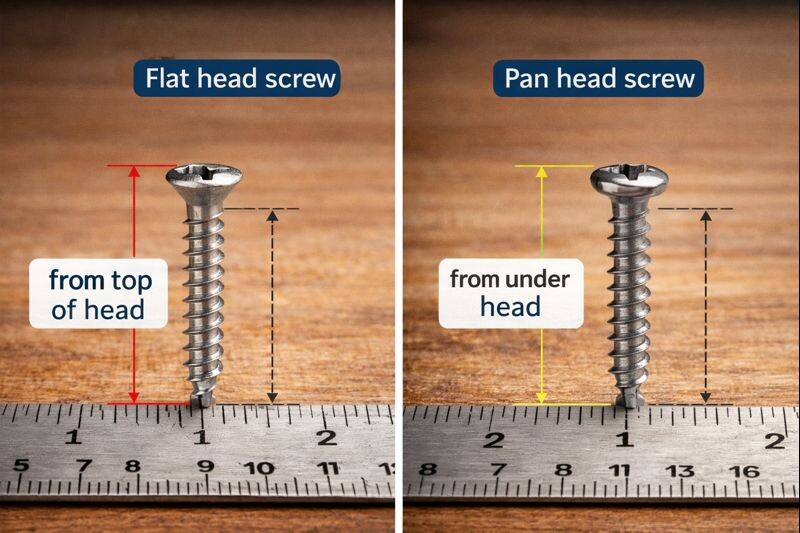
Length: how screw length is measured (and where people get tricked)
Screw length usually means the distance from under the head to the tip.
However, the head style matters.
Quick length rule
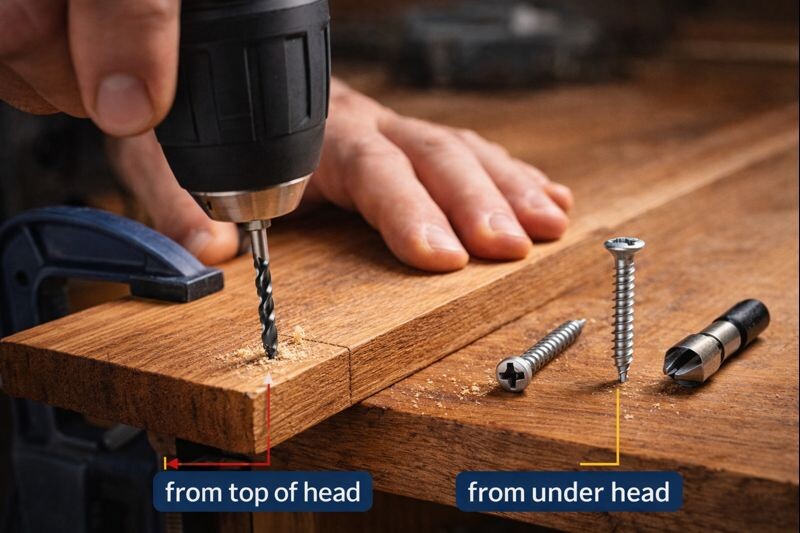
- Flat/countersunk head: length is typically measured from the top of the head to the tip (because the head sinks into the wood).
- Pan/round/truss head: length is measured from under the head to the tip (because the head sits on the surface).
That’s why two screws that “look” the same length can measure differently on paper.
A practical tray stand guideline
To avoid poking through, aim for the screw to bite into the second piece by about:
- 1/2 to 2/3 of that second piece’s thickness
Example: fastening a 3/4″ tray base into a 3/4″ support block often calls for 1-1/4″ to 1-1/2″ screws, depending on countersink depth and whether a pilot hole is used.
Threads: coarse vs fine, and why it matters in wood
Thread style affects grip and splitting risk.
Coarse threads
- Deeper, more aggressive threads
- Better grip in softwoods and plywood
- Faster driving
- More likely to split thin hardwood if you skip pilot holes
Fine threads
- More threads per inch (or tighter pitch in metric)
- Better in dense hardwoods
- Less splitting risk
- Can strip out easier in soft, crumbly material if the screw is too small
For most tray stand builds in pine, fir, or poplar, coarse-thread wood screws are dependable. In oak or maple, pilot holes matter more than thread choice.
If you want wood choices that behave differently with screws, it helps to read up on softwood vs hardwood selection in this guide on choosing between pine, oak, and maple.
The “gauge + length” format you’ll see on boxes
Typical listings look like this:
- #8 x 1-1/4″
- #10 x 2″
- M5 x 16 mm
That’s diameter first, then length.
If thread pitch is included, it may look like:
- M5 x 0.8 x 16 mm: (0.8 mm is the thread pitch)
A simple screw sizing table for tray stand work
| Task on a tray stand | Typical wood thickness | Good starting screw size | Notes |
|---|---|---|---|
| Fasten tray base to center post block | 3/4″ to 1″ | #8 x 1-1/4″ or #10 x 1-1/2″ | Pilot hole helps prevent splitting |
| Attach handle hardware into wood | 3/4″ | #8 x 3/4″ to 1″ | Avoid too long; don’t pierce top surface |
| Secure feet pads/blocks | 1/2″ to 3/4″ | #6 x 3/4″ | Small screws reduce cracking |
| Reinforce a wobbly joint (non-structural) | varies | #8 x 1-1/2″ | Add glue if appropriate |
Head styles: what changes in real woodworking
Head style changes two things: how the screw seats, and how much wood it can pull tight.
Common head styles you’ll run into
- Flat (countersunk): sinks flush, clean look, great for trays and stands
- Pan: sits on top, good for hardware straps or brackets
- Washer/truss: wider bearing surface, helps prevent pull-through
- Pocket hole screws: designed to pull joints tight without splitting
For tray stands, flat heads are popular because they disappear after a plug, filler, or paint.
Drive types: why Torx and square save your sanity
Drive type isn’t part of “size,” but it affects results.
- Phillips: easy to find, easiest to cam-out (strip)
- Square (Robertson): strong grip, great for woodworking
- Torx/Star: very strong, clean driving, fewer stripped heads
If you’ve ever had to back out a half-stripped screw near a finished tray surface, you already know why this matters. If that happens, this guide on removing a stripped screw from wood safely is worth keeping bookmarked.
How to choose the right screw size step by step
This is the exact process that keeps tray stand builds tight and clean.
Step 1: Identify what the screw is doing
Ask one question: Is the screw clamping two pieces together, or just holding hardware in place?
- Clamping wood-to-wood joints needs thicker screws (#8–#10).
- Hardware fastening can use smaller screws (#6–#8) unless the hardware is load-bearing.
Step 2: Measure the wood thickness honestly
Nominal lumber lies. “1x” boards aren’t really 1″ thick.
Common actual thicknesses:
- 1x material: about 3/4″
- 2x material: about 1-1/2″
Step 3: Pick a diameter that matches the job
- Light trim and small accents: #6
- Most tray stand joints: #8
- Heavier support blocks, thicker legs/posts: #10
Step 4: Pick a length that won’t poke through
A safe starting point:
Total screw length ≈ thickness of first piece + 1/2 thickness of second piece
Adjust for countersink depth if using a flat head.
Step 5: Decide on pilot holes (don’t skip this in hardwood)
Pilot holes reduce splitting and crooked driving.
- Softwood: pilot holes are helpful, not always required
- Hardwood: pilot holes prevent cracks and snapped screws
If you’ve dealt with splitting or loosening before, the fixes in stopping a tiered tray stand from wobbling pair well with better screw sizing.
Step 6: Match the screw type to the material
- Wood screws for wood-to-wood
- Machine screws + nuts/inserts for metal hardware or knock-down stands
- Pocket hole screws for pocket joinery
Benefits of sizing screws correctly
Getting screw sizing right pays you back immediately.
- Less splitting, especially near edges
- Stronger joints that don’t loosen with seasonal movement
- Cleaner finishes because you avoid blow-outs and ugly repairs
- Fewer stripped heads, especially when the screw isn’t oversized for the material
- More predictable builds, which matters when you’re making matching trays or selling pieces
Plus, a properly sized screw makes glue-ups calmer. Clamping pressure stays even instead of fighting a screw that’s acting like a wedge.
Drawbacks and common mistakes to avoid
Oversized diameter
- Splits wood, especially in thin rails or hardwood
- Leaves little room for pilot holes
- Can force parts out of alignment
Too much length
- Pokes through finished surfaces
- Creates weak “volcano” bumps under paint or stain
- Can crack a thin top tray if it bottoms out
Undersized screws
- Strips out over time
- Lets handles and posts wobble
- Fails suddenly if the tray gets loaded
If a hole is already chewed up, don’t just jam a bigger screw in and hope. Use a real repair method like the steps in fixing a stripped screw hole in wood.
Where screw sizing matters most on a tray stand
Tray stands are deceptively hard on fasteners because people pick them up by the handle and carry them loaded.
Pay extra attention to:
- Handle attachment points (torsion and lifting force)
- Center post joints (constant wobble pressure)
- Feet blocks (racking and uneven countertops)
If your tray stand includes stacked tiers, a deeper build guide can help with the full structure. This walkthrough on making a tiered tray stand from scratch ties screw choices into the build sequence.
Quick checklist: screw sizing for clean results
Use this before buying screws or drilling anything.
- Choose #8 or #10 for most tray stand structural joints
- Keep length short enough to avoid poke-through
- Use flat heads where you want flush surfaces
- Prefer Torx or square drive for fewer stripped heads
- Drill pilot holes in hardwood and near edges
- If the joint will be lifted often, don’t under-size the screw

And if the driver bit keeps slipping, it’s usually not just the bit. It’s often the wrong drive type or an over-torqued screw. A little routine care helps, especially if you’re building regularly. This guide on tool maintenance basics for woodworking newbies keeps drivers and bits performing like they should.
FAQs about Screws Sized
Are screw “# sizes” the same as drill bit sizes?
No. Screw “# sizes” describe screw diameter, while drill bit sizes describe the bit diameter. For pilot holes, match the pilot bit to the screw’s shank and wood density, not the screw’s outer thread diameter.
What screw size is most common for a wooden tray stand?
or most wooden tray stands, #8 screws are a dependable default because they balance strength and low splitting risk. When parts are thicker or the stand will carry heavier loads, #10 screws are often a safer choice.
How is screw length measured on countersunk screws?
On most countersunk (flat head) screws, length is measured from the top of the head to the tip. This matters because the head sinks into the wood, effectively increasing how deep the screw reaches compared to a pan head screw.
Do coarse-thread screws work in hardwood?
They can, but pilot holes become more important. Coarse threads bite aggressively, which can split dense hardwood near edges. When fastening oak or maple, drilling an appropriate pilot hole reduces cracking and helps the screw drive straight.
Final thoughts on Screws Sized
Screw sizing isn’t mysterious once it’s broken into diameter, length, and threads. Pick the diameter for strength, pick the length for safe bite, and match threads to the wood. Do that, add pilot holes where they matter, and your tray stand joints stay tight even after years of being picked up, moved around, and loaded down.