Turned Leg 3 Tier Stand: Build a Stylish, Functional Piece Today

Hey there, fellow woodworking enthusiasts! Wayne Kocher here, and today, I’m excited to walk you through how to make a turned leg 3 tier stand. If you’re looking for a challenging yet rewarding woodworking project, you’ve come to the right place! This tutorial is for those who are ready to take their skills to the next level and create a beautiful, functional piece that will look great in any space.
In this guide, I’ll take you through every step—materials, tools, techniques, and even some tips for getting those turned legs just right. By the end of this project, you’ll have a stunning 3-tier stand to showcase your decor, whether it’s in your kitchen, living room, or even a retail space.
So, let’s get started! Here’s everything you’ll need to make your very own turned-leg 3-tier stand.
Contents Here
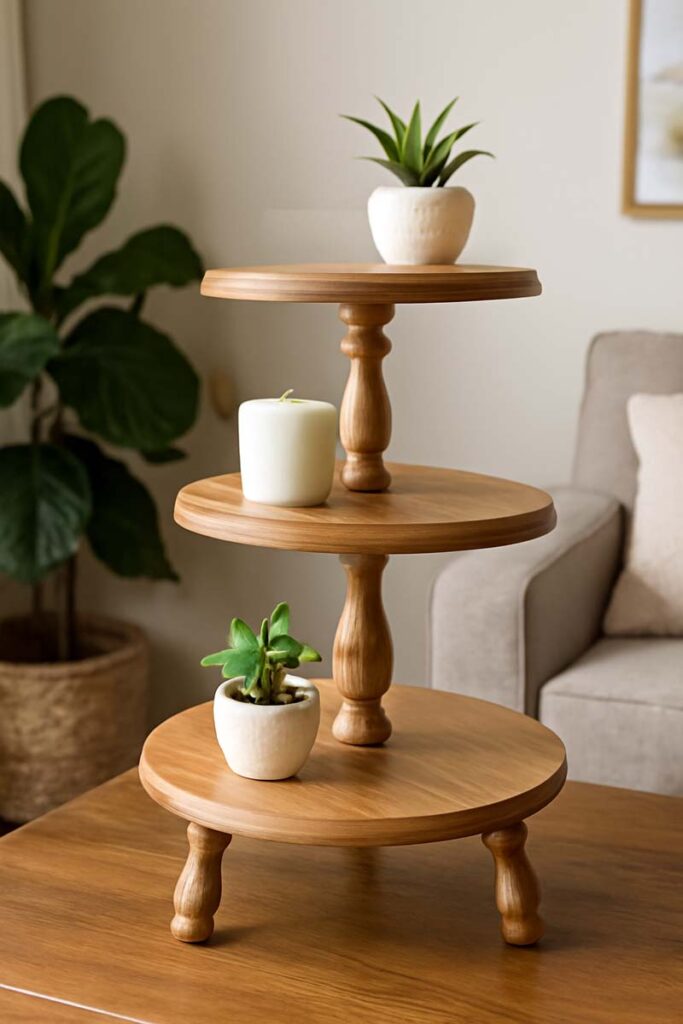
Why a Turned Leg 3 Tier Stand?
Turned legs are a hallmark of classic furniture making. The process of shaping wood on a lathe creates smooth, flowing curves that are both eye-catching and sturdy. These legs give the stand a timeless appeal, whether you’re displaying decorative items, serving snacks at a gathering, or organizing your kitchen.
Use a tiered decor tray to creatively display your favorite home accessories, from candles to plants, adding dimension and style to your space.
In this tutorial, I’ll guide you through every step of creating the turned-leg stand—from choosing the right materials to final finishing. It’s a fun, rewarding challenge that will teach you a lot about woodworking techniques.
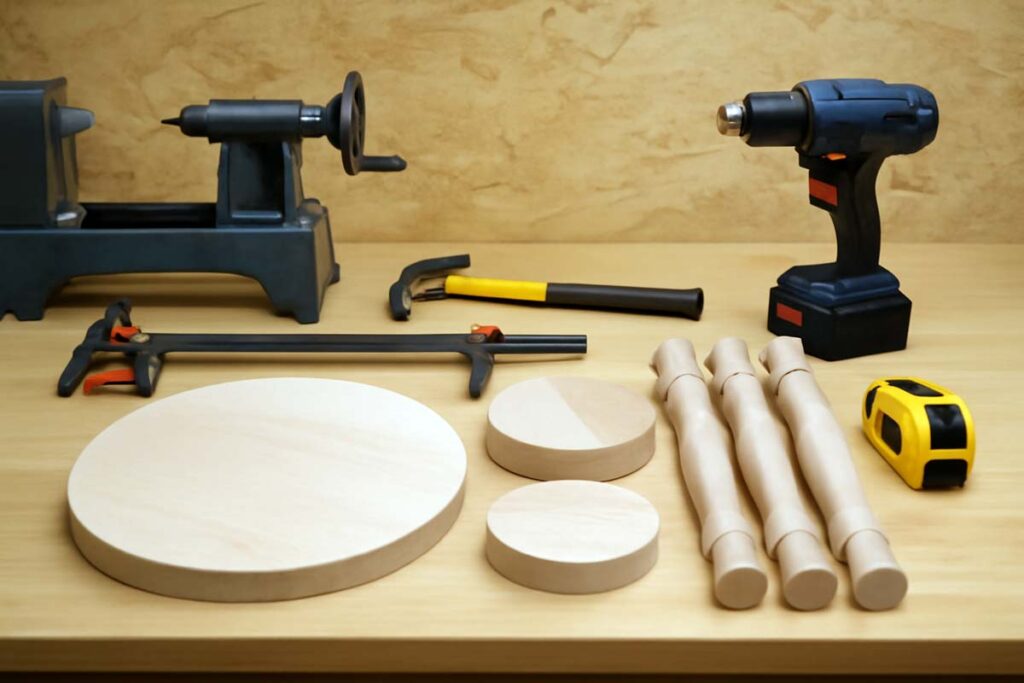
What You’ll Need
Before you start, make sure you have the right materials and tools. For this project, I’m using:
Materials:
- Wood for the tiers: I recommend using hardwood like oak or maple for durability and a nice finish. You’ll need enough wood to cut three circular tiers, each a different diameter (the sizes are up to you, but I usually go for a large base, medium middle, and small top).
- Wood for the legs: Turned legs are the highlight of this project, and you’ll need 4 of them. For this, use something sturdy like birch or walnut.
- Wood glue: A must-have for securing all the parts together.
- Screws: These will hold the tiers to the legs.
- Finish: A good varnish or wood oil to bring out the wood grain and add a protective layer.
Tools:
- Lathe: For turning the legs. If you don’t have one, you can sometimes find local shops that offer lathe rental or consider outsourcing the turning part.
- Saw: A jigsaw or bandsaw will help you cut the tiers out of your wood blanks.
- Drill: For making holes where the legs will attach to the tiers.
- Sandpaper: Essential for smoothening the wood surfaces, especially on the tiers and legs.
- Measuring tape & ruler: To ensure precise cuts and measurements.
- Clamps: These are helpful to hold parts together while the glue dries.
How to Make a Turned Leg 3 Tier Stand: Step-by-Step Instructions
Step 1: Cut the Wood for the Tiers
Start by cutting out the three circles for your tiers. For a traditional look, I recommend using different sizes: a larger one for the base, a medium one for the middle, and a smaller one for the top. Here’s the trick for cutting perfect circles:
- Measure: Determine the size of each tier (I usually go with 14”, 10”, and 6” in diameter, but you can adjust based on your preference).
- Cut: Use a jigsaw or a bandsaw to carefully cut out each circle. If you’re using a jigsaw, make sure to use a steady hand and take your time to ensure smooth edges. If you have access to a bandsaw, this will be even easier.
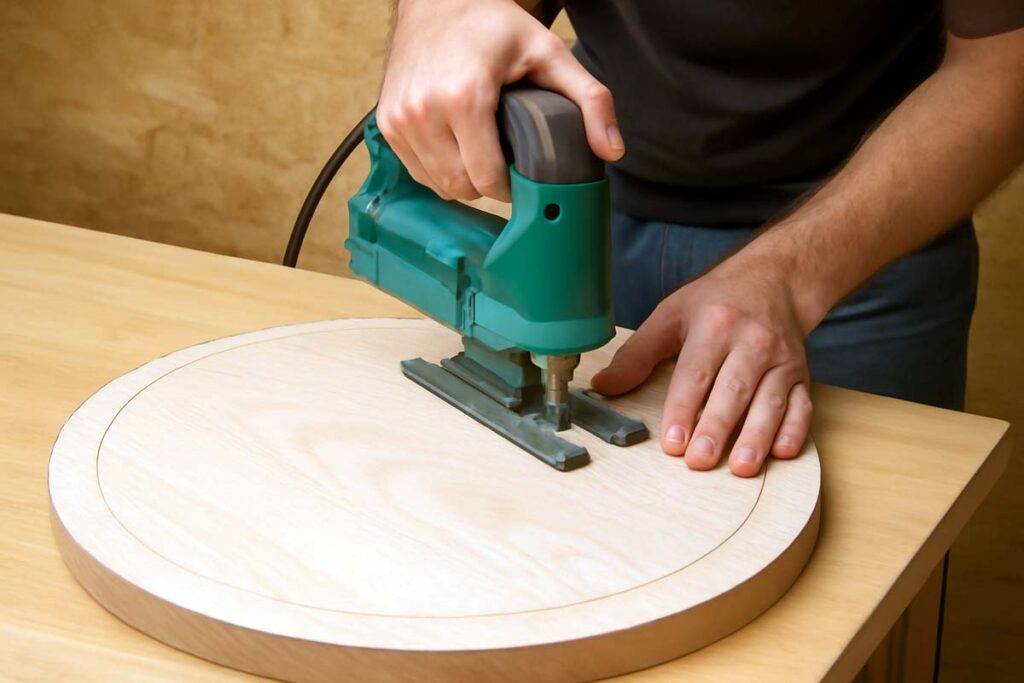
After cutting the tiers, it’s time to smooth out the edges. Use sandpaper or a sanding block to give the edges a rounded finish. A router could also be a great tool for this if you have one.
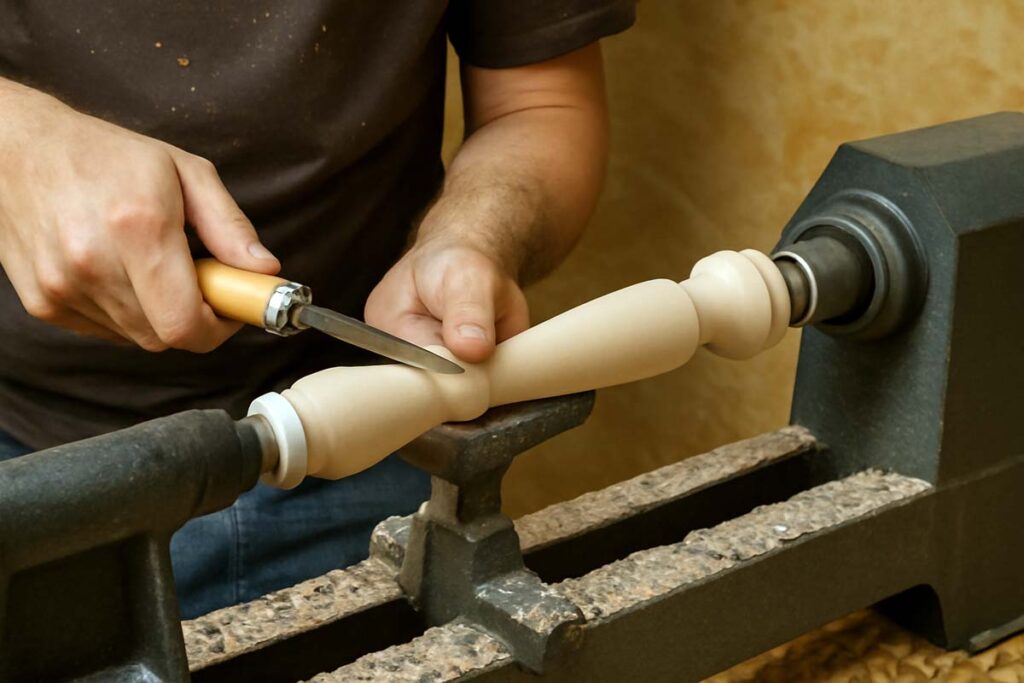
Step 2: Turn the Legs
Now comes the fun part: turning the legs! If you’ve never used a lathe before, don’t worry—I’ll walk you through it.
- Prepare your leg blanks: Cut four equal-length pieces of wood (around 3 to 4 feet long). These will be your leg blanks. You can use a saw to make the initial cuts before moving on to the lathe.
- Set up the lathe: Mount one of the leg blanks securely on the lathe. Make sure it’s centered and balanced, or it’ll wobble while turning.
- Start turning: Turn the lathe on at a slow speed and use your turning tools (like gouges) to shape the wood. You’ll want to make the legs taper from thicker at the top to thinner at the bottom. Try to get a smooth, even shape, and don’t rush—it takes practice to get those perfect curves!
- Finish the legs: Once the legs are turned, sand them with progressively finer grit sandpaper to make them smooth to the touch. After that, use a wood finish of your choice to seal and protect the wood.
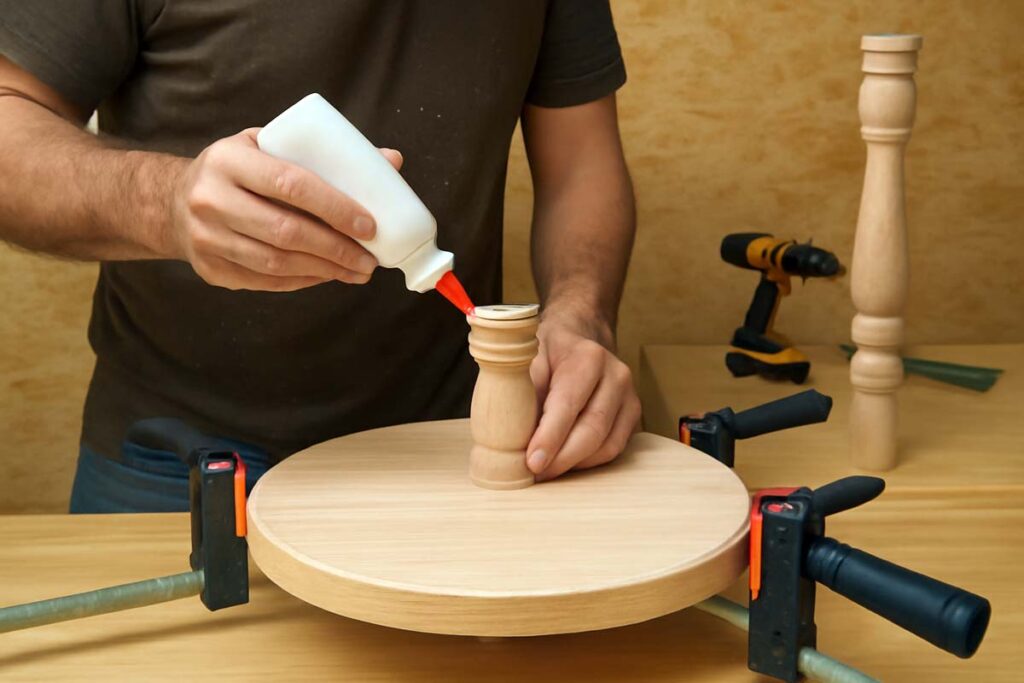
Step 3: Attach the Legs to the Base Tier
Now that the tiers and legs are ready, it’s time to start assembling your stand.
- Drill Holes: On the underside of your base tier (the largest circle), measure and mark where the four legs will go. Make sure the legs are evenly spaced. Use a drill to make holes where the legs will be attached.
- Attach the Legs: Apply wood glue to the top of each leg, and then insert them into the holes. Use clamps to hold everything in place while the glue dries. After it’s dry, reinforce the joints by screwing the legs into place. This will add extra strength.
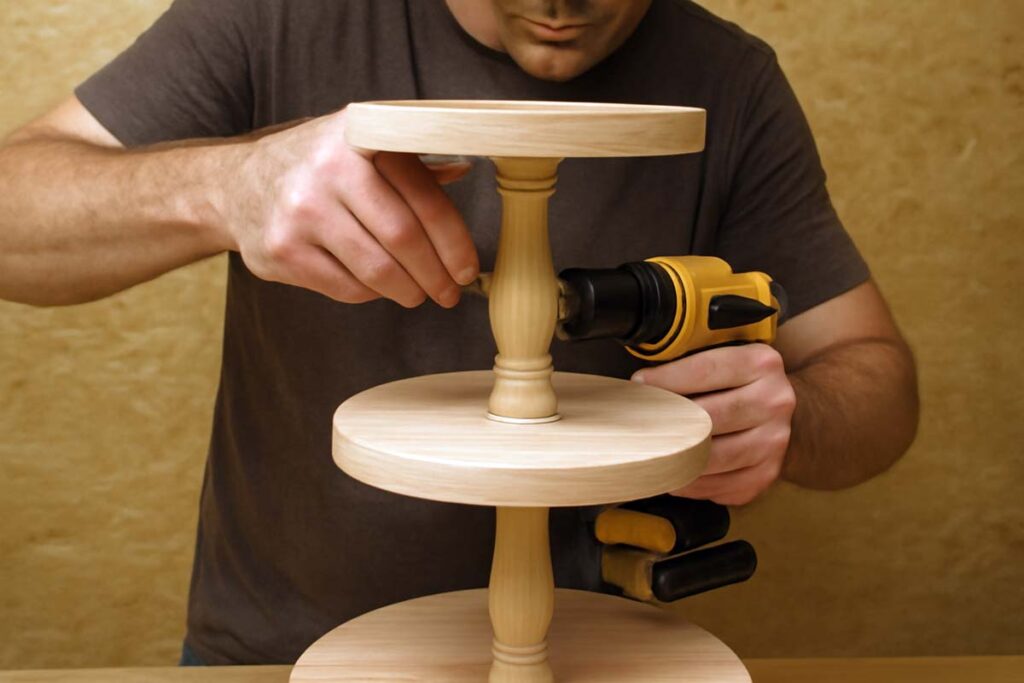
Step 4: Attach the Middle and Top Tiers
With the base tier and legs secured, it’s time to add the middle and top tiers.
- Drill Holes for the Middle Tier: On the top of the base tier, measure and mark where you want the middle tier to sit. Drill a hole that matches the diameter of the leg. You may want to use a longer screw to secure the middle tier onto the legs.
- Secure the Middle Tier: Apply wood glue to the top of the legs, place the middle tier on top, and screw the tier into place. Ensure the middle tier is perfectly level before securing it fully.
- Repeat for the Top Tier: The process for attaching the top tier is the same. Drill holes in the center of the middle tier, place the top tier, apply glue, and screw it into place.
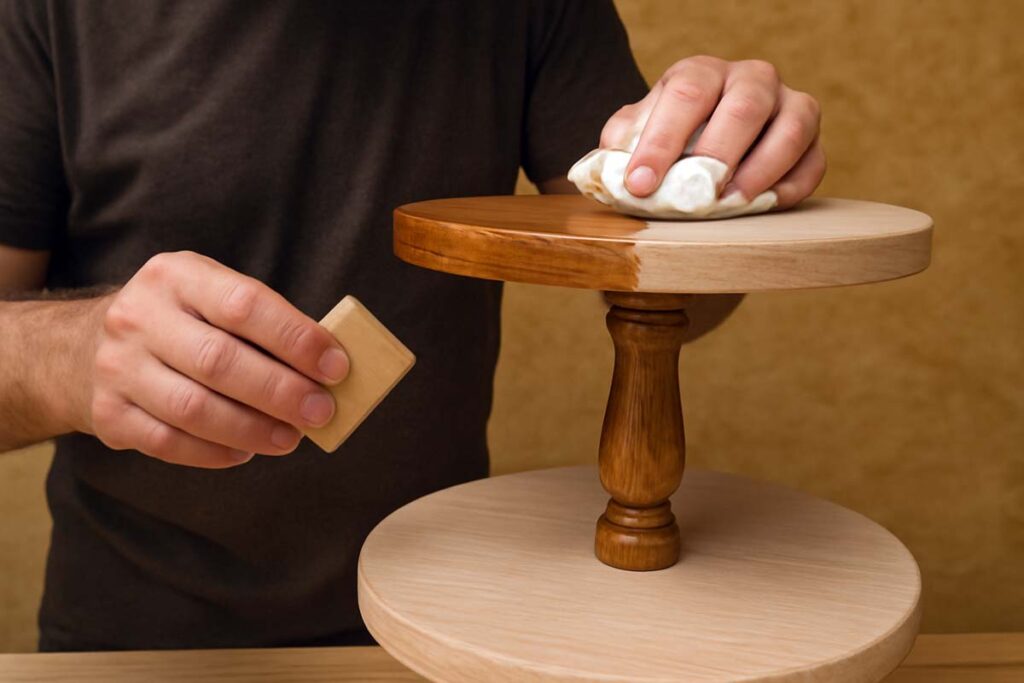
Step 5: Finishing Touches
Once all the tiers are attached, it’s time to add the finishing touches to make your stand shine.
- Sand everything: Go over the entire stand with sandpaper to ensure smooth edges and a uniform finish. Pay extra attention to any rough spots on the legs or tiers.
- Apply finish: A coat of wood finish will protect your stand and bring out the beautiful grain of the wood. I recommend using a satin or matte finish for a more natural look. Let the finish dry completely before handling.
- Decorate and Enjoy: Now that the stand is fully assembled and finished, it’s time to decorate! Whether you’re using it as a centerpiece or for holding candles, plants, or seasonal decor, your new turned-leg 3-tier stand will be a perfect addition to any space.
Tips and Tricks
- Practice your turning: Turning legs can be tricky, especially if you’re new to lathe work. If you have scrap wood, practice turning it into legs before working on the actual project.
- Use clamps: When attaching the tiers, clamps are a lifesaver. They’ll hold everything in place while the glue dries, ensuring a solid, long-lasting bond.
- Don’t rush the drying time: I know it can be tempting to skip ahead, but letting the glue dry properly before moving on to the next step will make all the difference in the final result.
FAQs about Turned Leg 3 Tier Stand
Conclusion
Creating a turned leg 3 tier stand is an excellent project to refine your woodworking skills and add a touch of elegance to your home. It combines traditional woodworking techniques with modern design, making it a piece that can be passed down for generations. Plus, the customization options are endless, allowing you to make a stand that reflects your personal style.
Remember to take your time, work carefully, and enjoy the process. Happy woodworking, and I can’t wait to see what you create with this tutorial!
With a little patience and practice, you’ll have a beautiful turned-leg 3-tier stand that’s not only functional but a real showpiece in your home.